Kerberos Authentication
Mindbreeze InSpire
Introduction
This document describes how to configure Kerberos authentication in Mindbreeze InSpire.
Kerberos authentication can be used in the following scenarios:
- A connector works as a Kerberos user. See section "Connector authentication with Kerberos"
- Users can log in as Kerberos users when searching. See section "Client authentication with Kerberos"
Requirements
Preparing your Windows infrastructure (in our example, Windows Server 2016)
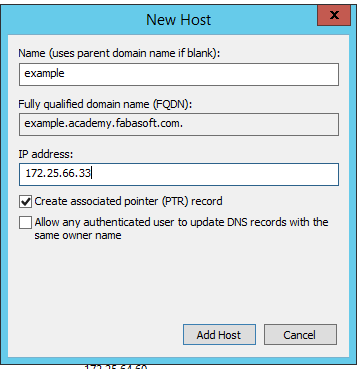
Creating a new host entry for your appliance on your DNS server
Attention: The PTR record is required.
Creating an SPN on your domain controller
The SPN, also called the service principal name, must match the FQDN of the host name of your appliance created in the preceding point. The syntax for this command on your Windows domain controller server is:
setspn -a HTTP/YOURAPPLIANCE.mydomain.com DOMAIN\serviceuser
Example:
setspn -a HTTP/example.academy.fabasoft.com academy\Administrator
The service user does not have to be an administrator. He or she just needs full read access to the LDAP directory in order to carry out group resolution and authentication.
If a login prompt is displayed on your PC after you have completed this setup and your registered domain user is not automatically used, you have to enable Kerberos ticketing in the GPOs of your domain controller server. In this process, it is important to be sure to add the address of your Mindbreeze appliance to the trusted sites.
Connector authentication with Kerberos
For Kerberos-based authentication with active directory, you must create a user in the active directory who has the correct permissions for the data source (see documentation for the respective connector).
Client authentication with Kerberos
For Kerberos-based authentication with active directory, you must create a service user in the active directory − for example, mindbreeze.service. Please make sure that the following requirements are met:
- The user exists in Active Directory
- The user is registered with the service principal name HTTP/<fully qualified host name for Mindbreeze InSpire>
- You can set the service principal name as the active directory domain administrator in a Windows prompt with the following command:
setspn –s HTTP/<fully qualified host name for Mindbreeze InSpire> <domain>\<mindbreeze.service>
Example:
setspn –s HTTP/search.companyname.com companyname\mindbreeze.service
The Fully Qualified Domain Name (FQDN) must be defined in a DNS A record. Otherwise, if it is a DNS C-NAME, a Service Principal Name (SPN) will be required in addition for the A-Record host.
Configuration
General
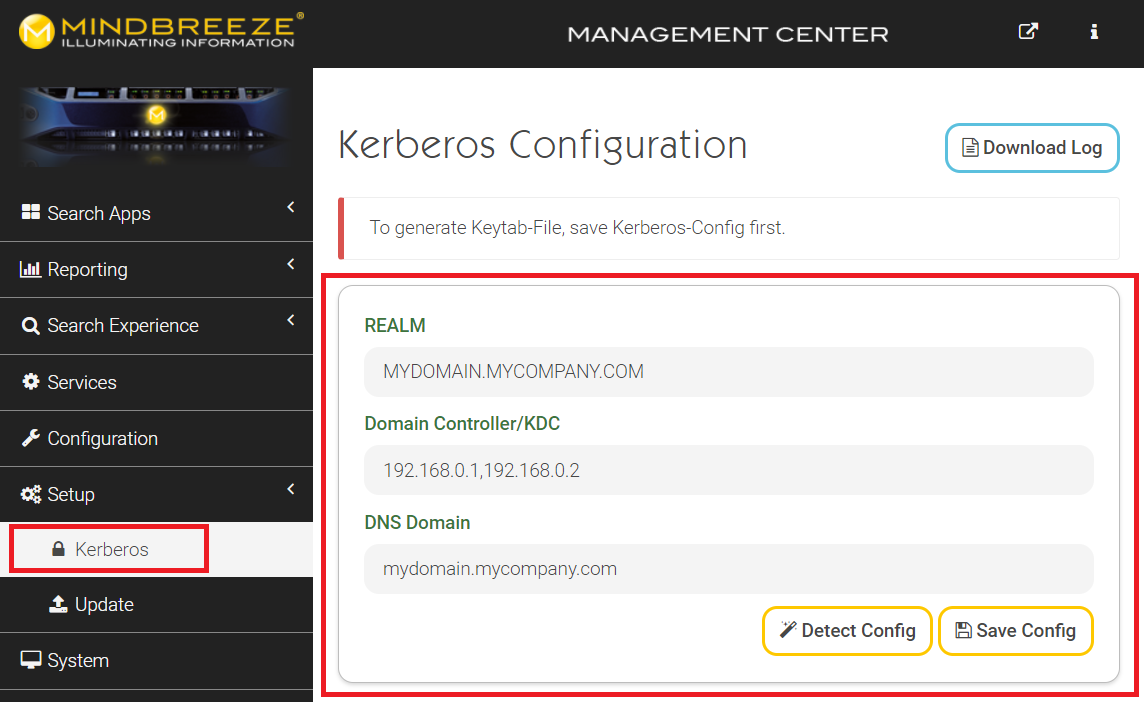
You can find the Kerberos configuration in the Management Center under “Setup” “Kerberos“.
You need to create a Kerberos configuration if it does not already exist.
To do this, you have the following options:
- Automatic determination of the configuration using “Detect Config”
- Manual configuration
If you would like to use the option for automatic determination of the configuration, click "Detect Config", which uses the DNS settings of the operating system to determine the "REALM", "Domain Controller KDC" and "DNS Domain".
Requirements for the automatic determination of the configuration:
- Hostname can be resolved via DNS (forward and reverse lookup)
For manual configuration, the following settings need to be made:
Setting | Description |
REALM | Realm of the domain, usually the domain in uppercase |
Domain Controller/KDC | Domain controller or Kerberos server to be used. |
DNS Domain | DNS domain name |
Then click "Save Config" to save the Kerberos configuration.
Various verification steps are performed during saving. If errors occur, the properties involved will be marked in red and the system outputs the corresponding error messages. Correct the entered values or make sure that the relevant infrastructure is running correctly and is accessible. Then click "Save Config" again.
If everything is saved correctly, two new sections will appear below:
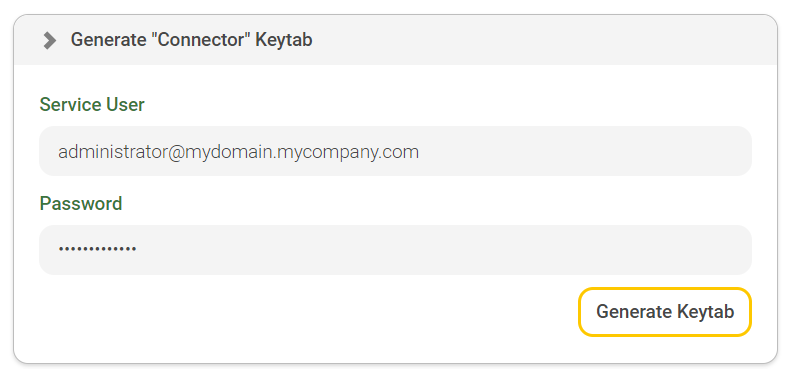
- Generate “Connector“ Keytab
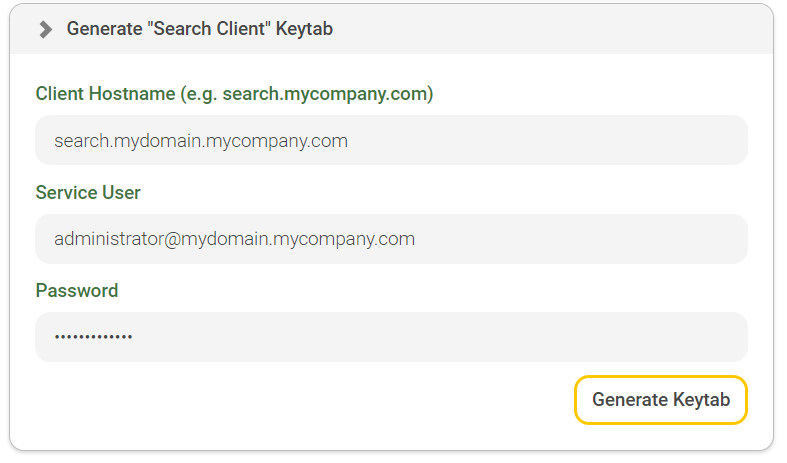
- Generate “Search Client“ Keytab
Connector authentication with Kerberos
After the Kerberos configuration has been successfully saved, expand the "Generate ‘Connector’ Keytab" section. Now specify the login data for the user with whom the connector is going to work. In the "Service User" property, specify the full user name and enter the corresponding password in the "Password" property.
Then click on "Generate Keytab".
Various verification steps are performed during the generation. If errors occur, the properties involved will be marked in red and the system outputs the corresponding error messages. Correct the entered values or make sure that the relevant infrastructure is running correctly and is accessible. Then click "Generate Keytab" again.
If the data is correct, a new section "’Connector’ Keytab" appears below:
The entries in the keytab are displayed in a table. To download the keytab file, click "Download Keytab File". Make a note of the "Principal" name (user name) as this name will be required later.
Then switch to the "Configuration" section in the Management Center and select the "Authentication" tab. Select the downloaded keytab file and click "Upload".
After successfully uploading, the keytab file appears in the Available Keytabs list.
Then, in the "Setup Kerberos Authentication" section, select the desired keytab file for the connector, and enter the principal name that you previously noted.
Then save the configuration and restart.
Client authentication with Kerberos
After the Kerberos configuration has been saved successfully, expand the "Generate ‘Search Client’ Keytab" section. Under “Client hostname”, enter the hostname that you want to use for the client service. Now enter the login data for the service user. In the "Service User" property, specify the full user name and enter the corresponding password in the "Password" property.
Then click "Generate Keytab".
During the generation, various verification steps are executed. If errors occur, the respective properties are colored red and the system outputs relevant error messages. Correct the entered values or make sure that the relevant infrastructure is running correctly and is accessible. Then click "Generate Keytab" again.
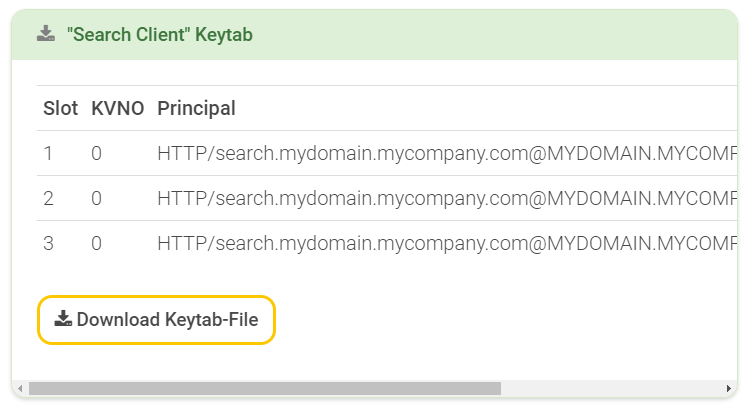
If the data is correct, a new section “’Search Client’ Keytab” appears below:
The entries in the keytab are displayed in a table. To download the keytab file, click "Download Keytab File". Note the "Principal" name (beginning with "HTTP/"), which is required later.
Then change to the "Configuration" section in the Management Center and select the "Authentication" tab. Select the downloaded keytab file and click "Upload".
After successfully uploading, the keytab file appears in the Available Keytabs list.
Then, in the "Kerberos Authentication" section, select the desired keytab file for the client service and enter the principal name that you previously noted.
Then save the configuration and restart.
Troubleshooting
If you are working with a Windows domain controller and users with special characters (e.g. umlauts) in their user name cannot log in, then you can set the following option:
Activate the "Advanced Setting" in the Client Service and set the following value for the option "Embedded Java VM Args (-Xmx..)":
-Dsun.security.krb5.msinterop.kstring=true
After restarting the client service, these users will be able to log in.

