
Sure, you can handle it. But should you?
Let our experts manage the tech maintenance while you focus on your business.
Let our experts manage the tech maintenance while you focus on your business.
Whitepaper
Mindbreeze InSpire App in Microsoft Teams
Introduction
Mindbreeze InSpire is available as app in Microsoft Teams. The Mindbreeze InSpire App brings the full power of Mindbreeze InSpire directly into Microsoft Teams. It allows your employees to securely access Mindbreeze-powered Insight Apps within the familiar Teams interface. Whether your team is collaborating on projects or sharing information, Mindbreeze ensures relevant knowledge is just a click away.
With the Mindbreeze InSpire App you can:
- Integrate Mindbreeze InSpire as a tab in Microsoft Teams.
- Access intelligent, AI-powered insights from across your enterprise systems.
- Enhance user productivity with seamless, secure access - no need to leave Microsoft Teams.
This tool transforms Microsoft Teams from a communication platform into a centralized knowledge hub - bringing content, context, and collaboration together in one place.
Prerequisites
The following prerequisites are to be met:
- Microsoft Teams is installed and accessible for your users.
- The administrator has provided access to the Mindbreeze InSpire App either via the Microsoft Teams App Catalog or a direct installation link.
- A working Mindbreeze InSpire environment and Client Service.
Installation
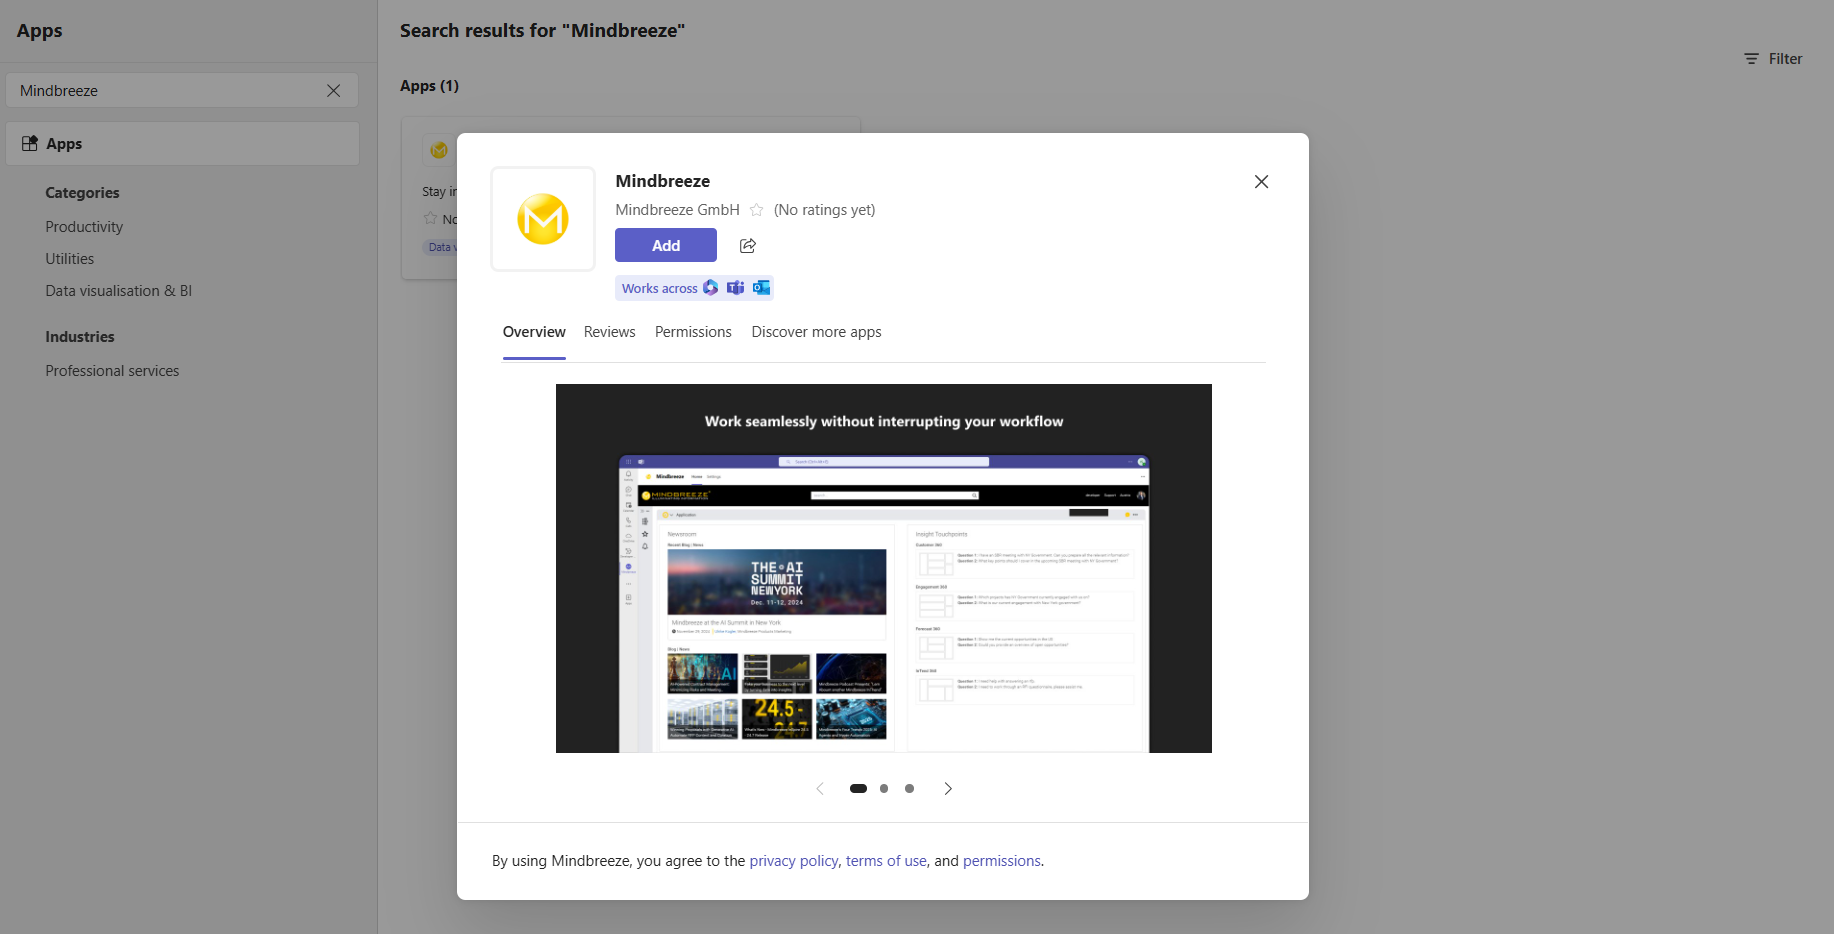
To use Mindbreeze InSpire inside Microsoft Teams, you need to install the Mindbreeze InSpire App. You can find the app in your organization's Microsoft Teams App Catalog:
- Open Microsoft Teams.
- Click on “Apps” in the side navigation.
- Search for „Mindbreeze“.
- Select the Mindbreeze InSpire App and click in the window “Add” to pin it to a team, channel, or personal space.
You can find the Mindbreeze InSpire App also via this link: https://appsource.microsoft.com/en-us/product/Office365/WA200009042
Hint: If your organization uses a custom deployment, your administrator might provide a direct link or pre-install the app automatically. If you encounter issues during installation, please contact our support team at support@mindbreeze.com.
Configuration
After the installation of the Mindbreeze InSpire App is finished, the configuration can be started. The configuration is made up of the following:
- Linking the search app with Microsoft Teams
- Configuring the authorization, if SAML or JWT is being used
Hint: If you encounter issues during the configuration, please contact our support team at support@mindbreeze.com.
Linking the search app with Microsoft Teams
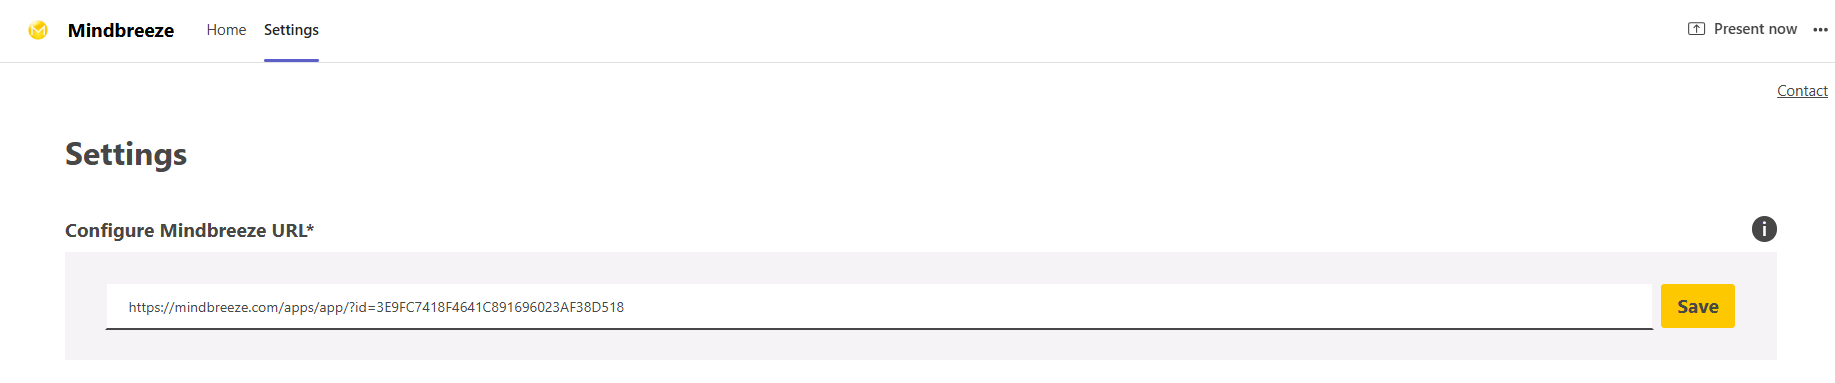
To link Microsoft Teams with your Search App, paste the URL of your search app in the setting “Configure Mindbreeze URL”.

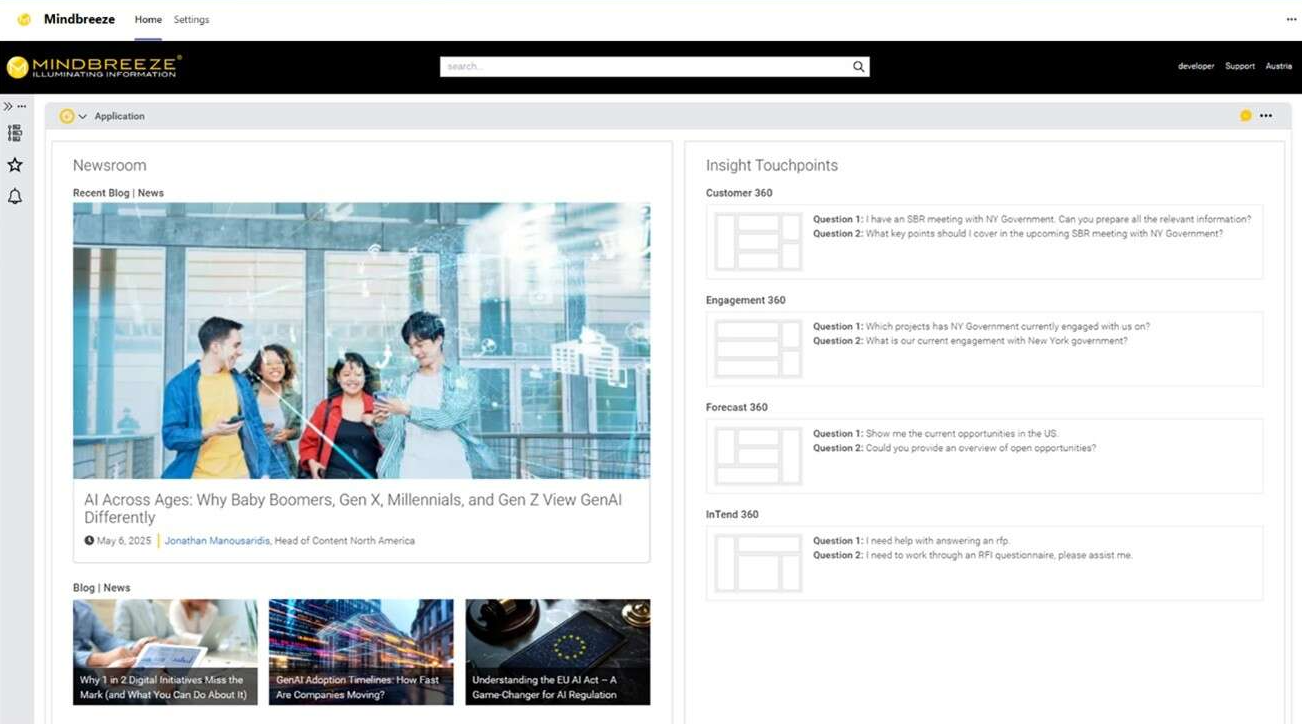
Then click on “Save” and you will be forwarded to the “Home” area, where your search app is displayed and ready to be used.
Authentication
Authentication Scenarios
Mindbreeze supports multiple authentication mechanisms. When integrating with Microsoft Teams, the right configuration depends on the setup of your Mindbreeze InSpire Client Service.
This chapter outlines the most common scenarios and what actions are required to ensure secure and seamless access through the Mindbreeze InSpire App.
The following table provides an overview on the multiple authentication mechanisms and if further actions are required:
Authentication mechanism | Are further actions required? |
No authentication required (Client Service is publicly accessible) | No |
Kerberos (Provided it is accessible within the Teams environment) | No |
SAML | Yes, JWT-based authentication in the Mindbreeze Management Center must be enabled to allow Microsoft Teams to pass identity tokens. For more information, see the chapter Configure Single Sign-On using JWT. |
JWT with a different JWK | Yes, a separate Client Service must be configured. For more information, see the chapter Configure Single Sign-On using JWT. |
Configure Single Sign-On using JWT
To allow Mindbreeze InSpire to be embedded in Microsoft Teams with seamless user authentication, you need to configure the Client Service in the Management Center to accept and validate JWT tokens.
For more information about JWT authentication, including JWK JSON setup, claims mapping, and identity settings, go to JWT Authentication.
Step 1: Configure the Client Service to allow JWT Authentication
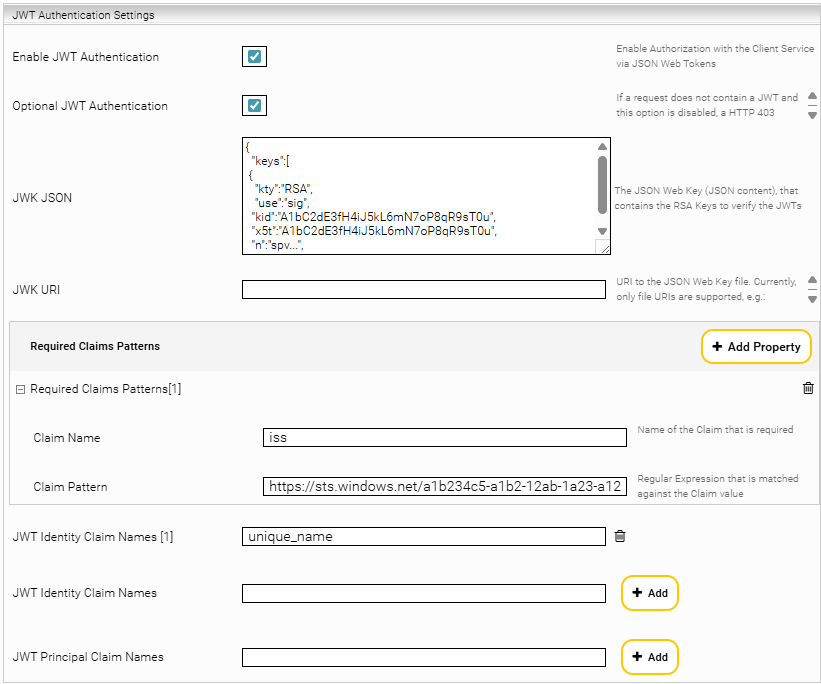
In the Mindbreeze Management Center, open the menu item “Configuration” and go to the tab “Client Services”. Activate “Advanced Settings”, expand the Client Service you want to use and go to the section “JWT Authentication Settings”.
Configure the settings as follows:
Entry | |||||||||||||
Enable JWT Authentication | Activate | ||||||||||||
Optional JWT Authentication | Activate By activating this setting, users can authenticate with the previously configured authentication method in the browser and Microsoft Teams users (via JWT) can be accepted with Single Sign-On. | ||||||||||||
JWK JSON | To validate JWT tokens from Microsoft Teams, the JWK JSON must be configured. For example: { "keys":[ { "kty":"RSA", "use":"sig", "kid":"A1bC2dE3fH4iJ5kL6mN7oP8qR9sT0u", "x5t":"A1bC2dE3fH4iJ5kL6mN7oP8qR9sT0u", "n":"spv...", …… The JWK JSON can be found here: https://login.microsoftonline.com/{tenantID}/discovery/keys | ||||||||||||
Required Claims Patterns | These values ensure the token is issued by Microsoft Entra ID and intended for Microsoft Teams to work with Mindbreeze InSpire. Example 1:
Example 2:
| ||||||||||||
JWT Identity Claim Names | Add a claim key used to identify users uniquely. For example: upn preferred_username unique_name |
For more information about JWT authentication, see JWT Authentication or contact our support team.
Step 2: Download the Mindbreeze Microsoft Teams JWT Plugin
After the JWT authentication is configured in the Client Service, the Mindbreeze Microsoft Teams JWT Plugin must be downloaded.
The download file “mindbreeze-msteams-jwt-0.0.0.165.tar” is available here and will be needed in the next step: Updates & PI
Step 3: Installation of the JWT Plugin
After the download is complete, the JWT plugin must be installed.
In the Management Center, go to “Configuration” and then to the tab “Plugins”. Select the downloaded .tar file and click “Upload”.
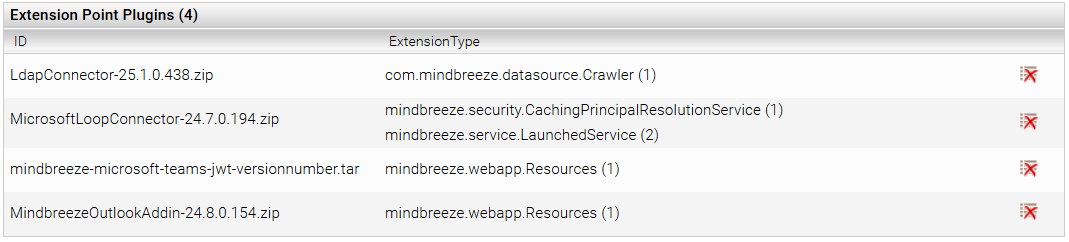
The JWT plugin should now be listed in the section “Extension Point Plugins” at the bottom of the page.
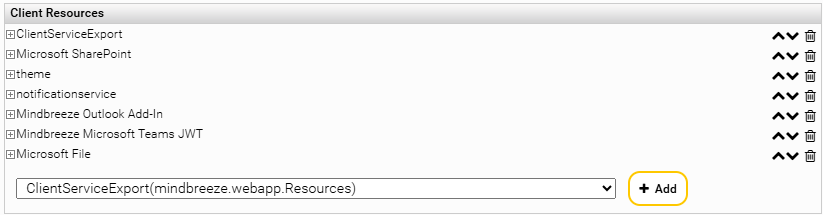
To verify, if the installation of the JWT plugin was successful, go to the tab “Client Services” and activate “Advanced Settings”. Expand your Client Service and go to the section “Client Resources” at the bottom of the page. If the installation was successful, the JWT plugin should be listed as “Mindbreeze Microsoft Teams JWT”.

The configuration of Single Sign-On with JWT is completed and you are now able to use Mindbreeze InSpire in Microsoft Teams with JWT authentication.
Troubleshooting
If the Mindbreeze InSpire App doesn't behave as expected in Microsoft Teams, the issue is typically related to the authentication setup, plugin configuration or the URL usage.
Possible problems and the solution are described in the following chapters.
Mindbreeze InSpire App cannot be found in the Microsoft Teams App Catalog
If the Mindbreeze InSpire App is not available in the Microsoft Teams App Catalog, your Teams admin can provide a direct installation link or deploy it centrally.
Mindbreeze InSpire App is not loading or displaying a blank screen
If the Mindbreeze InSpire App is not loading or only displaying a blank screen in Microsoft Teams, the URL is misconfigured or the JWT plugin is missing.
Please check the following:
- Configured Mindbreeze URL: Ensure that the saved Mindbreeze URL is configured correctly by going to the tab “Settings” and checking the full URL. The format of the URL looks like this: https://domain/someOtherParams
- HTTPS Access: Verify that the Client Service is accessible via HTTPS URL.
Authentication or Token Errors
If an authentication or token error occurs or if the search interface is not accessible, check the following points:
- Enable JWT authentication: In the Management Center, go to the menu item “Configuration”, click on the tab “Client Services” and activate “Advanced Settings”. Then expand the Client Service to be used and check if the setting “Enable JWT Authentication” is enabled in the section “JWT Authorization Settings”.

For more information about the configuration of the Client Service for JWT authorization, see the chapter Step 1: Configure the Client Service to allow JWT Authentication.
- Confirm Plugin Installation: Verify the successful installation of the Mindbreeze Microsoft Teams JWT Plugin and that the plugin is active. For more information, see the chapter Step 3: Installation of the JWT Plugin.
- Check the Claims Mapping: Check, if the required claims are configured correctly and make sure that the incoming JWT contains those claims. For more information, see the chapter Step 1: Configure the Client Service to allow JWT Authentication.