
Outlook Plugin
Mindbreeze InSpire
Copyright ©
Mindbreeze GmbH, A-4020 Linz, 2024.
All rights reserved. All hardware and software names are brand names and/or trademarks of their respective manufacturers.
These documents are strictly confidential. The submission and presentation of these documents does not confer any rights to our software, our services and service outcomes or other protected rights.
The dissemination, publication or reproduction hereof is prohibited.
For ease of readability, gender differentiation has been waived. Corresponding terms and definitions apply within the meaning and intent of the equal treatment principle for both sexes.
.
Introduction
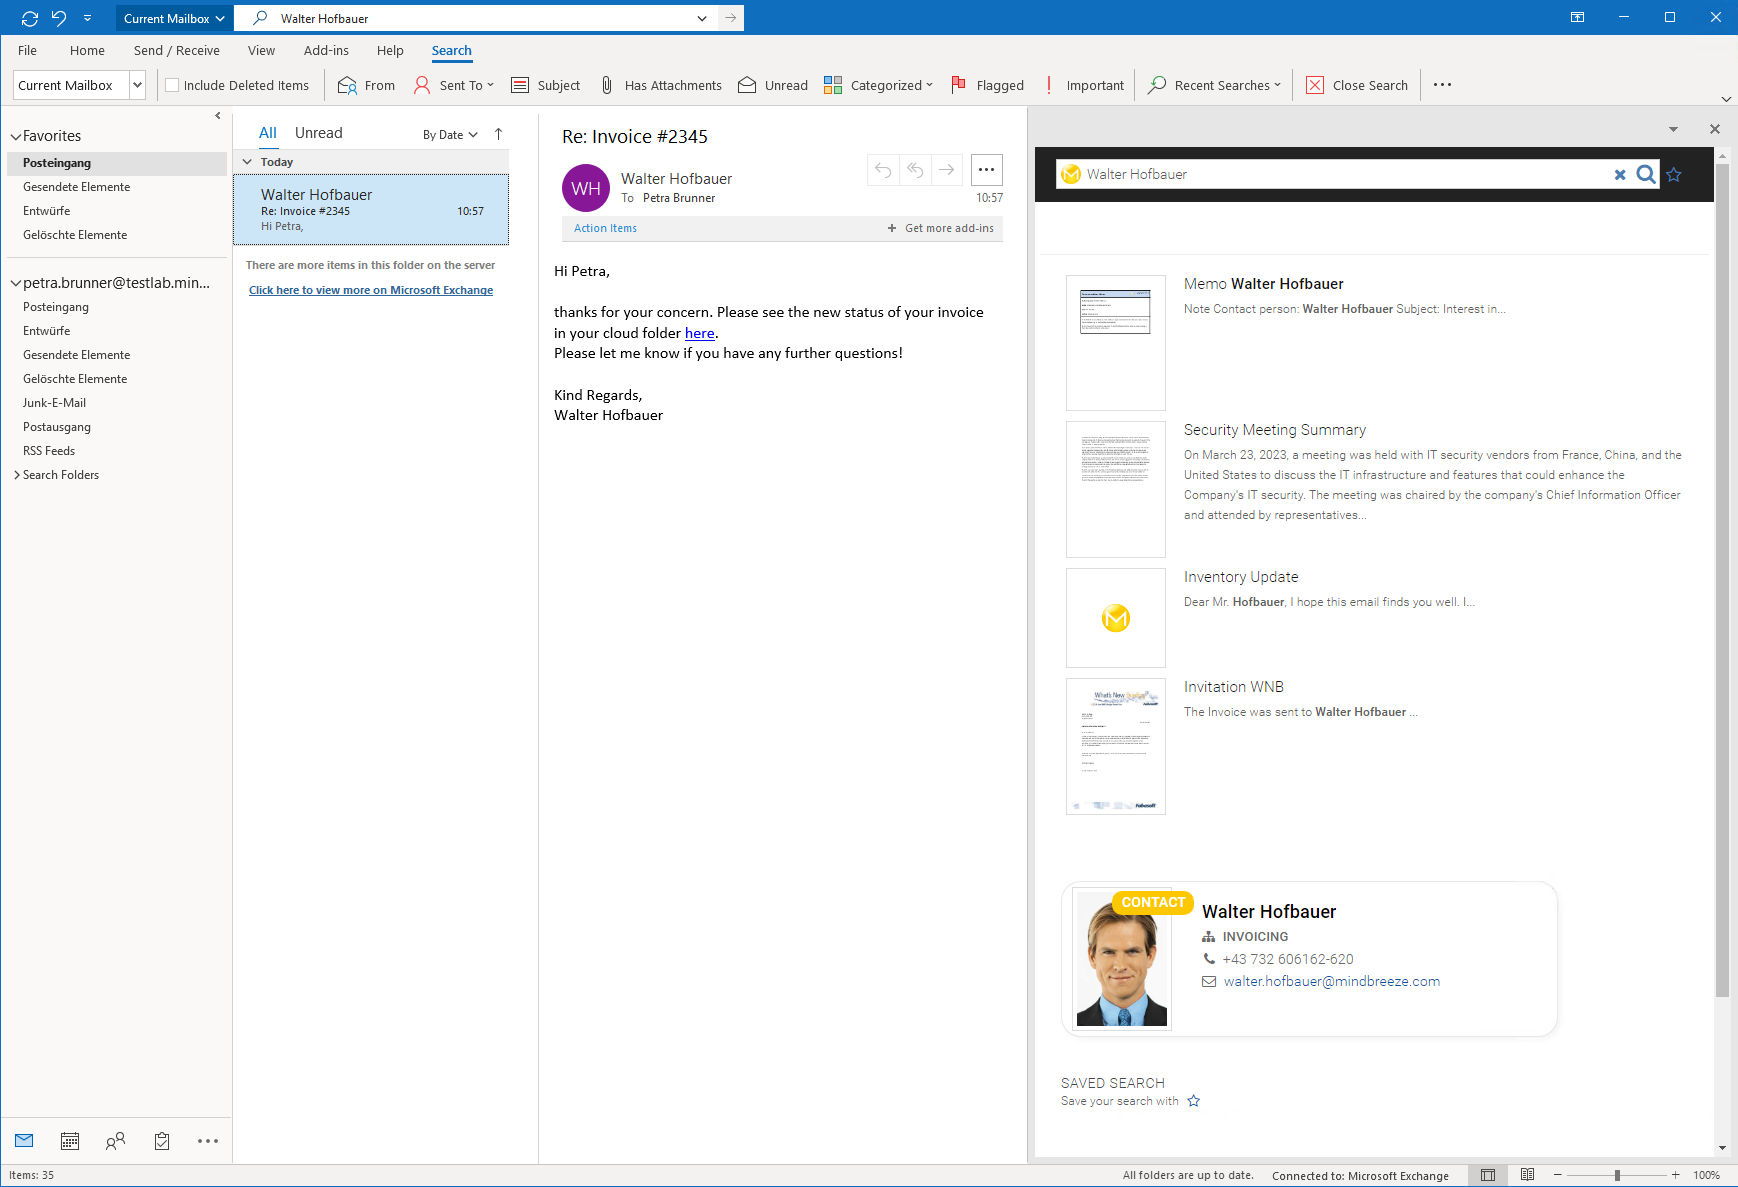
The Outlook add-in integrates the Mindbreeze InSpire search into Microsoft Outlook.
If the add-in is activated, a Mindbreeze search is performed in parallel with the Outlook search.
Mindbreeze Outlook Addin is compatible with Microsoft Office 2016, 2019, 2021 LTSC and Microsoft Office 365 (both 32-bit and 64-bit installations).
Requirements
The Outlook Addin requires the following installed programs/runtimes for the addin to be installed/used:
- Microsoft .NET Framework 4.7.2
- Visual Studio 2010 Tools for Office Runtime
- Microsoft WebView2 Runtime
These runtimes are usually already present on systems with full installations of Microsoft Office and current versions of Windows 10 and 11.
Note: It is possible to install a bundle using the Mindbreeze Bundled Installer to install the required runtimes together with the Outlook Addin.
Installation and Configuration
There are two ways to install the add-in. For both variants, it is necessary to install the required runtimes locally and to install the Outlook Addin plugin on the appliance which Client Service is used for searching (see Install Plugin).
In the first variant, a user without administration rights can install the add-in via the browser from the Mindbreeze Insight App.
In the second variant, an administrator can install an MSI installer system-wide and preconfigure it. Furthermore, the Mindbreeze Bundled Installer which automatically installs the required runtimes is also available.
Install Outlook Add-In Plugin
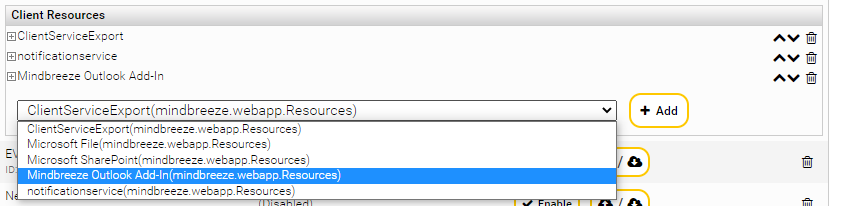
First install the Outlook Add-In plugin under "Plugins".

Then, under the "Client Services" tab, select the settings of the client service which will be used for the search by the Outlook Addin. Under "Client Resources", select the Mindbreeze Outlook Addin from the drop-down menu and add it to the Client Resources using the "Add" button.
Installation via Browser and Client Service (User)
Client Service Configuration
To be able to use the Outlook plugin, the option "External URL" must be set in the client service. The External URL is the URL under which the client service can be reached. Furthermore, a valid SSL certificate must be installed in the client service. (See Client Service)
Plugin Installation
For the next steps, it is necessary to install the Outlook Addin plugin on the client service, on which the Outlook Search should be executed. (See Plugin Install)
Download and Installation
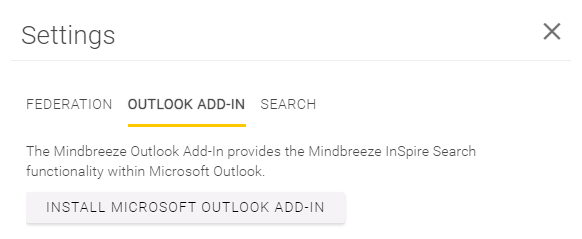
The add-in can now be downloaded in the client under "Settings" -> "Outlook Add-In".
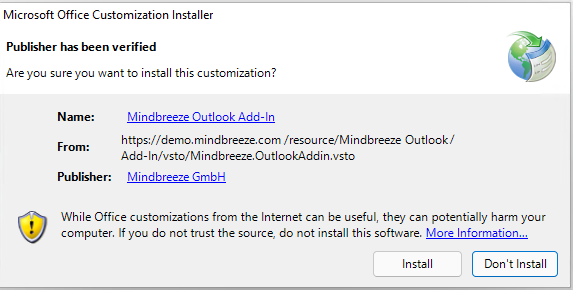
The add-in can now be installed by running the downloaded ClickOnce installer "setup .exe" by the user. No administrator rights are required for this. After the installation, the Outlook Add-In is immediately available (restart Outlook).
Installation via MSI Setup (Administrator)
In the Outlook Plugin package you will find an MSI setup file. The MSI setup installs the Outlook add-in system-wide. The setup requires several runtimes to be installed on the computer for the add-in to work (See requirements). Furthermore it is also necessary to install the Outlook Add-in plug-in on the client service on which the Outlook Search is to be run (See Installing the Plugin).
After installation, the client service URL must be entered in the settings for the Outlook Add-In to work. It is recommended to set all settings via the system registry as administrator before installation (See System-wide configuration).
Note: The MSI setup is silent (no install-wizard) and installs the add-in immediately without further prompting. After successful installation the Outlook Add-In is active for all users of the system.
Installation via Mindbreeze Bundled Installer (Administrator)
The Mindbreeze Bundled Installer contains the MSI Installer and all required runtimes.
After installation, the client service URL must be entered in the settings for the Outlook Add-In to work. It is recommended to set all settings via the system registry as administrator before installation. See System-wide configuration.
Note: The Mindbreeze Bundled installer displays an installation wizard by default. For a silent installation, you can run the installer on the command line with the following parameters:
MindbreezeOutlookAddin-BundledInstaller-<version>.exe /silent /install
Configuration in Microsoft Outlook
The following chapter explains how to activate and configure the add-in in Microsoft Outlook. We are using the 2021 LTSC version here but the steps apply for all supported versions.
The add-in can be found in the "Add-Ins" menu item. The buttons "Disable Mindbreeze Search" and "Settings" are displayed there.

Disable/Enable Mindbreeze Search
Use this button to activate or deactivate the add-in.
Settings
The desired client URL is specified in the settings.
Example: https://demo.mindbreeze.com/apps/client
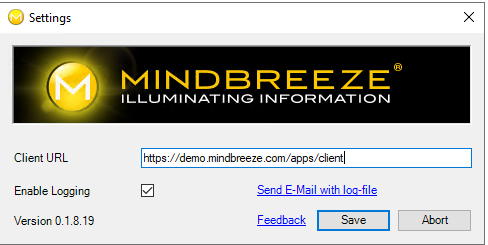
You can also enable internal diagnostics with "Enable Logging". This will write log files to the %APPDATA%\Mindbreeze\log\ directory.
Installed and Activated
Once the configuration of the add-in is complete, the Outlook Add-In can be used.
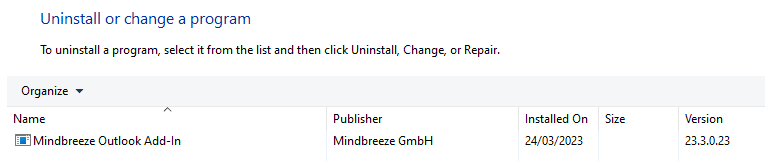
Uninstall the Add-In
If the add-in is no longer needed, it can be uninstalled at "Uninstall or change program". If the add-in was installed via the client service, the add-in can be uninstalled without administrator rights. Otherwise administrator rights are required.
Search for the following program:
System-Wide Configuration
Mindbreeze Outlook Add-in stores configuration settings in the user's Windows Registry (HKEY_CURRENT_USER). An administrator has the option to set preferences in the machine's Windows Registry (HKEY_LOCAL_MACHINE).
If a user has saved his own settings the settings are used by the user, otherwise the settings of the machine are used.
The registry path of the user settings is:
HKEY_CURRENT_USER\Software\Microsoft\Office\Outlook\Addins\Mindbreeze.OutlookAddin.Config
The registry path for local machine settings is:
HKEY_LOCAL_MACHINE\SOFTWARE\Microsoft\Office\Outlook\Addins\Mindbreeze.OutlookAddin.Config
If 32-bit versions of Microsoft Outlook are used, the following registry path is used instead:
HKEY_LOCAL_MACHINE\SOFTWARE\WOW6432Node\Microsoft\Office\Outlook\AddIns\Mindbreeze.OutlookAddin.Config
The following pre-sets can be set: (all values are string values)
Key | Description |
uri | Client URL e.g.: uri https://search.mycompany.com/apps/client/ |
activated | Activate or deactivate Mindbreeze search with the respective values "True" or "False". (Default value: True) |
loggingenabled | Enable or disable extended logging. E.g. loggingenabled True or loggingenabled False. (Default value: True). The log files are written to the %APPDATA%\Mindbreeze\log\ directory. |