
Sure, you can handle it. But should you?
Let our experts manage the tech maintenance while you focus on your business.
Let our experts manage the tech maintenance while you focus on your business.
Microsoft Dynamics CRM Connector
Installation and Configuration
Creating and testing a crawler account
Create a new account for Microsoft Dynamics CRM. This account must have the required read access rights for all data relevant for crawling in CRM. A read-only administrator account is best suited for this purpose.
Then test the account by logging in to your Microsoft Dynamics CRM and checking whether you can see all the data relevant for crawling.
Configuring Mindbreeze
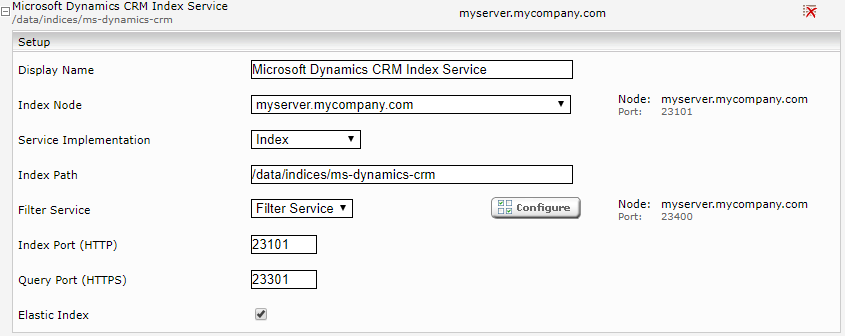
Index
Click the “Indices” tab and then click the “Add new index” icon to create a new index (optional).
Enter the index path. If necessary, adjust the display name of the index service and the associated filter service.

To do this, the “Advanced Settings” must be activated first.
The following “Dynamic Constraints” must be configured:
Einstellung | Eingabe |
Dynamic Constraint Source Expr | category:Undefined |
Dynamic Constraint Pattern | NOT categoryclass:systemuser |
Dynamic Constraint Static Fraction | NOT categoryclass:systemuser |
Datasource
Setup
Add a new data source with the “Add new custom source” icon (located at the bottom right).

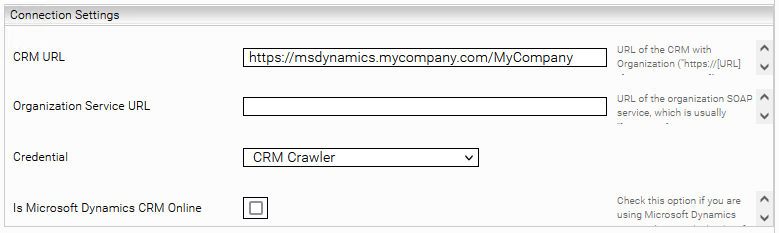
Connection Settings
- Legend:
- Properties marked with *: mandatory field, these must be configured explicitly
- Properties not specially marked: optional fields
- Fields marked with (Advanced Settings) are only displayed if the "Advanced Settings" view is activated in the configuration. This is only necessary in special cases.

Property | Description |
CRM URL* | The URL to your Microsoft Dynamics CRM instance, e.g. https://msdynamics.myorganization.com/MyOrganization |
Organization Service URL | If you have changed the URL to the "Organization SOAP Service" in your Microsoft Dynamics CRM instance, you can also set the URL here so that the correct endpoint is called. |
Credential* | The OAuth 2 credential created in the Network tab. |
Is Microsoft Dynamics CRM Online | Enable this option if you are using Microsoft Dynamics CRM Online (i.e. not On Premises). |
Use REST API | When this option is enabled, the Microsoft Dynamics CRM REST API is used. Note that if this setting is enabled, a Microsoft Dynamics CRM Version of at least 9.0 is required and only On-Premises Kerberos and Microsoft Online OAuth 2 Client Credentias Authentication are supported. We strongly advise to enable this setting, since the SOAP API is deprecated and there are known issues. |
Ignore Proxy | If you enable this option, the proxy settings from the "Network" tab will be ignored for the crawler. |
Connection Timeout (Seconds) | Time in seconds to wait for a response before aborting the API call. Increase this value if you get timeout errors while crawling. |
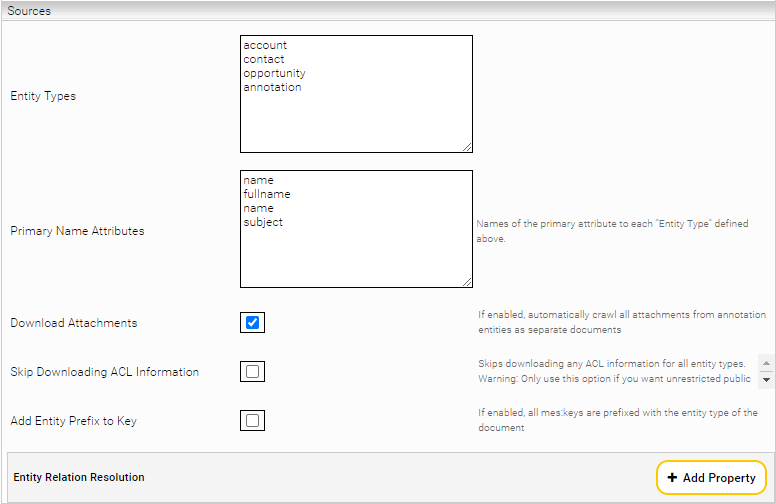
Sources
For the final step, specify which part(s) of your CRM should be indexed in Mindbreeze InSpire.
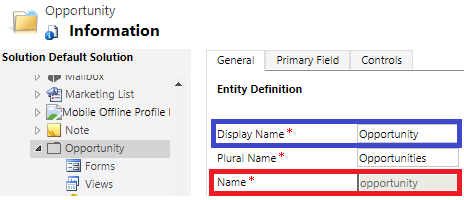
First, go to the entity settings of your CRM. The entity name of the relevant entity from Microsoft Dynamics CRM is required to index all entities of a particular entity type from Microsoft Dynamics CRM in Mindbreeze InSpire.
The following screenshot shows the configuration of the entity type “Opportunity” in Microsoft Dynamics CRM. In this example, all sales opportunities (blue-bordered in the screenshot) are to be indexed; the Microsoft Dynamics CRM connector requires the internal name of the entity type (name "opportunity", red-bordered in the screenshot).

In addition, the internal name of the main field is required for the configuration of the connector (red-bordered in the following screenshot).
Navigate back to the data source settings in Mindbreeze InSpire and enter all the entity types you want to index in the “Entity Types” field, separated by a line break. If you want to index all sales opportunities, enter the value “opportunity” in a new line in the field “Entity Types”.
For each entity type entered, the main field must be entered in the “Primary Name Attributes” field. The first line of “Entity Types” is linked to the first line of “Primary Name Attributes”; the second line of “Entity Types” is linked to the second line of “Primary Name Attributes” and so on. Since “opportunity” is written in the second to last line of the field “Entity Types” in this example, the corresponding main field “Name” must be placed in the second to last line of the field “Primary Name Attributes”.
The setting “Download Attachments” under “Advanced Settings” enables the automatic download of attachments as separate documents.
Note: This feature is currently only supported for Microsoft CRM On Premises.
With the setting "Skip Downloading ACL Information" under “Advanced Settings” one can disable the downloading of ACL information. This will result in no permission information being downloaded by the crawler. This option should only be used in combination with the index setting "Unrestricted Public Access" and only if public access of all documents is explicitly desired.
The Advanced Setting "Add Entity Prefix to Key" prefixes the entity type to the keys of all documents. This way, possible key conflicts can be avoided.
With the Advanced Setting "Entity Relation Resolution" you can also resolve database relationships and index the metadata of the connected entity in the document.
The following settings are necessary for this:
- Entity Name: The name of the entity from which the relationship originates. This name must be present in the configuration field "Entity Types".
- Foreign Key Column Name: The name of the attribute that contains the reference to the other entity.
- Referenced Entity Name: The name of the entity to which the reference points.
- Referenced Column Name: The name of the attribute to which the foreign key of the original entity points, usually a unique ID of the entity.
If the option "Use REST API" is enabled, "Referenced Entity Name" and "Referenced Column Name" are not required.
With the setting "Foreign Metadata Prefix" the metadata of the connected entity can be prefixed.
In CRM, you will find all these parameters in the entity settings.
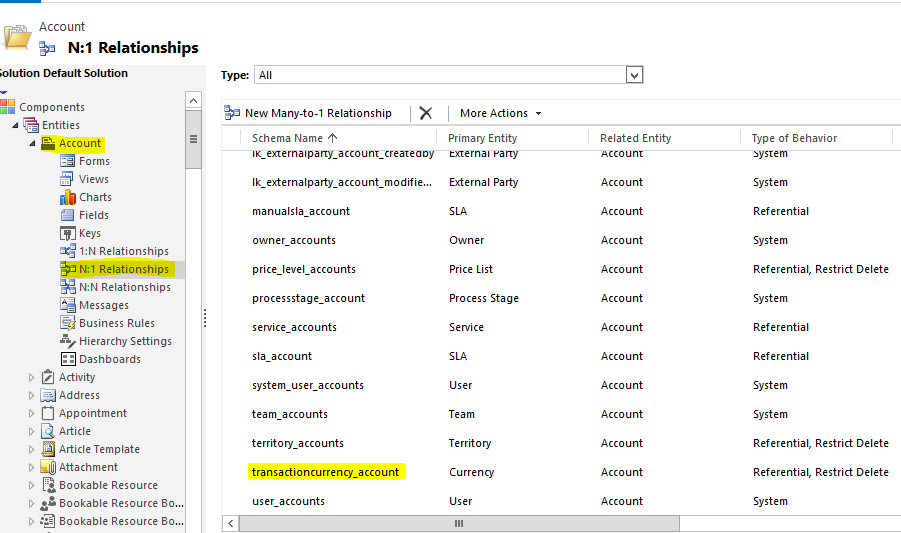
In this example, the relationship between Account and Currency is resolved:
Entity Names can be found as above for the Entity Types setting.
For the Column Names, first look in the Relationships of the entity for the relationship to be resolved:

When you open the relationship, you will see the field "Name" under "Lookup Field". Set this as the "Foreign Key Column Name".
The "Referenced Column Name" is usually the primary key of the referenced entity. Most of the time the name of this column is simply the name of the entity + "id". You can check this in the "Fields" of the entity:
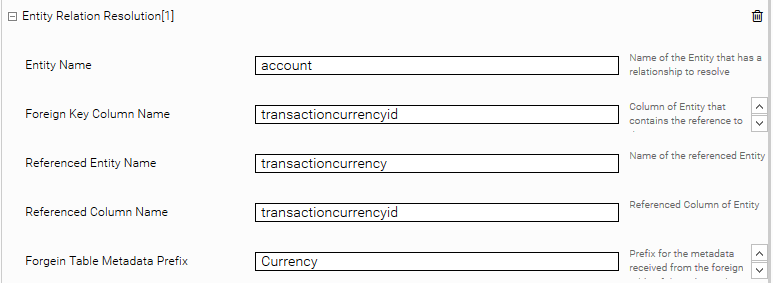
The complete configuration of this example looks like this:
With this feature you can also easily resolve multiple relationships per entity.
If you use this feature, you should be aware of the following things:
- The ACLs of the connected entity are ignored, the indexed document only uses the ACLs of the original entity. Therefore, you should not use this feature to resolve connections to entities with sensitive data.
- This feature supports 1:1 and N:1 relationships. If the connection to another entity returns more than one result per entry, this can lead to unexpected results.
For 1:N relationships, you can instead index the N side and connect to the 1 side to avoid this problem. - If you change the Foreign Metadata Prefix setting, you should do a full re-index, otherwise you may get unexpected results.
Error Handling (Advanced Settings)
The following options are for error handling and troubleshooting. Configure these settings only if you have problems with indexing.

Setting | Description |
Maximum Download Retries | The maximum number of attempts to download data from Microsoft Dynamics CRM. |
Ignore Unsuccessful Entity Types | If disabled, errors while downloading or indexing a document will abort the crawl run. If enabled and if an document of an entity type could not be downloaded or indexed correctly, remaining documents of this entity type will be ignored and the crawler will continue with the next entity type. |
Delete Unprocessed Documents On Error | If this option is enabled and the crawl run is aborted due to an error, the unprocessed documents will be deleted. |
Log SOAP Requests | If you enable this option, all requests against the Microsoft Dynamics CRM API are written to a soap-request-log.csv file. |
Performance Settings (Advanced Settings)
The following options affect the processing speed of the crawler. Change these settings only if you have problems with the crawl run.
Setting | Description |
Concurrent Filter and Index Dispatch Threads | The number of documents that are sent to the index by the crawler at the same time. |
Page Size | The number of documents that are fetched with one request from Microsoft Dynamics CRM. Increasing this value increases the crawl speed, but also consumes more memory and risks timeouts or API limits. |
Maximum Concurrent Content Fetch Connections | Sets the maximum amount of simultaneous connections allowed for content fetch (download action). This is only relevant for downloading attachments. Furthermore, the download action is only available when using Kerberos authentication for Microsoft CRM On Premises. |
Principal resolution service
To determine which users are allowed to see which entities in Mindbreeze, you need to add a PrincipalResolutionService under Services.
In the new or existing service, select the Microsoft Dynamics CRM Principal Resolution option in the Service setting. For more information about additional configuration options and how to create a cache and how to do the basic configuration of a cache for a Principal Resolution Service, see Installation & Configuration - Caching Principal Resolution Service.
The "ACL Cache Expires Minutes" option can be used to define the number of minutes after which the cached rights information will expire and have to be re-downloaded from the CRM.
With the option "Resolve msDS-PrincipalNames" an LDAP server is used to convert the email addresses of the users logged into Mindbreeze Inspire Search Client to msDS-PrincipalNames. This is necessary if the user names in Microsoft Dynamics CRM are also msDS PrincipalNames. With some Microsoft Dynamics CRM instances (e.g. in the online version) it can happen that e-mail addresses are used as usernames. In this case, you have to disable this option.
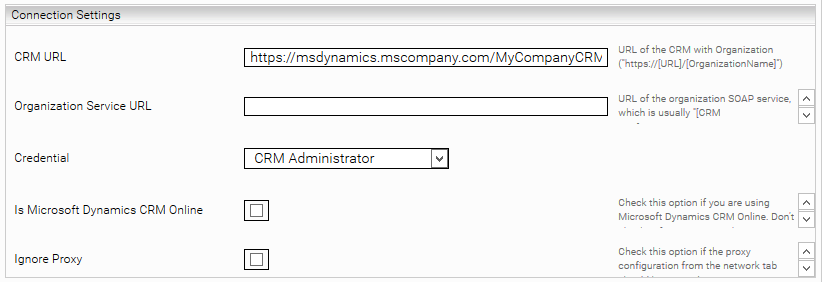
The "CRM URL", "Organization Service URL", "Is Microsoft Dynamics CRM Online", and "Ignore Proxy" options must be configured as described in the "Connection Settings" section.

If the option "Resolve msDS-PrincipalNames" is activated, you also need to configure the required LDAP server. Switch to the Network tab and enter the domain name in the LDAP settings as a minimum.
In the next step, you need to configure a user under Credentials who, at a minimum, has the rights to read the UPN names of all users.

In addition, you need to create a link under Endpoints between the LDAP settings and the added credentials. The Location field must be configured as follows:
dns://<LDAP Server Domain Name> (e.g. dns://myorganization.com)

Login information
For the next step, you’ll need the login information from chapter “Creating and Testing a Crawler Account”. In the Mindbreeze management UI, switch to the Plugins tab and add the credentials/login information under Credentials:

Now you have 2 possibilities to link the created credential with the crawler and the principal resolution service:
- Select the credential with the option "Credential" in the Crawler and in the Principal Resolution Service configuration or

- Under Endpoints, add a new endpoint. Enter the CRM URL in the Location field. In the Credential drop-down field, select the login information that has just been configured.

Attention: Depending on whether you are using an on-premises installation or Microsoft Online, the credentials must be configured differently (Username/Password or OAuth 2). The type of authentication is automatically detected by the connector, depending on how you have configured the connector. In the following table you can find in the first column the different types of authentication and in the columns to the right which fields have to be filled in the credentials configuration (X is a mandatory field, bracketed (X) is an optional field). It is absolutely necessary that the fields marked with X are configured so that the authentication type can be recognized. Please also read the next sections.
Type | Username | Domain | Password | Access Token URL | Client ID | Client Secret | |
On Premises (only for SOAP) | Username/ Password | X (or email) | (X) | X | |||
On Premises -Kerberos | Kerberos | X (keytab) | X (keytab) | ||||
Microsoft Online OAuth 2 Client Credentials | OAuth 2 | X | X | X | |||
Microsoft Online WS-Trust (only for SOAP) | Username/ Password | X (email) | (X) | X |
Authentication: On Premises
If you have an on-premises installation and have disabled the "Is Microsoft Dynamics CRM Online" option, this authentication method is suitable.
Create a new account for Microsoft Dynamics CRM or use an existing one. This account must have the required read permissions for all data in CRM that is relevant for crawling. A read-only administrator account is best suited for this purpose.
Credentials:
Now you can configure the credential in Mindbreeze Management Center in the Network tab as described in the section "Credentials". It is important that you configure the following fields:
- Type: Username/Password
- Username
- Domain (optional)
- Password
Authentication: Kerberos on Premises
If you have an on-premises installation and have disabled the "Is Microsoft Dynamics CRM Online" option, this authentication method is possible.
Create a new account for Microsoft Dynamics CRM or use an existing account. This account must have the required read permissions for all data in CRM that is relevant for crawling. A read-only administrator account is best suited for this purpose.
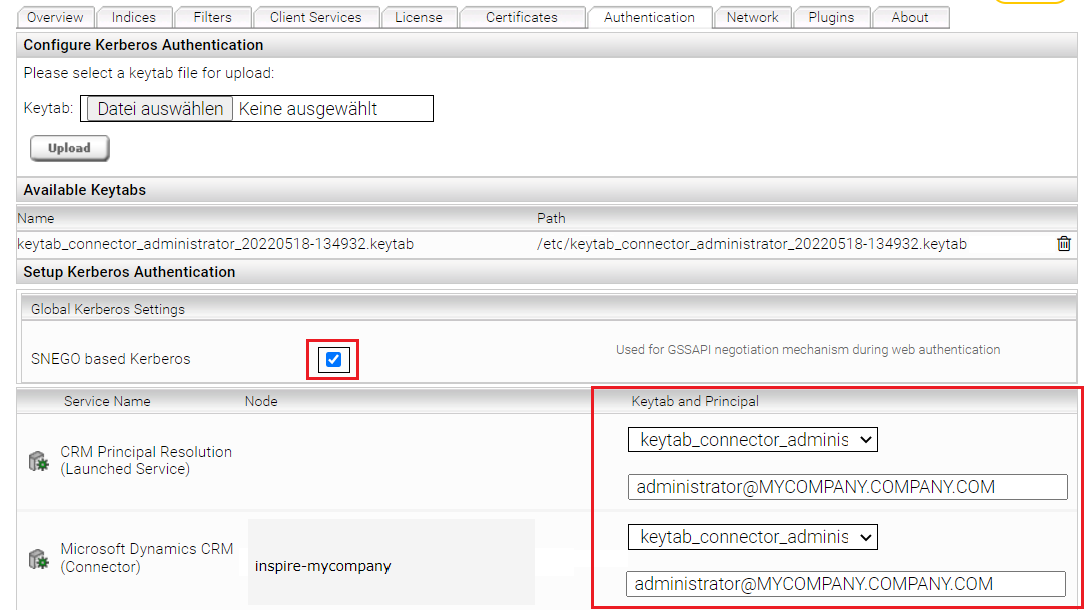
To configure Kerberos authentication on the Mindbreeze appliance, first follow the instructions in the Kerberos Authentication documentation to create the connector keytab file and upload it to the MMC in the “Configuration” menu item under the “Authentication” tab.

Then, in the “Global Kerberos Settings” area, enable the “SNEGO based Kerberos” option and set the uploaded keytab file and principal for the Microsoft Dynamics CRM Connector and the Microsoft Dynamics CRM Principal Resolution Service. When specifying the principal, pay attention to upper- and lower-case letters.

Authentication: Microsoft Online OAuth 2 Client Credentials (recommended for Microsoft Online)
If you have a Microsoft Online Dynamics instance and have enabled the "Is Microsoft Dynamics CRM Online" option, this authentication method is recommended. This authentication method is also suitable if you have a federated IDP (e.g. Okta) in use, through which users normally log in.
This authentication method does not require a real user, but instead requires an Azure app and a service user in Dynamics. To set this up, please follow the steps below:
Set up an Azure app
Log in to https://portal.azure.com and create an app in "Azure Active Directory" by clicking "New registration" under "App registrations". A redirect URI is not required.

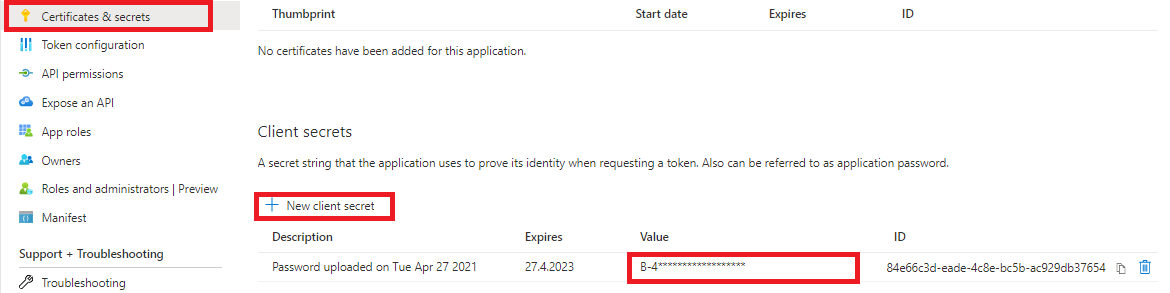
Then create a client secret in the "Certificates & secrets" menu note down the created client secret.
Then switch to the "Overview" and note down the "Application (client) ID" (= Client ID) and the OAuth2 Token Endpoint (v1) or (v2).

Application user setup
Now create an application user in Microsoft Dynamics that is linked to the Azure app.
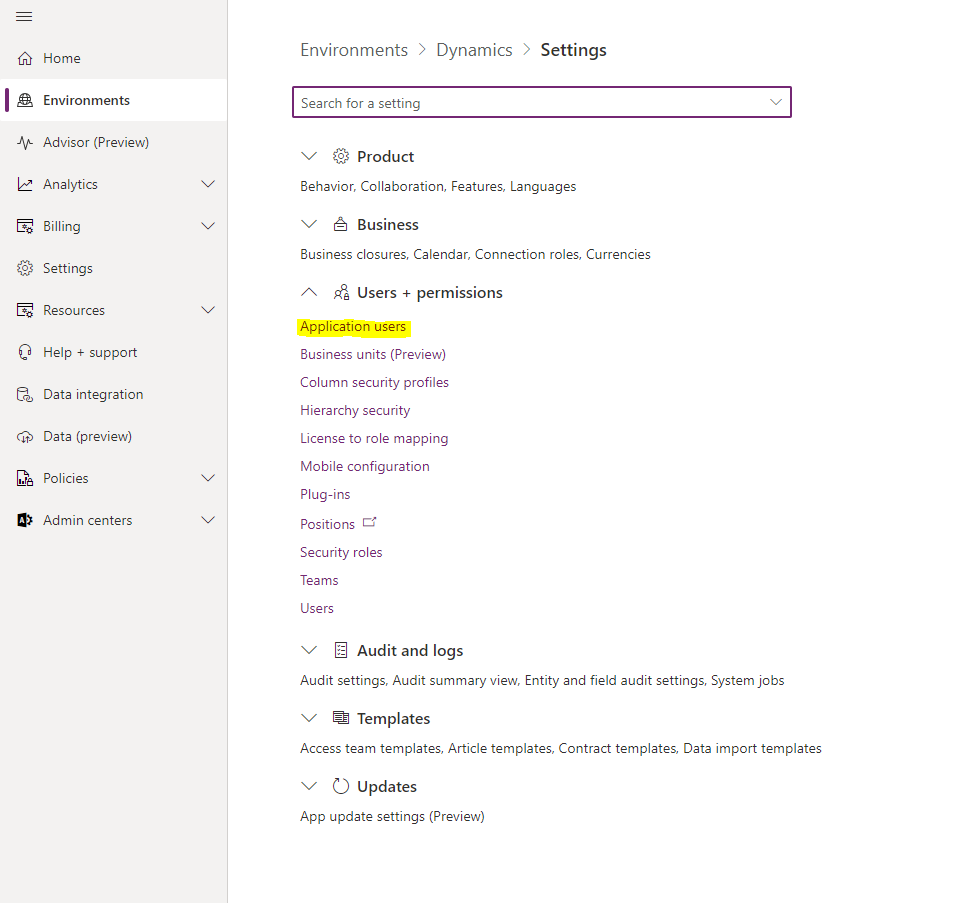
To do this, go to "Environments" in the Microsoft Power Platform Admin Center, select your Microsoft Dynamics environment and navigate to "Settings", "Users + Permissions" and then “Application Users”.
Then click on "New app user" and search for your Azure app by name or ID. Then assign a "Security role" to get all accesses relevant for the crawling. A read-only administrator role is best suited for this.

Credentials in Mindbreeze Management Center
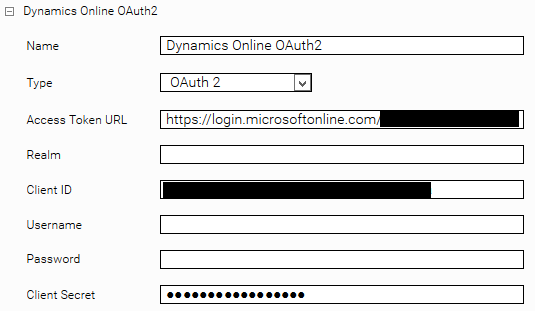
Now you can configure the credential in Mindbreeze Management Center in the Network tab as described in the section "Credentials". It is important that you configure the following fields:
- Type: OAuth 2
- Access Token URL
- Client ID
- Client Secret

Authentication: Microsoft Online WS-Trust with username/password (deprecated)
If you have a Microsoft Online Dynamics instance and have enabled the "Is Microsoft Dynamics CRM Online" option, this authentication method can be used.
Attention: This authentication method is deprecated by Microsoft and is no longer supported by new instances. Use OAuth 2 client credentials instead (see above).
If for some reason you still want to use this authentication method, please follow these steps: Create a new account for Microsoft Dynamics or use an existing one. This account must have the required read permissions for all data in Dynamics that is relevant for crawling. A read-only administrator account is best suited for this purpose.
Then test the account by logging into your Microsoft Dynamics and check whether you can see all the data relevant for crawling.
Credentials:
Now you can configure the credential in Mindbreeze Management Center in the Network tab as described in the section "Credentials". It is important that you configure the following fields:
- Type: Username/Password
- Username (Email)
- Password
Synthesized metadata
In Microsoft Dynamics CRM, entities are often related to other entities (frequently also to entities of a different entity type). In order to display attributes of the linked entity in the search client, ”synthesized metadata” needs to be configured. To do this, the “Advanced Settings” must be activated first.
Click the “Add Composite Property” icon and assign a name for the referenced attribute in the “Name” field.
The link is created in the “Property Expression” field using the following pattern: mscrm_<Fremdschlüssel-Attribut>/mscrm_<Attribut im Referenzierten Dokument>.
In “categoryDescriptor.xml”, the name (“mscrm_parentcustomer_name” in the screenshot) can then be used as the metadata date ID.

Must-have synthesized metadata
The following Synthesized Metadata Definitions have to be configured, as they are used in the “categoryDescriptor.xml” which is included in the standard delivery:
Appendix
Troubleshooting
If you are having problems with indexing, the following tips may be helpful:
Check the logon information. Are they correct? Are you using the right type of login (on-premises versus Microsoft Online)?
Are the configured URLs correct?
You may not want the configured proxy from the "Network" tab to be used. If this is the case, you can check the "Ignore Proxy" option.
Does the crawl run abort after some time, e.g. because there has been a read timeout? It may help to set the "Page Size" to a lower value. You can also try to set "Maximum Download Retries" and „Connection Timeout (Seconds)“ to a higher value or activate "Ingnore Unsuccessful Entity Types" to at least try to index content from other tables.