Sure, you can handle it. But should you?
Let our experts manage the tech maintenance while you focus on your business.
Let our experts manage the tech maintenance while you focus on your business.
Web Connector
Setup and Troubleshooting for Advanced JavaScript UseCases
Introduction
The Web Connector indexes HTML documents and also supports the indexing of web pages that use JavaScript by means of "JavaScript crawling".
This documentation describes how to use and handle JavaScript crawling in the context of advanced JavaScript use cases.
Note: For the use cases described here, basic knowledge of HTML and JavaScript is required. Furthermore, basic knowledge about the structure of the web page to be indexed is required.
Architecture
Web Connector without JavaScript (Regular Web Crawling)
In this mode, the web connector downloads the web page to be indexed directly using a single HTTP request. In this mode, it is not possible for the connector to properly index web pages with dynamic content.
Web connector with JavaScript (JavaScript crawling)
In this mode, the Web Connector downloads the web pages to be indexed indirectly using JavaScript crawling, allowing it to index web pages that are dynamically loaded with JavaScript.
However, this mode is very performance-intensive and should only be used if no better alternative is available. See the section Alternatives.
JavaScript crawling requires some additional settings, which are described in the following sections.
Comparison between Regular Web Crawling and JavaScript Crawling
The following table shows the main features and differences between regular web crawling and JavaScript crawling.
Web Content Compatibility | Regular Web-Crawling | JavaScript-Crawling |
Crawling Efficiency | Highly Efficient | Very performance-intensive |
Static Websites | Are fully indexed. | Are fully indexed. |
Web pages with authorization (not supported in regular crawling) | Are indexed with login mask, indexing not fully possible. | Automatic login is possible to index only desired content. |
Web pages with unwanted content (static cookie banners or ads) | Unwanted content is indexed. | Unwanted content can be hidden. |
Content loaded by user input | Some content is not loaded. | User input can be simulated. All content is loaded and indexed. |
Content with delayed (lazy) loading | Some content is not loaded. | The crawler can wait for content. All content is indexed. |
Configuration JavaScript crawling
Settings for indexing with JavaScript
The following settings can be used to regulate which pages should be indexed with JavaScript. Furthermore, you can also control whether only web pages with the content type "text/html" should be indexed (this is determined in a separate HEAD request).
A detailed explanation of the settings listed below can be found in the documentation Configuration - Web Connector.
- Enable JavaScript
- Skip Head Request
- Include JavaScript URL (regex)
- Exclude JavaScript URL (regex)
The idea behind these fine-grained configuration options is to only use JavaScript crawling for web pages when it is necessary.
Default behavior
When the Web Connector is run in JavaScript mode (without configuring any other settings), the web page content is loaded and indexed as soon as the configured "Page Ready State" is reached. If the configured "Page Ready State" is not reached within the "Network Timeout", an error is logged and the content is not indexed.
These settings can also be found here.
Behavior with Scripts
Scripts are JavaScript code fragments that can be configured for advanced use cases. The following sections describe how to use these scripts:
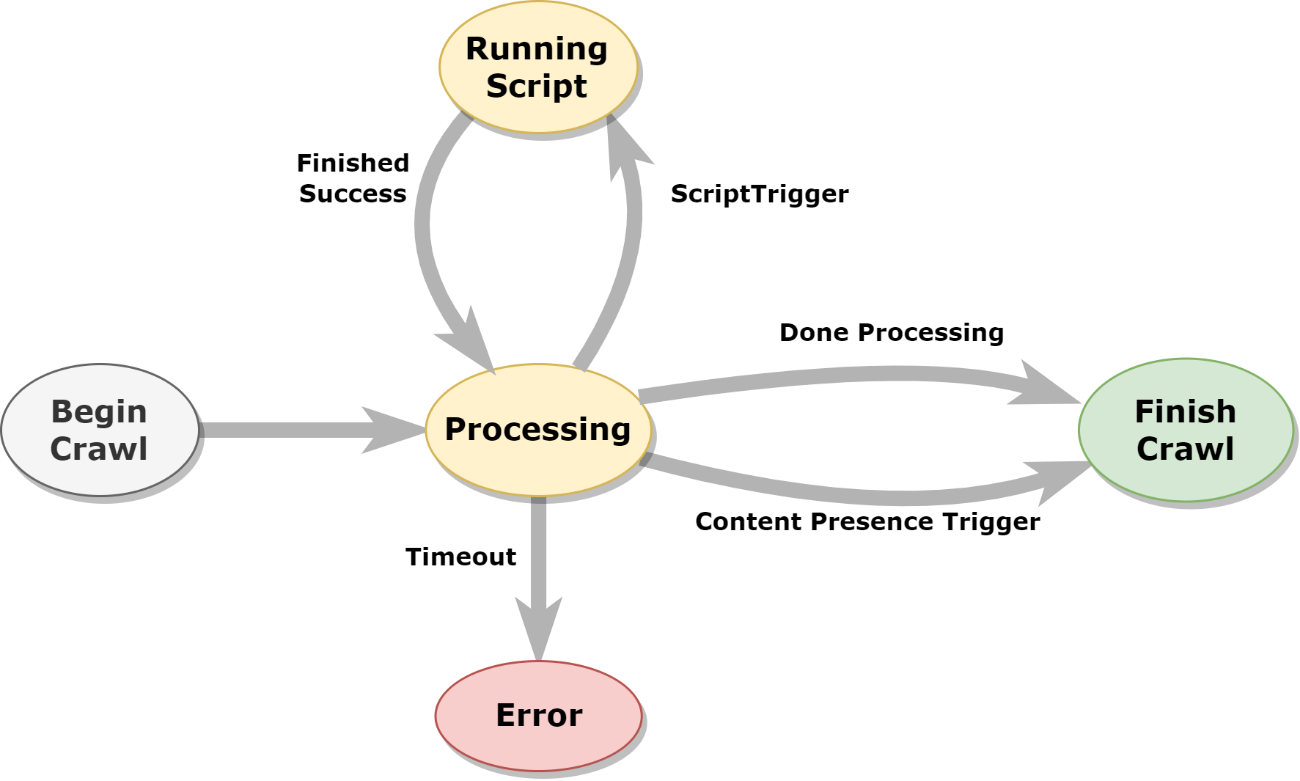
JavaScript Processing Flow with Scripts
When JavaScript fragments are executed, the program flow always follows the same pattern, interrupted only by certain conditions. The following diagram shows this logic.

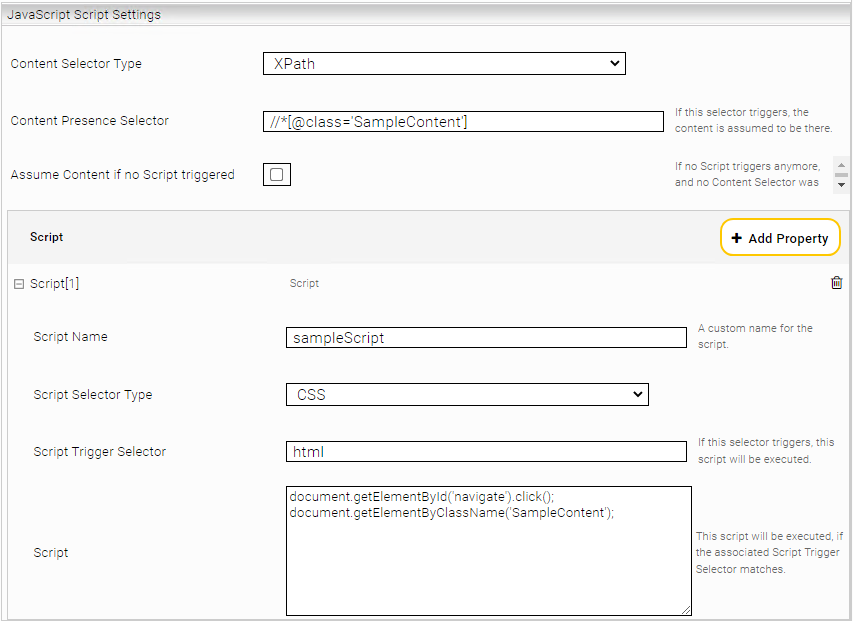
Content Presence Selector
If the default behavior of the connector is not sufficient (for example, a web page is indexed with incomplete content) it is possible to define a "Content Presence Selector". This selector can be specified using XPath or CSS selectors and changes the operation to recognize the content, so that now it waits for the selector. This is especially useful for complex web pages that take longer to load.
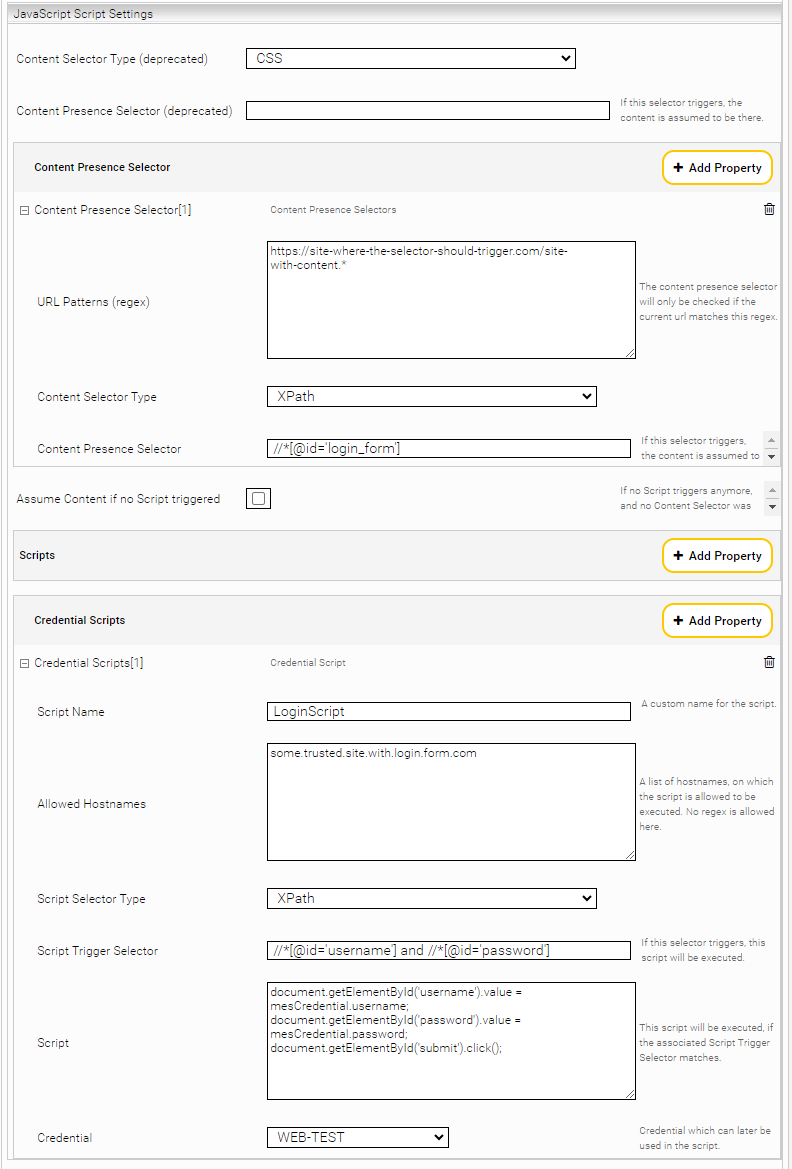
In case you have different websites with different use cases, you can define one or more URL patterns for each Content Presence Selector. These patterns define which URLs the Content Presence Selector can trigger on.
Scripts
For web pages that require user input or are more complex, the Content Presence Selector can be extended with the Script setting.
Configured scripts are executed based on events using the "Script Trigger Selectors". In addition, the Script Trigger Selectors are only checked, if the current URL matches the URL regex patterns (for normal scripts) or the allowed hostnames (for credential scripts).
Script Trigger Selector
A Script Trigger Selector checks the DOM of the document to see if a certain condition occurs. When a Script Trigger Selector becomes active, the associated script is executed in the context of the current processing of the web page.
Processing stops when the Content Presence Selector becomes active (when the requested content is loaded).
For example, a Script Trigger Selector can detect if user input is currently required (e.g. a login form is displayed) and then perform actions in the associated script (e.g. a click on the login button)
The "Script Trigger Selectors" can be specified using XPath and CSS.
Script Types
The main purpose of a script is to perform basic actions such as scrolling, closing of cookie banners and others. Such scripts can be adapted according to the use case.
Credential Script
A credential script is a normal script that contains some security enhancements:
- For each credential script a credential can be selected to be used in the script. This means that the password does not have to be written in clear text in the script. With the mesCredential object, credentials can be used in the script as follows:
- mesCredential.password
- mesCredential.username
- mesCredential.domain
Restrictions
Do not specify scripts where content is loaded in a loop. Scripts are executed single threaded and block any actions from the browser in case of a loop (infinite scrolling).
If a script is to be executed very often and over a longer period of time (scrolling), take care that the "Network Timeout" and the "Page Load Timeout" are high enough.
No listeners may be used in the scripts, because the context between the individual script executions gets lost.
Assume Content if no Script triggered
In some cases, an explicit "Content Presence Selector" cannot be defined. This may be the case, if elements of the content are already loaded in the DOM before the script has been executed.
The setting "Assume Content if no Script triggered" exists to support these special cases. If this setting is enabled, the processing will be stopped as soon as no Script Trigger Selector is active and the web page will be indexed in this state.
Note: care should be taken regarding pages with delayed loading, as this setting may cause subsequent scripts to stop running and the content may be indexed prematurely and incompletely.
Use Cases
Intranet with unsupported API authentication
This example explains the steps required to set up Mindbreeze Web Connector to crawl an intranet website with unsupported API authentication (in regular crawling).
Requirements Analysis
Alternatives
First of all, the website to be indexed must be analyzed. Since indexing with JavaScript is very performance-intensive, the following questions should be answered first and foremost:
- Is the relevant website a supported data source for which another connector already exists?
- (e.g.: Microsoft Sharepoint Online, Salesforce, Google Drive, Box Connector)
- Is the authentication variant already supported with regular crawling? (Form, Basic, NTLM, OAuth)
- Is there an API that can be integrated in the Data Integration Connector?
Configuration - Data Integration Connector
If none of these alternatives apply to the web page, we proceed with JavaScript crawling. Next, we analyze the behavior of the web page.
Behavior
In order to analyze the behavior of the web page, we first need to make sure that the necessary credentials (username, password) are available and that the login works with a browser (e.g.: Chrome, Firefox).
If the login in the browser was successful, it will be checked if all contents that should be indexed are available. (It is possible that the user does not have sufficient permissions to see the relevant content).
If all content is displayed correctly, the individual pages are analyzed in detail.
For the analysis of the individual pages, a distinction must be made between three types:
- Login pages
- Content pages
- Redirects ("redirected pages")
Login Pages
- How is the login form structured, which fields have to be filled in?
- How is the login triggered? Which button has to be pressed?
- How long does the entire login process take? (timeouts may have to be adjusted)
- To which hosts are connections established (e.g. loading fonts or JavaScript components from other servers)?
Note: 2-factor authentications can NOT be supported.
Content Pages
The following points are to be considered here:
- Are actions required by the user to view the content? E.G.:
- Do you need to scroll down to load the whole content?
- Does a button need to be pressed to view the content?
- Does an element need to be entered and confirmed to display the content? (e.g. cookie banner)
- Do you need to operate a menu?
- How quickly does the page react to these actions? (maybe timeouts have to be adjusted)
- Which hosts are connections established to? (e.g. loading fonts or JavaScript components from other servers)?
- see "Forwarded pages" for more information.
Redirects (Redirected Pages)
For web pages that redirect to other pages, it is important to note that the web connector blocks all unknown hosts by default for security reasons. (Error code: BLOCKED_BY_CLIENT)
To allow other hosts, they must be specified as "Additional Network Resources Hosts" in the settings.
Note: This also applies to sitemaps. Here, all relevant hosts must be specified as "Additional Network Resources Hosts".
Browser Developer Console
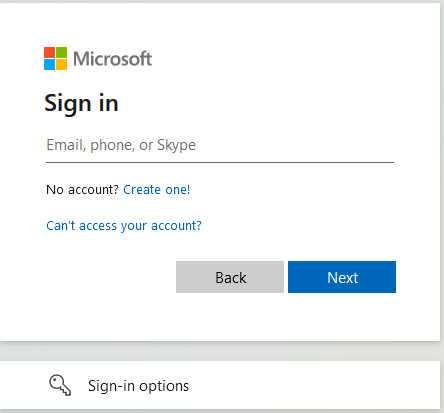
When the analysis of these pages is complete, you can begin to recreate the login using JavaScript in the browser's Developer Console (F12).
Login Page
The first step is to locate the elements of the login window (e.g.: username, password, login button) and note the corresponding selector.
For the login page, the selector for the form is very suitable as a "Script Trigger Selector". Using XPath, you can specify more complex selector, which for example, search for the combination of username and password ID.
(//*[@id='username'] and //*[@id='password'])

- Locate an element in the DOM.
- Copy the CSS selector of an element
- Copy the XPATH selector of an element
Once the selectors are noted, they can be tested in the console tab of the developer console as follows:

Once all elements of the login page have been found, you can begin recreating the login process in the console:

- Enter your username
- Enter your password
- Press „Login“
If the Developer Console login was successful, the three commands can be created as a standalone credential script in the Management Center using the corresponding Script Trigger Selector.
Content pages/redirects (Redirected pages)
The content page(s) contain the content to be indexed. You can define multiple Content Presence Selectors to identify these content pages. It is therefore important to ensure that all Content Presence Selectors are configured relative strictly. This is because the Content Presence Selectors should only be applied to the requested URLs, which can be defined in the URL Patterns setting. In addition, the CSS or XPath value of the Content Presence Selectors should be precisely defined to wait for the requested content to load.
For this step it is also important that ALL pages are checked (not just the start/login page).
In some cases, special user interactions may also need to be performed for the content pages to see the final content. This can be done by configuring scripts the same way as a login script.
- Identify selectors (trigger selector & selector of the element being interacted with)
- Test selectors
- Imitate user interaction in the development console
- Copy script to configuration and test indexing
Redirected pages behave like normal content pages, and are treated the same way. If user interaction is required, a script must be configured. Otherwise the default JavaScript process behavior will be executed. When linking to hosts that do not correspond to the configured "Crawling Root" hosts, these must also be specified as Additional Network Resources hosts.
Notes on unsupported Authorization Methods
Currently, the following authorization methods are not yet supported:
- Classic pop-ups with login forms, as the pop-up window is not accessible from the main document. Often, Identity Providers (IDPs) offer options to perform a login process without a pop-up. This should be preferred in such cases.
- Authentication via "HTTP Request Header" is only supported to a limited extent, as long as no redirects or XHR-requests with these headers are performed.
Websites that use accordions
This example explains the steps required to set up Mindbreeze Web Connector to crawl web pages with accordions.
Procedure
If the web page loads the accordion content into the DOM, no further steps need to be taken to expand it.
Otherwise, you need to check if the web page is a single page application, as they are not currently supported. (Limitations of the "Enable JavaScript" option). However, this restriction can be bypassed in certain cases.
Basically, to load the content, it is important to know that accordions have the options to:
- Expand all accordion elements
- Expand only one accordion element at a time
Both types require user interaction and the goal is to load all content into the DOM.
Expanding all accordion elements
If all elements of the accordion are expandable at the same time, a script is sufficient to click on the respective buttons to load the content.
If not all elements can be unfolded at the same time, a script is needed first to disable this mechanism, otherwise not all content is available.
This mechanism can be implemented by JavaScript on the web page, but it can also be determined by the properties of the framework used.
In case of any ambiguity in this regard, the web developers of the website should be contacted to clarify the possibilities of disabling this mechanism.
If the mechanism is disabled, a script can expand the individual accordion elements as before.
Infinity Scrolling
This example explains the steps required to set up Mindbreeze Web Connector to crawl web pages that support infinite scrolling.
Procedure
If the web page loads the entire content into the DOM, no further steps need to be taken to scroll.
If this is not the case, a script must be used to scroll to the bottom of the page so that all content is available in the DOM.
The difficulty with this is to recognize when you have reached the bottom, as this is not consistent across web pages.
“No more results” Notification
For web pages that display a "No more results" notification at the end of the list, which does not always exist in the DOM, a "Content Presence Selector" that addresses this notification and a script that only scrolls down are sufficient.
If the notification always exists in the DOM, you must try to determine the end of the document, as with loading animations.
Loading animation for further results
If there is no notification at the end of the list, a script and the setting "Assume Content if no Script triggered" must be used to find out when the end of the list is reached.
For this purpose, the loading animation of the list, as well as several height parameters can be used.
To stop the iteration of the script, the used "Script Trigger Selector" in the HTML must be changed when the end of the list is reached.
Examples
“No more results” Notification
The web page to be indexed must be scrolled to the bottom in order to display all elements. As long as the list of elements is found, try to scroll down. When the end of this list is reached, a message with "No more results" is displayed.
- Content Presence Selector (CSS): #no-more-results
- Script Trigger Selector (CSS): #result-tree
- Script: window.scrollTo(0, document.body.scrollHeight)
The script is executed until the Content Presence Selector triggers (the end is reached).
Loading animation for further results
The web page to be indexed must be scrolled to the bottom in order to display all elements. As long as the list with the elements is found, try to scroll down. If more results are available, this will be indicated with a loading animation. When the end of this list is reached, no message is displayed.
Assume Content if no Script triggered: true
Script Trigger Selector (CSS): .element-list
Script:
if (window.innerHeight + window.pageYOffset == document.body.offsetHeight &&
document.getElementsByClassName(‚element-list').length == 0)
{
document.getElementsByClassName("element-list")[0].className =
"element-list-done";
} else {
window.scrollTo(0, document.body.scrollHeight);
}
The section to check if you are already ready to scroll down is done here by the conditions
window.innerHeight + window.pageYOffset == document.body.offsetHeight
.getElementsByClassName('element-list').length == 0
The first part checks if the end of the document has been reached. However, since this script is executed very often, it can happen that the end is reached by the loading bar, which signals that more objects are being loaded. To avoid this, it is also checked if the loading bar is present.
If both conditions are met, the tag that serves as the content trigger selector is changed so that the script does not trigger further. Otherwise it will scroll further down.
Input is not recognized
Procedure
If text is inserted using JavaScript (entering the user name), it can happen that this is not recognized when clicking on Next/Enter/... or the text "enter a valid email" appears.
This is the case, for example, when logging in to "login.microsoftonline.com" and happens because there is an interaction validation behind the field that is not triggered when entering with JavaScript, and the field is therefore recognized as empty.
To work around this behavior on "login.microsoftonline.com", an event must be triggered to simulate the user behavior.
Example
const username = document.getElementById('username');
const next = document.getElementById('next');
const event = new Event('change');
username.value = mesCredential.username;
username.dispatchEvent(event);
next.click();
JavaScript message in content
If you encounter content in an indexed document that prompts you to enable JavaScript, the Content Presence Selector may not have been enabled or may be set to trigger before the web page has fully loaded.
This results in the content being indexed too early and the message not being deleted from the DOM. Please define a more precise " Content Presence Selector", which fully includes the content to be indexed.
Troubleshooting
General
If too few, too many or incomplete documents are indexed, check the following items:
- Check configuration for correctness
- Selectors
- Scripts
- Check website for response time, adjust timeouts
- Check logs for errors
- /current/log-mescrawler_launchedservice.log
- /current/job/logs/crawl.log
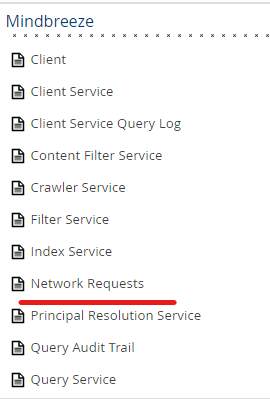
- app.telemetry
- check Crawler Service
- check Index Service
- activate Advanced Settings "Enable Verbose Logging", crawl again and check logs
- /current/log-webdriver-webdriver/current/chromedriver-logs/<driver-port>/*
- /current/log-webdriver-webdriver/current/chromedriver-browser-snapshots/<driver-port>/*
- /current/log-webdriver-webdriver/current/chromedriver-javascript-process.csv
- /current/log-webdriver-webdriver/current/chromedriver-network.csv
- /current/log-webdriver-webdriver/current/log-webdriver.log
Logs
This section lists the most important logs needed for analyzing the web connector in JavaScript mode.
All log paths are specified starting from the following path: /data/logs/crawler-log/current
First, the general logs of the web connector log should be checked. The most important ones are:
- log-mescrawler_launchedservice.log
provides a general overview of the web connector process. - /job/logs/crawl.log
provides an overview of the crawled pages and their status code and other metadata.
If no useful information can be obtained from these logs, the JavaScript process logs must be checked.
To get all these log files, the "Enable Verbose Logging" setting must be enabled in the Management Center under Advanced Settings.
All of the following logs are specified starting from the following path:
/data/logs/crawler-log/current/log-webdriver-webdriver/current
The general logs for the JavaScript process are:
- log-webdriver.log
provides a general overview of the JS process. - chromedriver -network.csv
provides an overview of all web pages accessed during the JS process, their status code and other metadata. - chromedriver-javascript-process.csv
provides an overview of the JS process in CSV format with references to screenshots
The extended logs to the JavaScript process are:
- /chromedriver-logs/<driver-port>/driver-actions.log
provides an overview of all actions performed by the crawler. If configured, this log will display login scripts with username and password. - /chromedriver-logs/<driver-port>/network-performance.log
provides an overview of ALL network actions the process performs.
Comparable to the network overview in DevTools (F12). - /chromedriver-logs/<driver-port>/page-lifecycle.log
provides a general overview of the state of the current web page. - /chromedriver-logs/<driver-port>/cdp-logs.log
provides an overview of errors and warnings in the JS process. If configured, this log will display login scripts with username and password. - /chromedriver-logs/<driver-port>/unhandled-events.log
lists all chrome driver events that were not specifically handled by the webdriver. - /chromedriver-browser-snapshots/<driver-port>/*
stores all screenshots which are created during the JS process. They can be assigned via the chromedriver-javascript-process.csv file. If configured, the screenshots that are stored here will display login scripts with username and password.
Timeouts
If web pages are not indexed, timeouts are often the cause.
There are two timeout-related settings: "Page Load Timeout" and "Network Timeout".
If you see any of the following error messages:
TimeoutException: Waiting for the pages readyState took too long.
TimeoutException: Couldn't find content in time. …
follow these steps:
Call the web page in the browser, measure the loading time.
Adjust the two timeout-settings according to this result.
If the timeout problems still occur, compare the output of the DevTool "Time" and "Waterfall" columns with the results you will find in AppTelemetry.
Be sure to change the "Waterfall" column to "Total Duration".
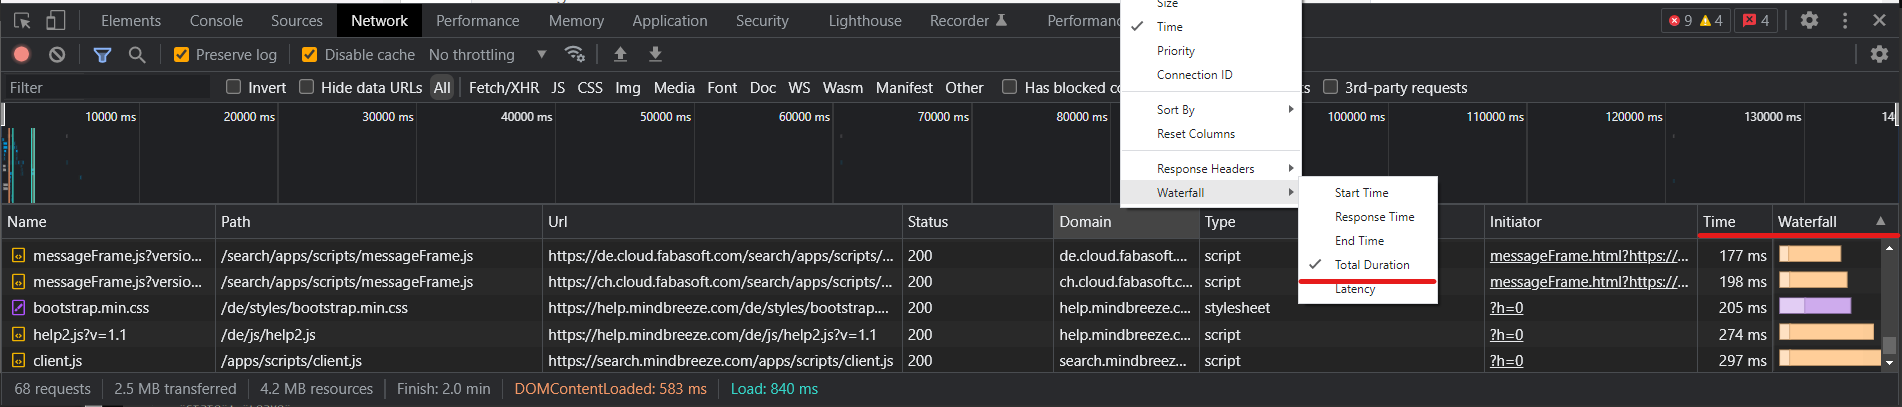
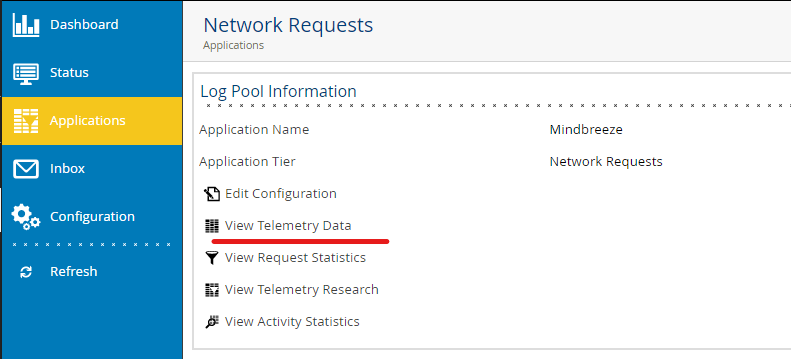
In AppTelemetry, go to the "Network Requests" LogPool and select "View Telemetry Data".
To get a better overview of the requests, filter by the service "Network Requests - webdriver-webdriver" and the current thread ID to get an overview of the entire request.
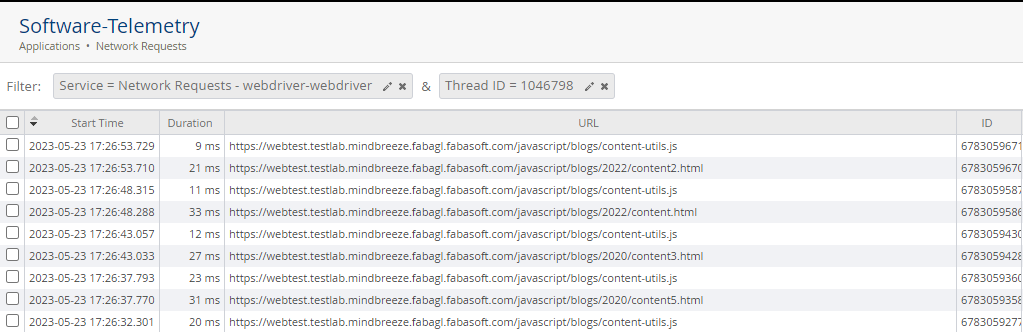
Now compare the URLs to see if the times are roughly in the same range. Note, however, that the crawler handles user interactions faster and these requests are not comparable.
If the times differ greatly, it may be a network problem between the Mindbreeze Appliance and the target server.
If you experience such connectivity problems, contact the appropriate persons in your organization.
Robots.txt
In some cases, a robots.txt file of the website prevents proper crawling.
This can be seen in the crawl.log (see 5.2 Logs) if no other pages appear next to the robots.txt.
![]()
This behavior can be bypassed by configuring "Exclude JavaScript URL (regex)". (.*robots.txt)
Selectors
If "Content Presence Selector" or "Script Trigger Selector" are not executed as expected, the log "/current/log-webdriver-webdriver/current/chromedriver-logs/driver-actions.log" should be checked.
In this log file, look for the method: "isElementPresent". This is where the selectors are processed. In case of syntax errors, these would be displayed in the leave event.

It is important to note that selectors should only be specified with single quotes. If double quotes are used, they must be escaped beforehand with "\".
Content Presence Selector always present
In some cases, scripts may not be executed and incorrect content may be indexed.
This happens when the Content Presence Selector is already available in the DOM but not yet displayed. This can cause the execution of the script to fail and the content to be indexed immediately.
An example of this would be a pop-up on a web page that is to be clicked away. However, the content to be indexed, including the "Content Presence Selector", is already loaded in the DOM (advertising banner).
In this case, the "Content Presence Selector" must be selected more precisely and adjusted accordingly for the element to be removed.
Content Presence Selector not definable
If a "Content Presence Selector" cannot be defined (changing IDs, content always in the DOM, ...), an HTML element can also be defined by means of scripts in certain cases, which then acts as a "Content Presence Selector".
However, this should only be used if there is no other possibility to define a selector.
if (!document.getElementById('banner') {
document.body.appendChild(document.createElement('exit'));
}
Examples
Valid Examples
XPath:
//*[@id=’content’]
//*[@id=\"content\"]
CSS:
a[href^=’https’]
a[href^=\"https\"]
Invalid Examples
XPath:
//*[@id="content"]
CSS:
a[href^="https"]
Sitemaps
If sitemaps are imported from a filesystem and not with a URL, then the root host must be specified explicitly in the "Additional Network Resources Hosts" because it cannot be determined by the URL.
Error messages during crawling
net::ERR_ABORTED
Sometimes for documents in chromedriver-network.csv the "Status Code Description" "net:ERR_ABORTED" is displayed.
If this is the case, you have to look specifically at the columns "Website URL" and "Network Resource URL" which show the requested URL and the current URL.
These are usually different since the current URL represents the requested resource (jpg, js, svg, redirected url, ...).
These URLs can now be searched for in the cdp-logs.csv document to get a detailed description of the error.
net::ERR_BLOCKED_BY_CLIENT.Inspector
When this error occurs, specific domains have not been enabled for the crawler. This happens due to the configured "Additional Network Resources Hosts" setting.
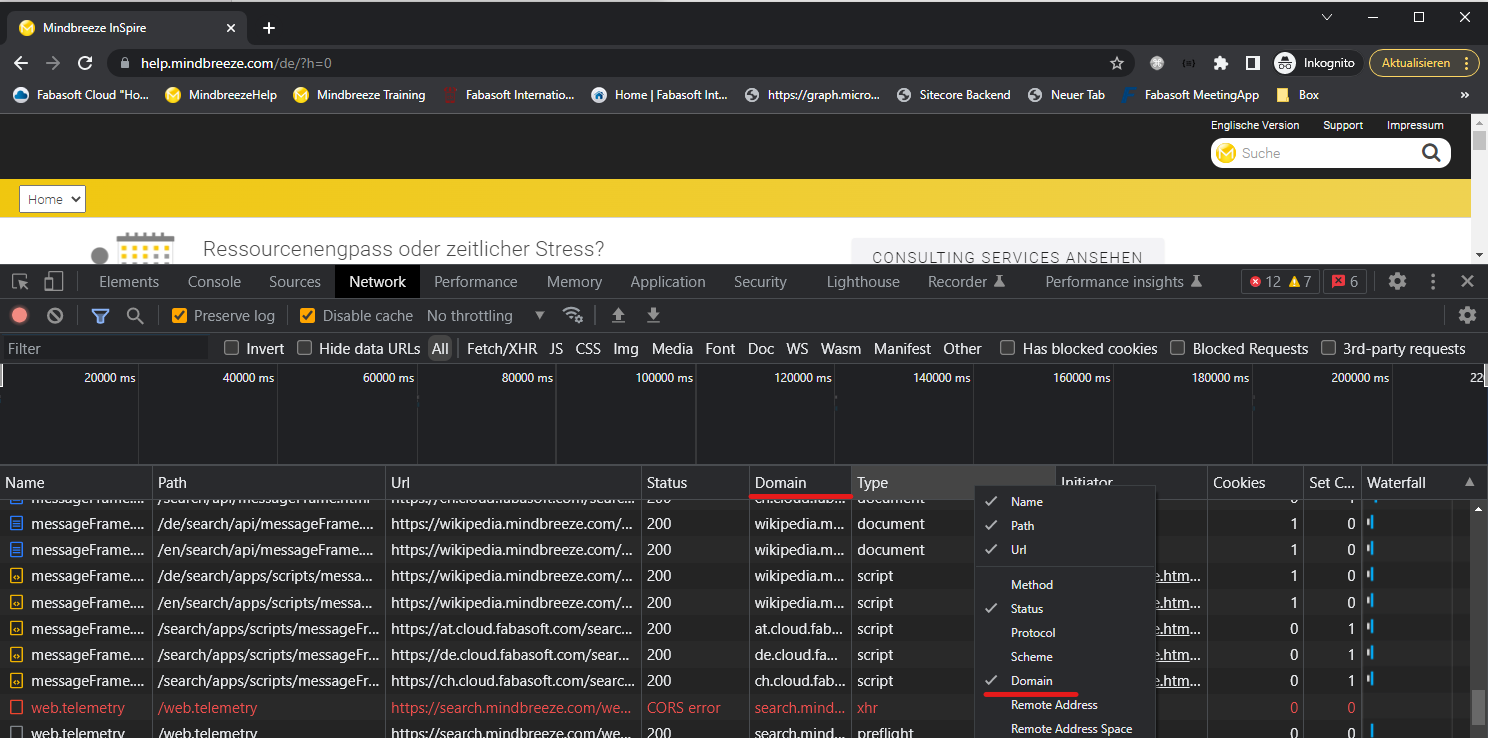
To find out all the required domains, Chrome's Developer Tools (F12) can be used to filter by domains.
To ensure correct behavior of the crawler, ALL domains must be added.
- Open a new incognito tab and the Developer Tools with F12
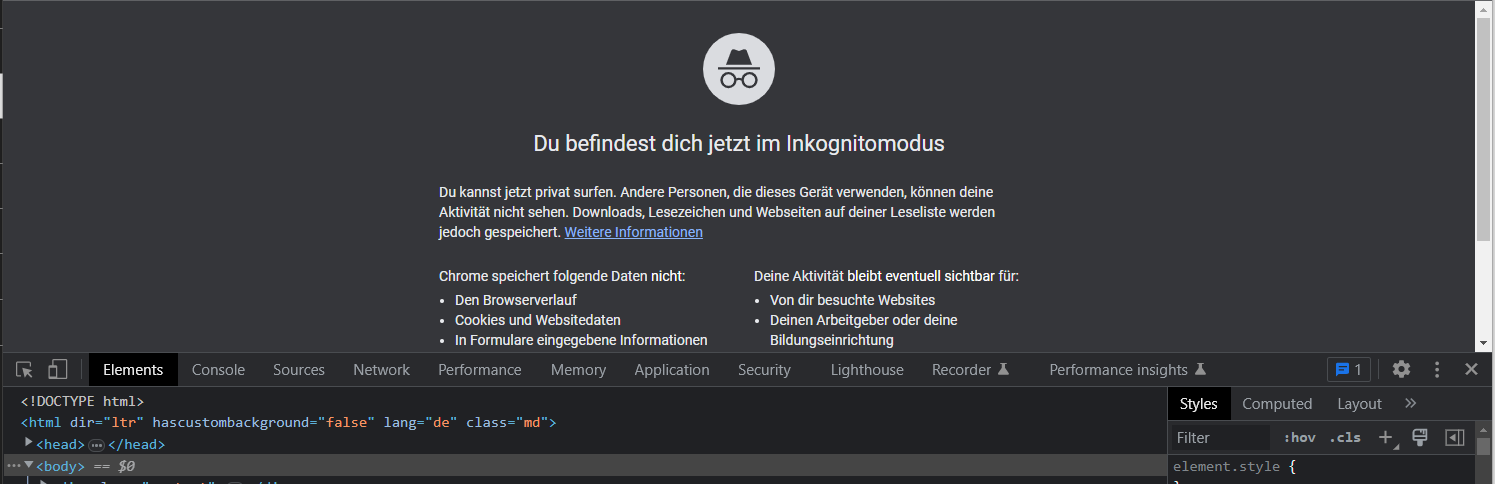
- Navigate to the desired website and then to the "Network" tab
- If the Domain tab is not already present, add this to the existing options by right-clicking the tab.