Sure, you can handle it. But should you?
Let our experts manage the tech maintenance while you focus on your business.
Let our experts manage the tech maintenance while you focus on your business.
Mindbreeze InSpire G7
Tutorial Video “First Startup and Support”
Learn how to install a Mindbreeze InSpire appliance and perform the initial configuration. We will show you how to set up the network and which Mindbreeze support platforms are available.
https://www.youtube.com/watch?v=IiqqxPZeS_g
Preparation
Please find inside a short guide to help you prepare your infrastructure for Mindbreeze InSpire.
Please provide us with the desired fully qualified host names for Mindbreeze InSpire (e.g. search.companyname.com), the technical contact for the implementation and suitable dates for the on-site support via our Mindbreeze InSpire contact form: https://www.mindbreeze.com/inspire-contact. Please also provide us with all data sources that you would like to link to the search. If necessary, also provide us with the authentication mechanism to be used for the search (e.g. Kerberos, SAML, etc.).
Necessary hardware resources
- Mindbreeze InSpire is envisaged for installation in a 19” server rack.
2RU are required – please reserve this space. - We recommend making two power connections available for the Mindbreeze InSpire server to guarantee a failsafe power supply (each 750W rated output).
- If possible, please prepare 2 Ethernet LAN connections so that the network bonding can be configured. For this both connections must be in the same sub-network. An Ethernet LAN connection is essential.
- To connect the Remote Management Interface (iDRAC), you require a 3rd Ethernet port. Please make sure that it is assigned a correct IP address (DHCP/manual). The assigned IP address can then be viewed on the front panel display or in BIOS. This IP is mandatory for the initial contact with our consulting team.
Mindbreeze Service Users
For Kerberos-based authentication with Active Directory you must set up a service user in Active Directory, e.g. mindbreeze.service. Please ensure that the following requirements are met:
- There must be an NTP server that is time synchronous with your Active Directory server and that the Mindbreeze InSpire appliance can access.
- The user exists in Active Directory
- The user has the service principal name
HTTP/<fully qualified host name for Mindbreeze InSpire>
As Active Directory domain administrator you can set the service principal name in a Windows prompt with the following command:
setspn –s HTTP/<full qualified hostname for Mindbreeze InSpire><domain>\<mindbreeze.service>
Sample:
setspn –s HTTP/search.companyname.com company\mindbreeze.service - The fully qualified hostname must have a DNS listing.
- The service user must have the “Trusted for Delegation (Kerberos only)” attribute set. You can set the attribute “Trusted for Delegation (Kerberos only)” for the user in the Microsoft Management Console under “Active Directory Users and Computers”.
Optional Service User
To crawl the data sources, users with full read access rights for all data to be indexed should also be created. These are only used by Mindbreeze to index data.
Firewall Configuration
Please ensure that the following network connections are activated for the Mindbreeze InSpire server:
- As a minimum, port 443 for the Mindbreeze Client Service must be accessible by all users
- Port 8443 and 22 are accessible by administrators
- Port 2222 is available for synchronization of InSpire Appliances
- Ports 88 and 389 on all Active Directory servers must be accessible by the Mindbreeze InSpire Service
- Among data sources, other services and the Mindbreeze InSpire Appliance appropriate ports must be unlocked (e.g. NTP: Port 123)
Technical Requirements
Electrical and Other Technical Requirements for installing your Mindbreeze InSpire Appliance.
Preparation
Your Mindbreeze InSpire Appliance must be installed in a location meeting the temperature, electrical, refrigeration, and other requirements shown in the following tables.
Requirements for Mindbreeze InSpire R760
Requirement | Mindbreeze InSpire | ||||||||||||||||||||||||||||||||||||||||
Typical Thermal Dissipation |
| ||||||||||||||||||||||||||||||||||||||||
Operating Temperature Range for Altitudes below 900 m (below 2953 ft) | 10 - 35 °C (50 - 95 °F) without direct sunlight on the devices. Attention: The maximum temperature is reduced by 1 °C / 300 m (33.8 °F / 984 ft) above 900 m (2953 ft). | ||||||||||||||||||||||||||||||||||||||||
Non-operational temperature limits | -40 to 65 °C (-40 °F to 149 °F). | ||||||||||||||||||||||||||||||||||||||||
Operating Relative Humidity Range (non-condensing at all times) | 8% relative humidity with -12 °C (10.4 °F) minimum dew point to 80% relative humidity with 21 °C (69.8 °F) maximum dew point. | ||||||||||||||||||||||||||||||||||||||||
Storage Relative Humidity Range (non-condensing at all times) | 5% to 95% relative humidity at a maximum dew point of 27 °C (80.6 °F). | ||||||||||||||||||||||||||||||||||||||||
Maximum Operating Vibration | 0.21 Grms at 5 Hz to 500 Hz over 10 minutes (all operating directions). | ||||||||||||||||||||||||||||||||||||||||
Maximum Storage Vibration | 1.88 Grms at 10 Hz to 500 Hz over 15 minutes (all six sides tested). | ||||||||||||||||||||||||||||||||||||||||
Maximum Operating Shock | Six consecutive impacts with 6 G of up to 11 ms duration in positive and negative X, Y and Z directions. | ||||||||||||||||||||||||||||||||||||||||
Maximum Storage Shock | Six consecutive impacts with 71 G of up to 2 ms duration in the positive and negative X, Y and Z directions (one impact on each side of the system). | ||||||||||||||||||||||||||||||||||||||||
Maximum Operating Altitude | 3050 m (10006 ft). | ||||||||||||||||||||||||||||||||||||||||
Maximum Storage Altitude | 12000 m (39370 ft). | ||||||||||||||||||||||||||||||||||||||||
Maximum System Power Consumption (peak current) |
| ||||||||||||||||||||||||||||||||||||||||
Input Voltage (AC) | 100 – 240 V | ||||||||||||||||||||||||||||||||||||||||
Frequency (Storage Clock Rate) | 50/60 Hz | ||||||||||||||||||||||||||||||||||||||||
Casing weight | 35.2 kg (77.60 lb) at maximum configuration. | ||||||||||||||||||||||||||||||||||||||||
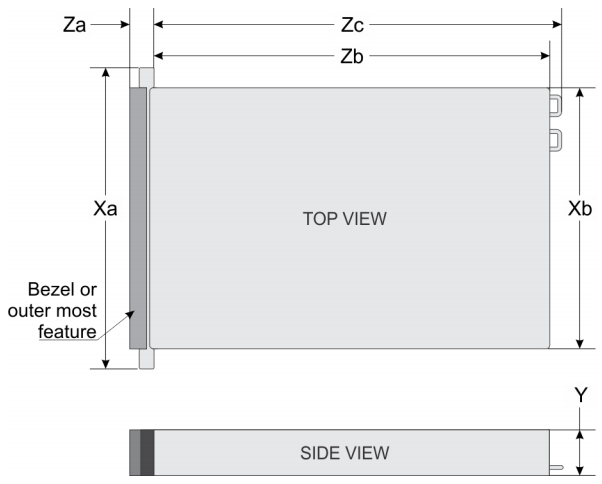
Casing dimensions |
| ||||||||||||||||||||||||||||||||||||||||
Industry Rack Height | 2U | ||||||||||||||||||||||||||||||||||||||||
Requirements for Mindbreeze InSpire R750
Requirement | Mindbreeze InSpire | ||||||||||||||||||||||||||||||
Typical Thermal Dissipation |
| ||||||||||||||||||||||||||||||
Operating Temperature Range for Altitudes below 900 m (below 2953 ft) | 10 - 35 °C (50 - 95 °F) without direct sunlight on the devices. Attention: The maximum temperature is reduced by 1 °C / 300 m (33.8 °F / 984 ft) above 900 m (2953 ft). | ||||||||||||||||||||||||||||||
Non-operational temperature limits | -40 to 65 °C (-40 °F to 149 °F). | ||||||||||||||||||||||||||||||
Operating Relative Humidity Range (non-condensing at all times) | 8% relative humidity with -12 °C (10.4 °F) minimum dew point to 80% relative humidity with 21 °C (69.8 °F) maximum dew point. | ||||||||||||||||||||||||||||||
Storage Relative Humidity Range (non-condensing at all times) | 5% to 95% relative humidity at a maximum dew point of 27 °C (80.6 °F). | ||||||||||||||||||||||||||||||
Maximum Operating Vibration | 0.21 Grms at 5 Hz to 500 Hz over 10 minutes (all operating directions). | ||||||||||||||||||||||||||||||
Maximum Storage Vibration | 1.88 G at 10 Hz to 500 Hz over 15 minutes (all six sides tested). | ||||||||||||||||||||||||||||||
Maximum Operating Shock | Six consecutive impacts with 6 G of up to 11 ms duration in positive and negative X, Y and Z directions. | ||||||||||||||||||||||||||||||
Maximum Storage Shock | Six consecutive impacts with 71 G of up to 2 ms duration in the positive and negative X, Y and Z directions (one impact on each side of the system). | ||||||||||||||||||||||||||||||
Maximum Operating Altitude | 3048 m (10000 ft). | ||||||||||||||||||||||||||||||
Maximum Storage Altitude | 12000 m (39370 ft). | ||||||||||||||||||||||||||||||
Maximum System Power Consumption (peak current) |
| ||||||||||||||||||||||||||||||
Input Voltage (AC) | 100 – 240 V | ||||||||||||||||||||||||||||||
Frequency (Storage Clock Rate) | 50/60 Hz | ||||||||||||||||||||||||||||||
Casing weight | 35.2 kg (77.60 lb) at maximum configuration. | ||||||||||||||||||||||||||||||
Casing dimensions |
| ||||||||||||||||||||||||||||||
Industry Rack Height | 2U | ||||||||||||||||||||||||||||||
Requirements for Mindbreeze InSpire R740
Requirement | Mindbreeze InSpire | ||||||||||||
Typical Thermal Dissipation | 2891 BTU/hr | ||||||||||||
Operating Temperature Range | 10°C to 35°C (50°F to 95°F) with a maximum temperature gradient of 20°C/h (68°F/h). Attention: The maximum temperature is reduced by 1°C/300 m (1°F/547 ft) above 950 m (3,117 ft). | ||||||||||||
Non-operational temperature limits | –40°C to 65°C (–40°F to 149°F) with a maximum temperature gradient of 20°C/h (68°F/h). Attention: The maximum temperature is reduced by 1°C/300 m (1°F/547 ft) above 950 m (3,117 ft). | ||||||||||||
Operating Relative Humidity Range (non-condensing at all times) | 10% to 80% relative humidity with 29°C (84.2°F) maximum dew point. | ||||||||||||
Storage Relative Humidity Range (non-condensing at all times) | 5% to 95% relative humidity with 33°C (91°F) maximum dew point. | ||||||||||||
Maximum Operating Vibration | 0.26 Grms at 5 Hz to 350 Hz (all three axes). | ||||||||||||
Maximum Storage Vibration | 1.88 G at 10 Hz to 500 Hz for 15 minutes. | ||||||||||||
Maximum Operating Shock | Six consecutive impacts with 6 G of up to 11 ms duration in positive and negative X, Y and Z directions. | ||||||||||||
Maximum Storage Shock | Six consecutive impacts with 71 G of up to 2 ms duration in the positive and negative X, Y and Z directions (one impact on each side of the system). | ||||||||||||
Maximum Operating Altitude | 3048 m (10,000 ft) | ||||||||||||
Maximum Storage Altitude | 12,000 m (39,370 ft) | ||||||||||||
Maximum System Power Consumption | 750 W | ||||||||||||
Input Voltage (AC) | 100 - 240 V AC, autoranging | ||||||||||||
Frequency (Storage Clock Rate) | 50/60 Hz | ||||||||||||
Case Weight | 22.5 kg (49,61 lb) at maximum configuration. | ||||||||||||
Case Dimensions |
| ||||||||||||
Industry Rack Height | 2U |
Mindbreeze Management Center
Preparation
The Mindbreeze InSpire Management Center is the interface where administration and management tasks can be performed on a Mindbreeze InSpire Search Appliance.
Browser Support
The Mindbreeze InSpire Management Center is fully supported in the following browsers:
- Google Chrome
- Mozilla Firefox
- Apple Safari
Firewall Configuration
For accessing the Mindbreeze InSpire Management Center make sure that the following network ports are accessible on the connected Mindbreeze InSpire server network interfaces:
Admin and Management Ports:
- Port 8443 (HTTPS) for accessing the Mindbreeze Management Center
- Port 22 (SSH) for accessing the Mindbreeze System Configuration Interface through one of our consultants.
General Mindbreeze Ports:
- Port 443 (HTTPS) for accessing the Mindbreeze Client
- Port 2222 (SSH) for synchronization between Mindbreeze Appliances
For using the iDRAC interface of the Mindbreeze InSpire Server the following Ports have to be accessible on the Mindbreeze InSpire Server’s iDRAC network interface:
- Port 443 (HTTPS) for accessing the iDRAC Web Interface
- Port 5900 (TCP, UDP) for accessing the iDRAC Virtual Console
- Port 8080 (TCP, UDP) for accessing the iDRAC Virtual Console
Setup of the Mindbreeze InSpire appliance
In general, the setup of the Mindbreeze InSpire appliance is dependent on the network environments and requirements of your company. In the most cases it is expected by the network administrator of your company to know the exact details that are needed to perform the network configuration. This includes important details about the network environment of your company, the requirements that should be met by the appliance and expected network administrator knowledge.
Therefore, please be aware that the following chapters only describe the basic setup of the appliance and additional setup options that could be necessary based on the network environment and requirements of your company.
It is also possible to perform the setup of the Mindbreeze InSpire appliance via Mindbreeze Consulting Services: Carefree Renewal
Basic setup
Step 1: Connect the appliance with wires
The Mindbreeze InSpire appliance has several network interface cards (NICs) available. For example, the Mindbreeze InSpire R760 appliance has the following NICs:
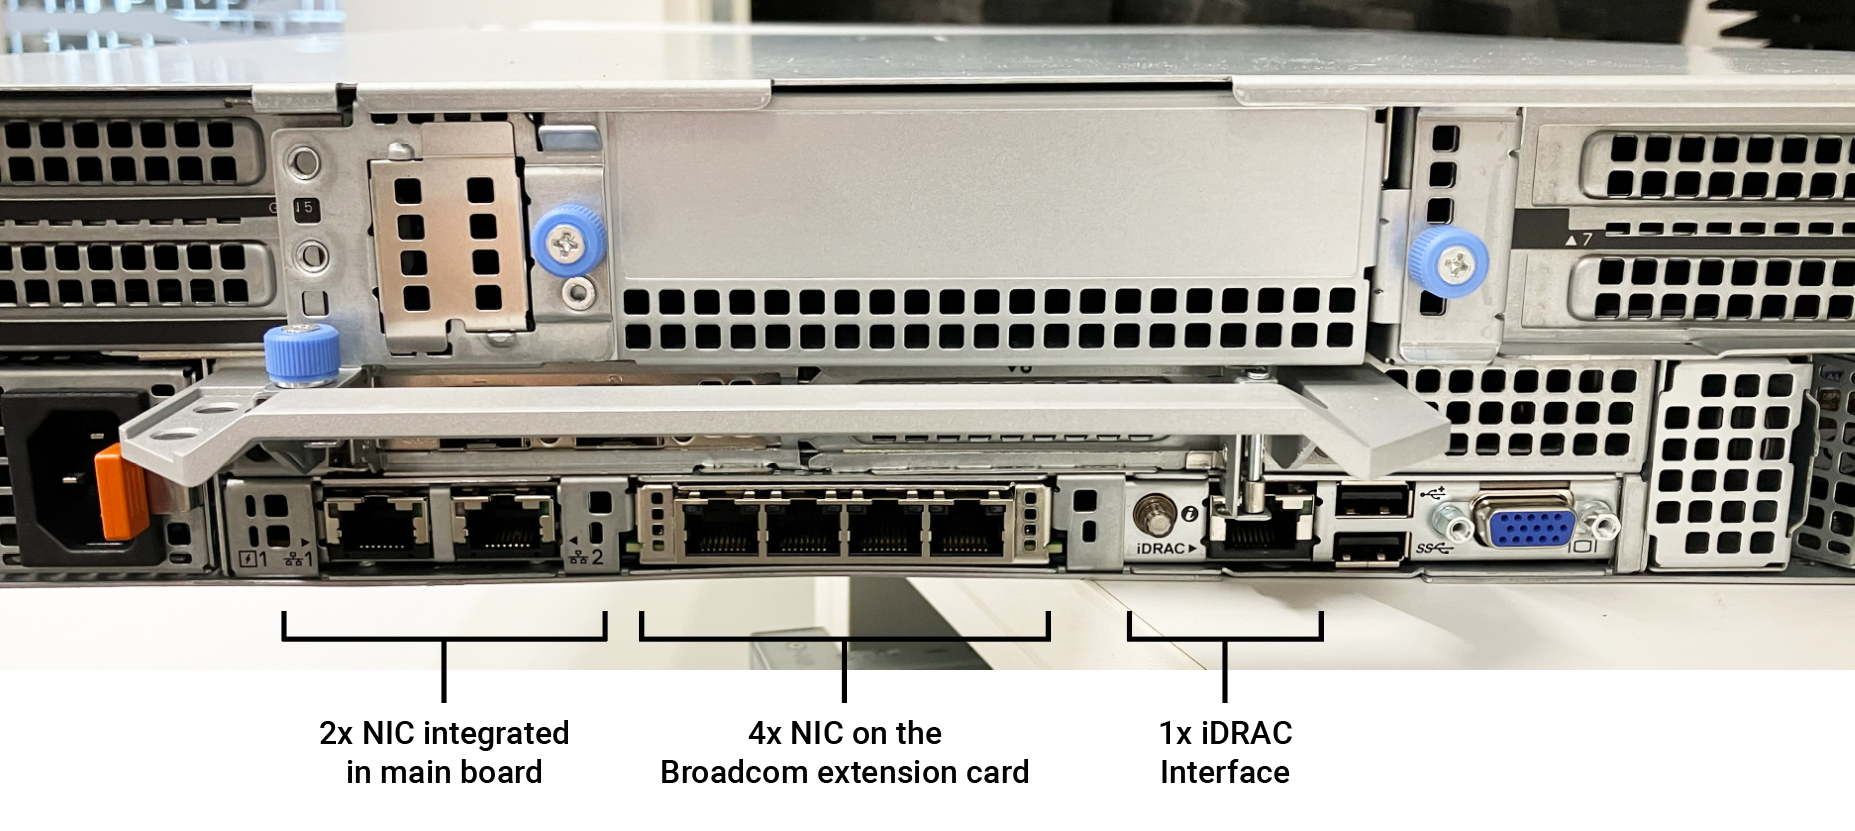
The following table describes the minimal configuration that is needed:
Network |
|
Power | 2x PSUs with a separate power circuit for each PSU. |
By default, the Mindbreeze InSpire NICs are set to DHCP. If iDRAC is to be used to obtain the host MAC address for reserving a DHCP lease, please see the chapter Configuration via iDRAC.
The Mindbreeze InSpire appliance can also handle a bonding interface with several LAN cables automatically. In this case, it is sufficient to connect the appliance with the LAN cables and then continue the basic setup with Step 2: Find/Configure the IP address for the iDRAC interface.
The appliance can also handle other types of connections automatically, like a fiberglass connection. In the case of a fiberglass connection, the NICs on the Broadcom extension card must be changed to a fiberglass module. After this, the basic setup can be performed as described in this and the next chapter.
Step 2: Find/Configure the IP address for the iDRAC interface
After the necessary wires were connected to the appliance, the next step is to find or configure the IP address of iDRAC to enable remote administration of the appliance.
To do this, physical access to the Mindbreeze InSpire appliance is necessary, since the IP address of the iDRAC interface can be viewed and configured locally on the front panel LCD of the appliance. Depending on, if DHCP is available or a static IP is needed, the network administrator must navigate differently through the menu items. The following chapters describe how to navigate through the menu items to find and configure the IP address of iDRAC.
DHCP is available
If DHCP is available, the iDRAC IP can be found and configured in the front panel LCD of the appliance through the following menu items:
- Home
- View
- iDRAC IP
- IPv4 | IPv6
- Select IPv4 and the iDRAC IP that can be configured will look like this, for example:

With this information, you can find out which IP address was leased from the DHCP server for the NICs.
More detailed instructions on how to check the iDRAC IP address on the LCD panel can also be found here.
DHCP is not available and a static IP address is needed
If DHCP is not available, a static IP address can be found and manually configured in the front panel LCD of the appliance through the following menu items:
- Home
- Setup
- iDRAC
- DHCP | Static IP
- Choose the option “Static IP” and the static IP that can be configured will look like this, for example:
After the configuration of the static IP address, it is possible to configure a sub network mask in the next screen or by going through the following menu items:
- Home
- Setup
- iDRAC
- Static IP
- Confirm the configured static IP address by going to the end of the IP address and clicking the checkmark.
- Now you can configure the sub network mask, that can look like this, for example:

Following the configuration of the sub network mask, the gateway can be configured in the next screen or by going through the following menu items:
- Home
- Setup
- iDRAC
- Static IP
- Confirm the configured static IP address and sub network mask by going to the end of the IP address and then of the sub network mask and click the checkmark.
- Now you can configure the gateway, that can look like this, for example:

More detailed instructions on how to manually configure the iDRAC IP address on the LCD panel can also be found here.
Now with the IP address found and remote access to the appliance established, the basic setup is completed.
Additional setup options
Finding the MAC addresses of the Network Interface Cards (NICs)
The MAC addresses of the Network Interface Cards can either be found via the front panel LCD of the Mindbreeze InSpire appliance or via the iDRAC Admin portal.
Front panel LCD of the Mindbreeze InSpire appliance
To find the MAC addresses, go through the following menu items:
- Home
- View
- MAC
- iDRAC| iSCSI1 | iSCSI2 | iSCSIn | NET1 | NET2 …NETn.
- Choose one of the options, like “NET1”, “NET2” or others to find the MAC adresses.
iDRAC Admin portal
Go to the iDRAC Admin portal via this link:
https://<iDRAC_IP>:443
Hint: If a certificate error is displayed after the iDRAC Admin portal was opened with the link, make sure to install the necessary SSL certificate for iDRAC. More information can be found in the following Dell documentation: https://www.dell.com/support/manuals/en-us/idrac9-lifecycle-controller-v6.x-series/idrac9_6.xx_ug/ssl-server-certificates?guid=guid-3154dbfc-906d-4444-9341-356e2d7dc54e&lang=en-us
Then log in with the following credentials:
- Username: root
- Password: Appliance123
In the iDRAC Admin portal, the MAC addresses can be found in the menu item “System” in the section “Details”:

Manual configuration of an IPv4 address
By default, the IPv4 configuration is performed automatically and should only be changed if necessary.
If, for example, a specific IPv4 address is needed or should be used, the network administrator can configure the IPv4 address manually.
To manually configure the IPv4 address, two options are available:
- via iDRAC
- via physical access with a monitor and keyboard
Both options are described in the following chapters.
Configuration via iDRAC
Administrators can use the virtual console in the iDRAC Admin portal to configure the IPv4 address manually.
Go to the iDRAC Admin portal with the link “https://<iDRAC_IP>:443” and log in with the following username and password:
- Username: root
- Password: Appliance123
Hint: If a certificate error is displayed after the iDRAC Admin portal was opened with the link, make sure to install the necessary SSL certificate for iDRAC. More information can be found in the following Dell documentation: https://www.dell.com/support/manuals/en-us/idrac9-lifecycle-controller-v6.x-series/idrac9_6.xx_ug/ssl-server-certificates?guid=guid-3154dbfc-906d-4444-9341-356e2d7dc54e&lang=en-us
Then, go to the virtual console.
Log into the virtual console with the following credentials:
- Username: config
- Password: Appliance123
Hint: Please be aware that a system reboot will be performed after the network settings are configured and the session with the “config” user is closed.
After a successful login, the NetworkManager TUI should be shown with the following options available:
Option | What can I configure? |
Edit a connection | Existing connections |
Activate a connection | New connections |
Set system hostname | System Hostnames |
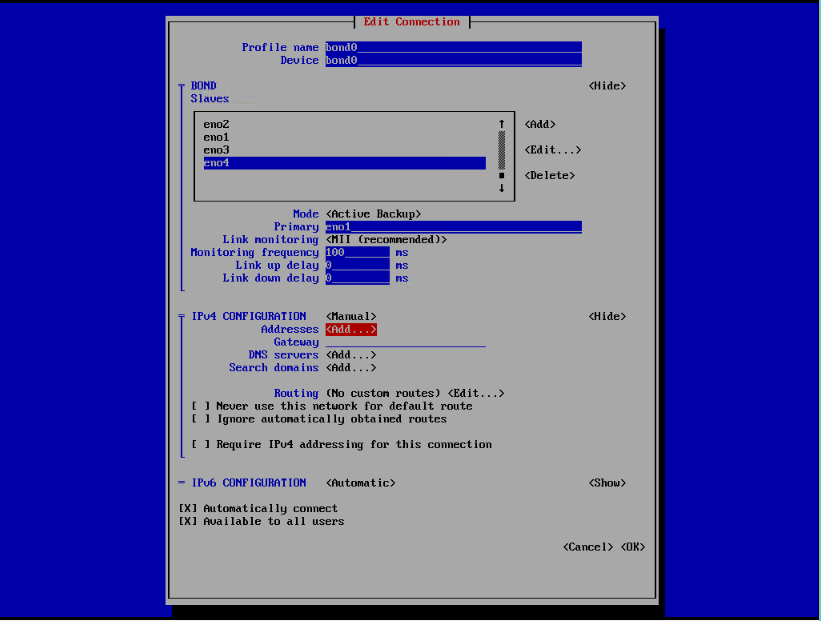
Continue with the option “Edit a connection”. Now this screen is shown:

Field | Description |
Bond Ports | To add, edit or delete a bond port. Attention: By default, the port “bond-slave” contains automatically all wired connections to the Mindbreeze InSpire appliance and is sufficient for most use case. In such cases where the adjustments of the bond ports is necessary to suit the network requirements of the company, the adjustments can be performed in this interface. |
Mode | Defines the bonding mode. In the mode “Active Backup” only one connection is active. If this connection goes down, a second connection will take over. |
Primary | Defines the primary port to be used. |
Link monitoring | Advanced setting for the bonding configuration. For the most cases, the default value for this setting is sufficient. |
Monitoring frequency | Advanced setting for the bonding configuration. For the most cases, the default value for this setting is sufficient. |
Link up delay | Advanced setting for the bonding configuration. For the most cases, the default value for this setting is sufficient. |
Link down delay | Advanced setting for the bonding configuration. For the most cases, the default value for this setting is sufficient. |
Cloned MAC address | Defines cloned MAC addresses. For the most cases, the configuration of this setting is not necessary. |
IPv4 Configuration | Configures the IPv4 address. Hint: This field is set to “<Automatic>” by default. Only change this field to “<Manual>”, if the IPv4 address must be configured manually. |
IPv6 Configuration | Please be aware, that IPv6 is not supported in the Mindbreeze InSpire appliance. |
Change the field “IPv4 Configuration” from “<Automatic>” to “<Manual>”. The following fields are now available for the configuration of the IPv4 address:
Field | Description |
Addresses | Defines the IP address to be used. Make sure to define the IP address in the following format: <IPv4 address>/<Number of bits to be used for netmask> Example: 192.168.1.123/24 Hint: Please be aware that the configuration of multiple IP addresses is not supported by Mindbreeze InSpire. Attention: The configuration of a IPv6 address is not supported by Mindbreeze InSpire. |
Gateway | Defines the gateway to be used. |
DNS servers | Defines the DNS server(s) to be used. Hint: It is recommended to configure and use the local DNS servers in order to avoid using fallback DNS servers like 8.8.8.8. |
Search domains | Defines the search domains to be used. |
Routing | Defines custom routes that are to be used. |
Never use this network for default route | Defines, if the network is used as a default route. |
Ignore automatically obtained routes | Defines, if automatically obtained routes should be ignored. |
Ignore automatically obtained DNS parameters | Defines, if automatically obtained DNS parameters should be ignored. |
Require IPv4 addressing for this connection | Defines, if IPv4 addressing should be required for this connection. |
After that, the manual configuration of the IPv4 address is completed and can be saved. Be aware, that the closing of the NetworkManager TUI window will cause a reboot, regardless of whether changes to the configuration were made.
Configuration via physical access with a monitor and keyboard
If access to iDRAC is not available, it is also possible to configure the IPv4 address manually by connecting the Mindbreeze InSpire appliance with a monitor and keyboard. After the physical connection is established, the configuration can be performed as described in the previous chapter by logging in with the “config” account and choosing the option “Edit a connection” in the NetworkManager TUI.
For more information, see the previous chapter Configuration via iDRAC.
Manual configuration of a system hostname
Based on the network environment of the company, it can be necessary to manually set a system hostname. This is the case, for example, when the DHCP server does not assign hostnames.
To manually set a hostname, access to the NetworkManager TUI will be needed either via iDRAC or via physical access to the Mindbreeze InSpire appliance. More information can be found in the chapter Configuration via iDRAC and in the previous chapter Configuration via physical access with a monitor and keyboard.
In the NetworkManager TUI, choose the option “Set system hostname” and then define a hostname without the domain:
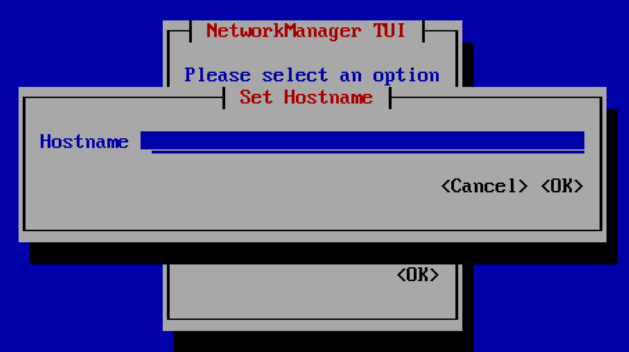
Save the hostname with “OK”.
Possible adjustment of the node settings in the Management Center
After the setup of the Mindbreeze InSpire appliance is completed and the Mindbreeze InSpire Management Center is accessed for the first time, administrators will see a notification about missing settings. Depending on the network configuration of your company, this is a hint that some adjustments of the node settings could be necessary.
For example, the following use cases would need an adjustment of the node settings:
- The domain and hostname of the Mindbreeze InSpire appliance is not compatible or being interfered by the network configuration of your company.
- Users outside of the company’s network should use a different hostname than the users inside the company’s network.
- A different hostname is needed for the communication between nodes.
Attention: Be aware that, if the node settings are not properly configured according to your company’s network configuration, operational problems can occur. It is possible to use Mindbreeze InSpire with improper node settings, but with the increasing use of Mindbreeze InSpire features, problems will occur and troubleshooting will become increasingly difficult and complex. For example, problems can occur in the following areas:
- Management Center functions and login
- Communication between Index Services and Client Services
- Upgrade of the Mindbreeze InSpire appliance
- Functions concerning the use of Large Language Models (LLMs) and Retrieval Augmented Generation (RAG)
Therefore, it is recommended, that the company’s network administrator ensures that the proper node settings are configured after the setup of the Mindbreeze InSpire appliance is completed.
Configuration and adjustment of node settings
To configure and adjust the node settings, access the Management Center as described in the following chapter and then expand the menu item “Setup” in the side navigation. Open the sub menu item “Nodes” to see an overview of all nodes. For the node settings, click the “i” in the column “Actions” of the node to be adjusted. A new window appears where the “Basic Node Information” can be edited via the “Edit” button.

When editing the basic node information, be aware of the following points:
- A Fully Qualified Domain Name (FQDN) should be used that can be resolved by a DNS that is associated with the system.
- In the case of migrating projects, where the domain is still used by the original system, use a temporary domain for the new system to avoid problems during the installation.
- Domains like “.local”, “.localhost” or “.test” are not supported.
Save the changes, to complete the adjustment of the node settings.
For more information about the basic node information, see the documentation Handbook - Distributed Operation (G7) - Basic Node Information.
Management Center
Accessing the Mindbreeze InSpire Management Center
After a successful network configuration the Mindbreeze InSpire Management Center is accessible via the following Secure HTTP Link: https://<ip_address>:8443 . Here the <ip_address> tag is the IP address of one of the connected network interfaces.
For accessing the Mindbreeze InSpire Management Center login credentials are required. By default, the management center can be accessed with “admin” user and “Appliance123” password.
For more information please take a look at the chapters Credentials, Change Password, Create user and Manage roles.

Sections
Below is the short description of the main sections in the Mindbreeze InSpire Management Center.
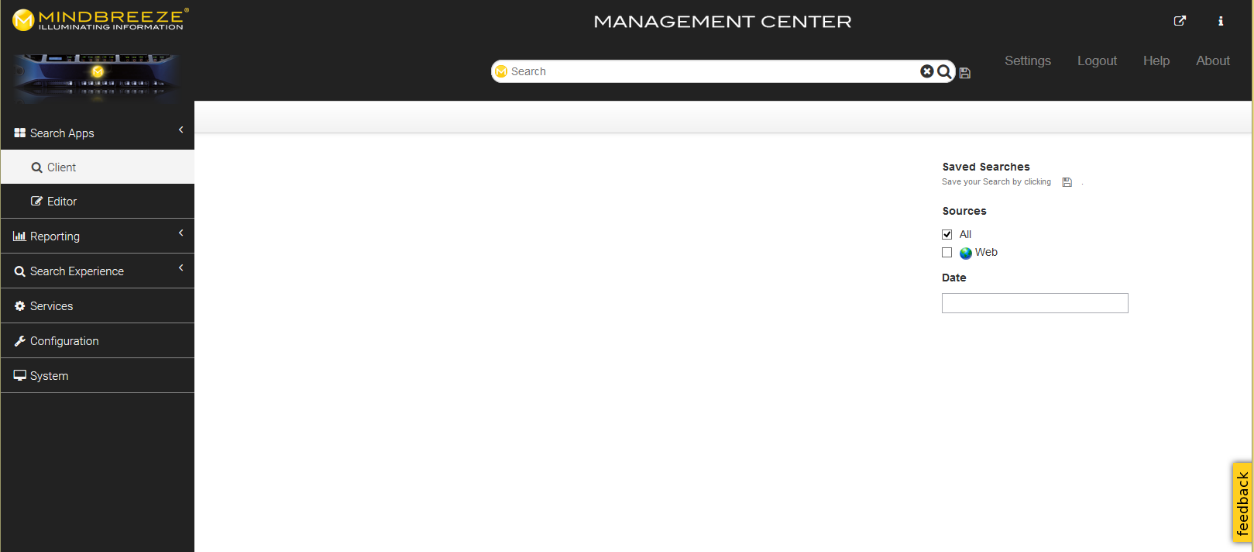
Insight Apps
In this section a preconfigured Mindbreeze Client Service and an Insight App Editor can be accessed.
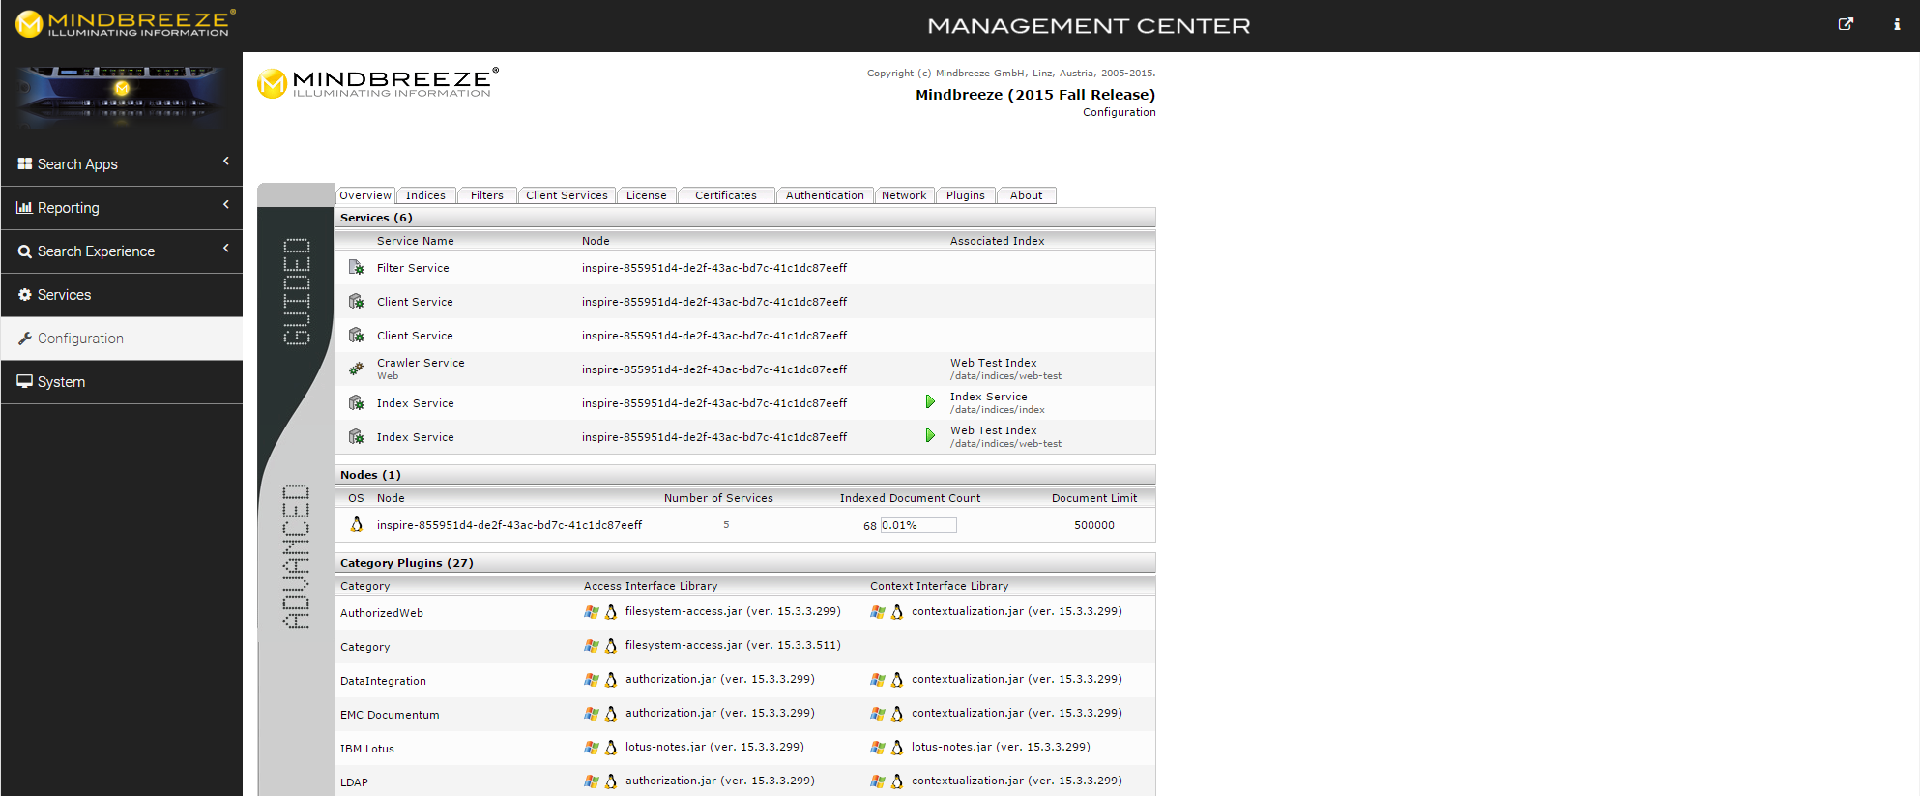
Reporting
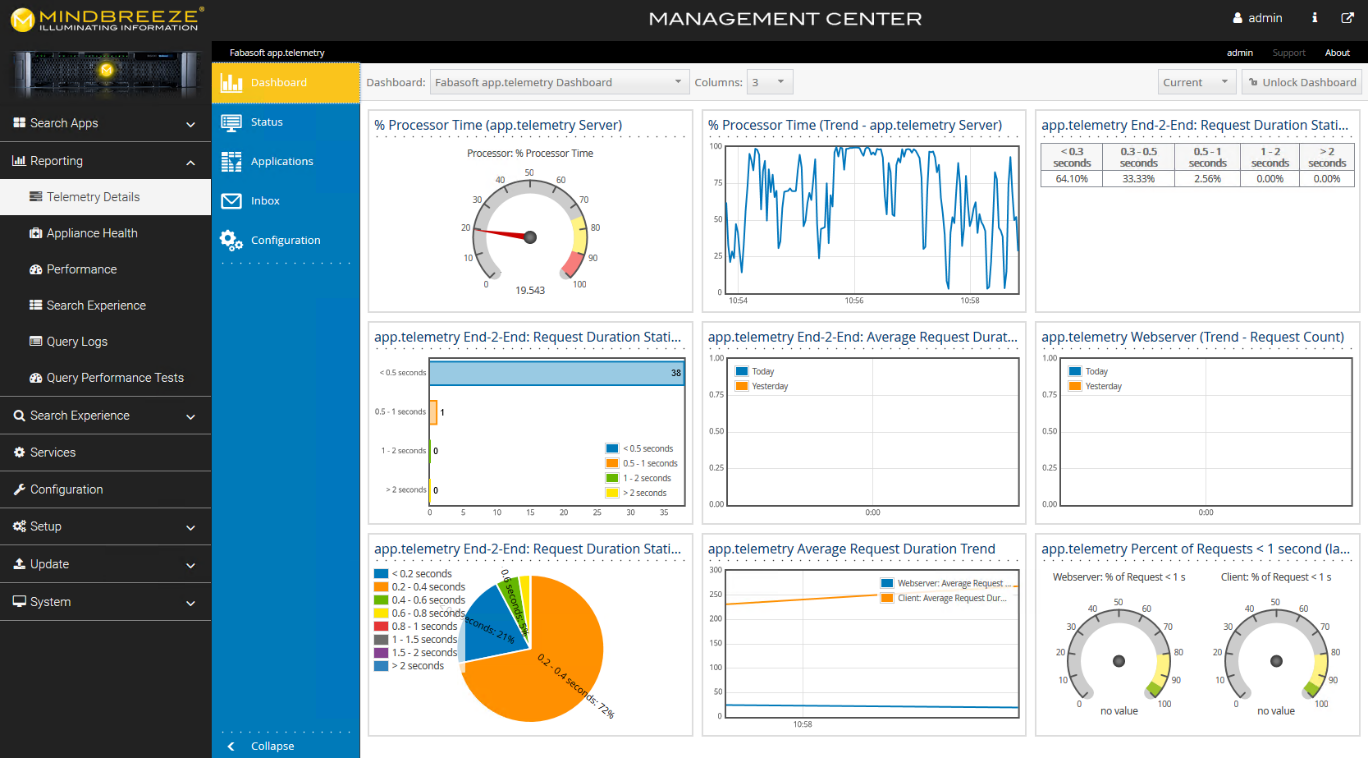
Here you can explore reports, telemetry data and statistics related to the Mindbreeze services.
By default, the PostgreSQL database of app.telemetry uses the user "telemetryuser" with the password "Appliance123".

Search Experience
Various advanced search parameters are defined in this area. The following submenu items are available.
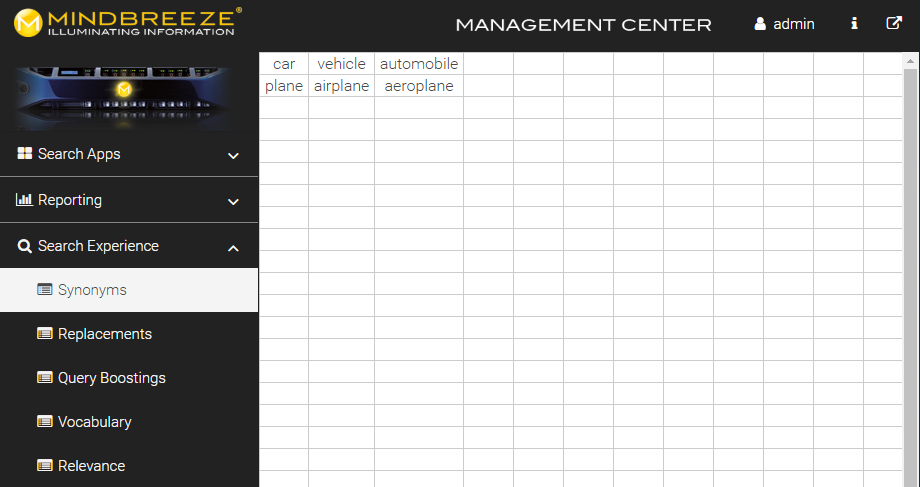
Synonyms
Here you can edit the CSV file that the Synonym Transformer Plugin uses to transform search queries to also search for synonyms.

Replacements
Here you can edit the CSV file that the Replacement Transformer Plugin uses to replace search terms in search queries.

Query Boostings
Here you can edit the CSV file that the Term2DocumentBoost Transformer Plugin uses to increase the relevance of documents with certain metadata depending on the search term.

Vocabulary
Here you can edit the CSV file that the Vocabulary Synonym Transformer Plugin uses to transform the search query to search for synonyms. The differences to the Synonym Transformer Plugin are described here.
Relevance
Here you can use a simple user interface to edit the JSON file used by the Term2DocumentBoost Transformer Plugin to change the relevance model of the documents.
Services
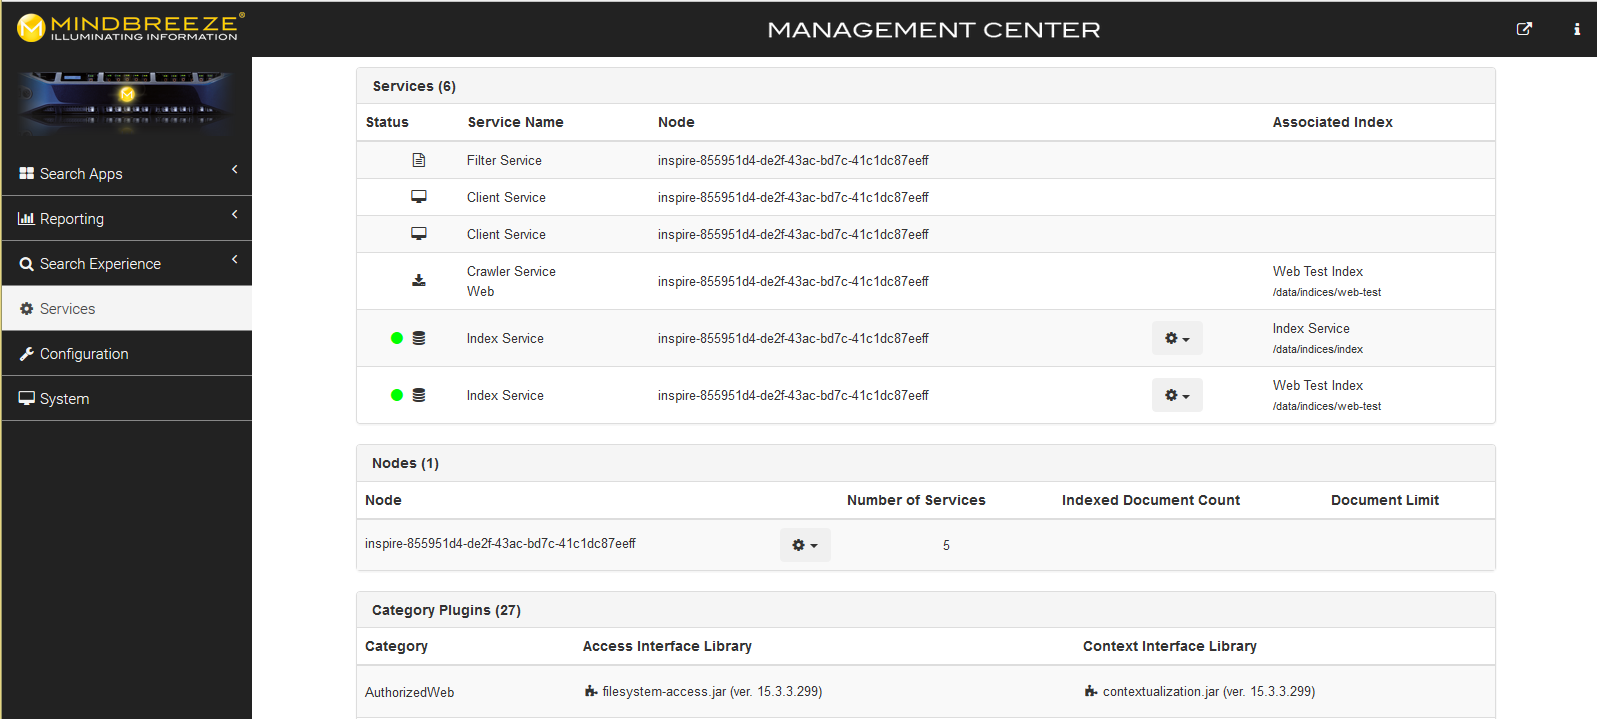
In this section different operations related to the Mindbreeze services can be performed, such as starting and stopping the services or resetting the indices (reindexing).

Configuration
The detailed configuration of the Mindbreeze services and components can be accessed and modified from this section. A detailed description of the configuration settings is available on help.mindbreeze.com.
Setup
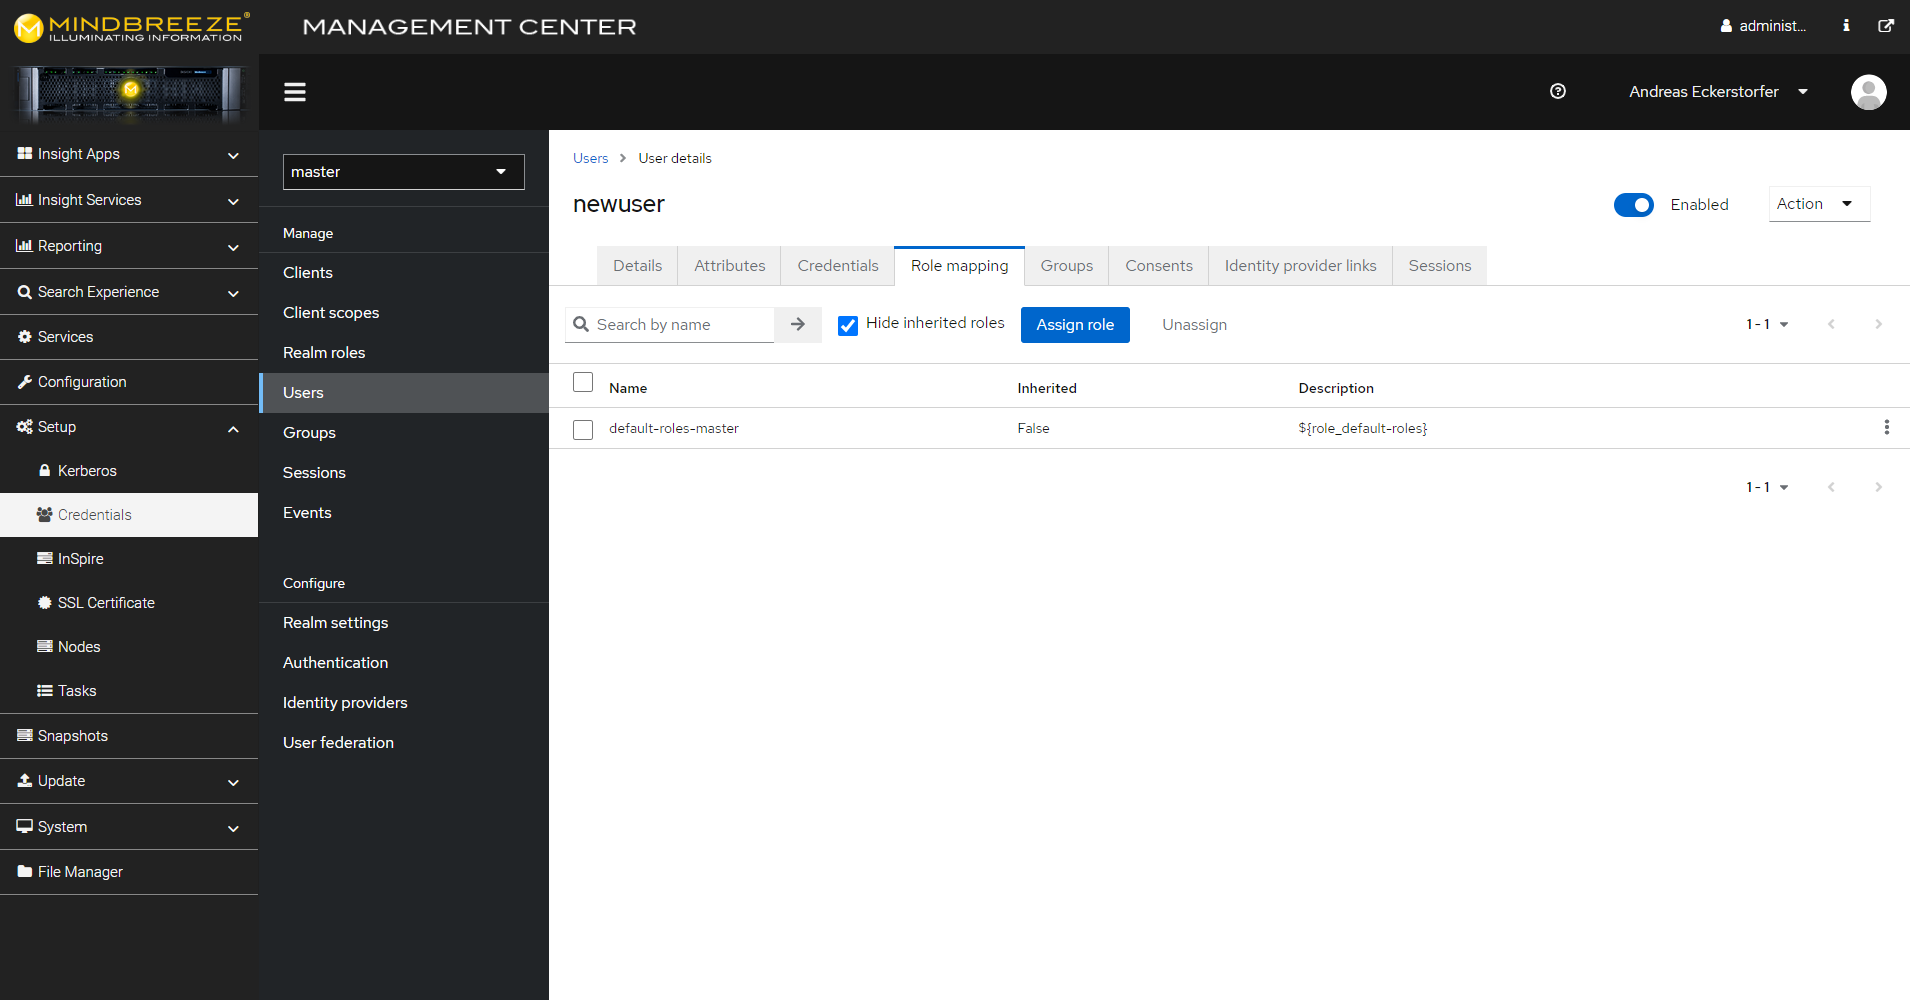
In this section you can setup Kerberos, generate keytabs, configure access to different parts of the appliance, configure a mail server and restart containers.
Kerberos
Kerberos configuration and keytab generation. Please find details in Configuration – Kerberos Authentication.
Credentials
The necessary credentials can be configured here. For more information, see Configuration – Back-End Credentials.
InSpire
For a complete explanation of the „InSpire“ menu item, please proceed to the chapter Mindbreeze InSpire Management.
SSL Certificate
The required SSL certificate can be uploaded here. For more information see Documentation – Mindbreeze InSpire – Tutorial Video “Install SSL certificate”.
Attention: The security header “strict-transport-security” can prevent the connection to the Mindbreeze Management Center, if the same browser has previously connected with a valid SSL certificate and now connects without a valid SSL certificate. If this is the case, use a “clean” browser (e.g. incognito mode) to connect to the Management Center and install a valid certificate.
Nodes
Nodes can be configured and edited here. For more information, see Handbook – Distributed Operation (G7) – Management of Nodes.
Tasks
Tasks can be added and edited here.
Snapshots
Snapshots can be used to back up a Mindbreeze InSpire appliance and migrate it to another appliance if necessary. For more information, see Handbook - Backup & Restore.
Update
Install updates. Please find details in the chapter Mindbreeze InSpire Updates.
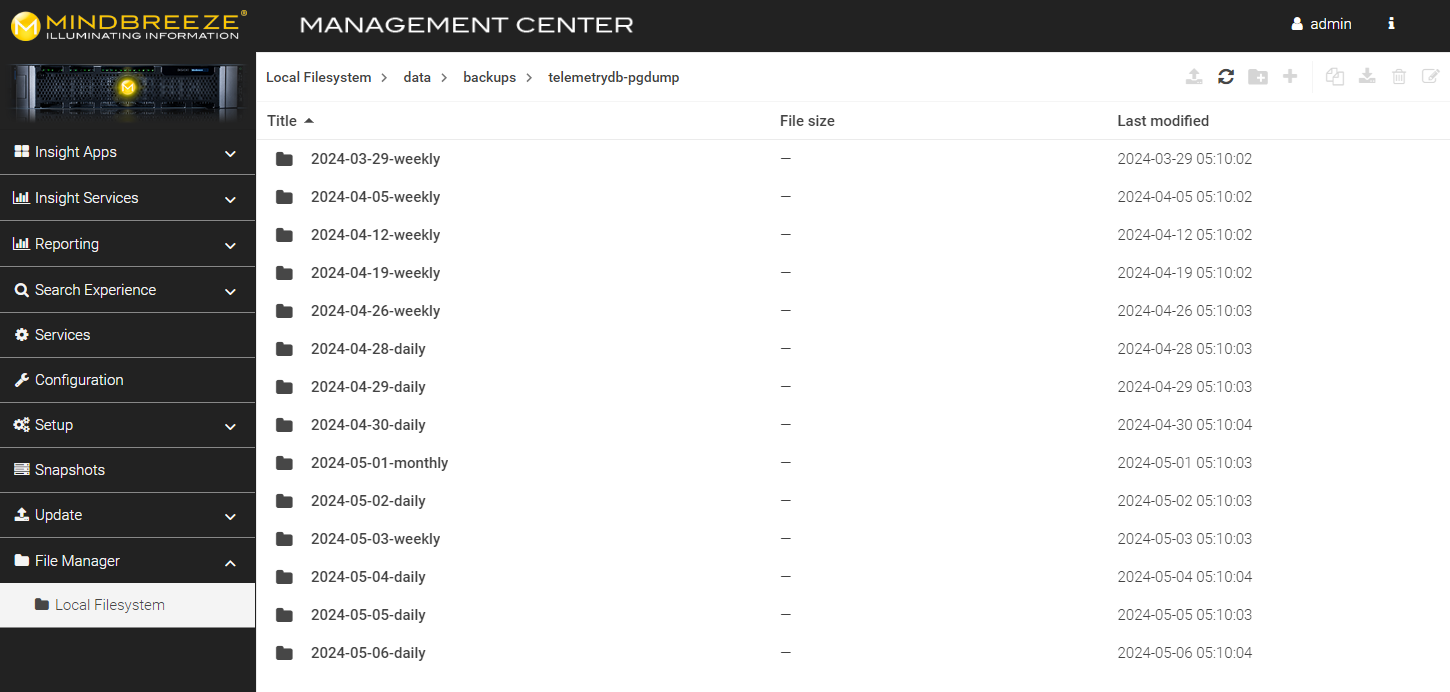
Filemanager
„File Manager“ provides access to the filesystem. Detailed documentation can be found at Mindbreeze – Filemanager.
Credentials
Mindbreeze InSpire uses the software component Keycloak to manage backend-credentials. This section covers the most important use-cases (change password, create new users …).
Please find additional documentation here: Keycloak 21.0 Server Administration
Change Password
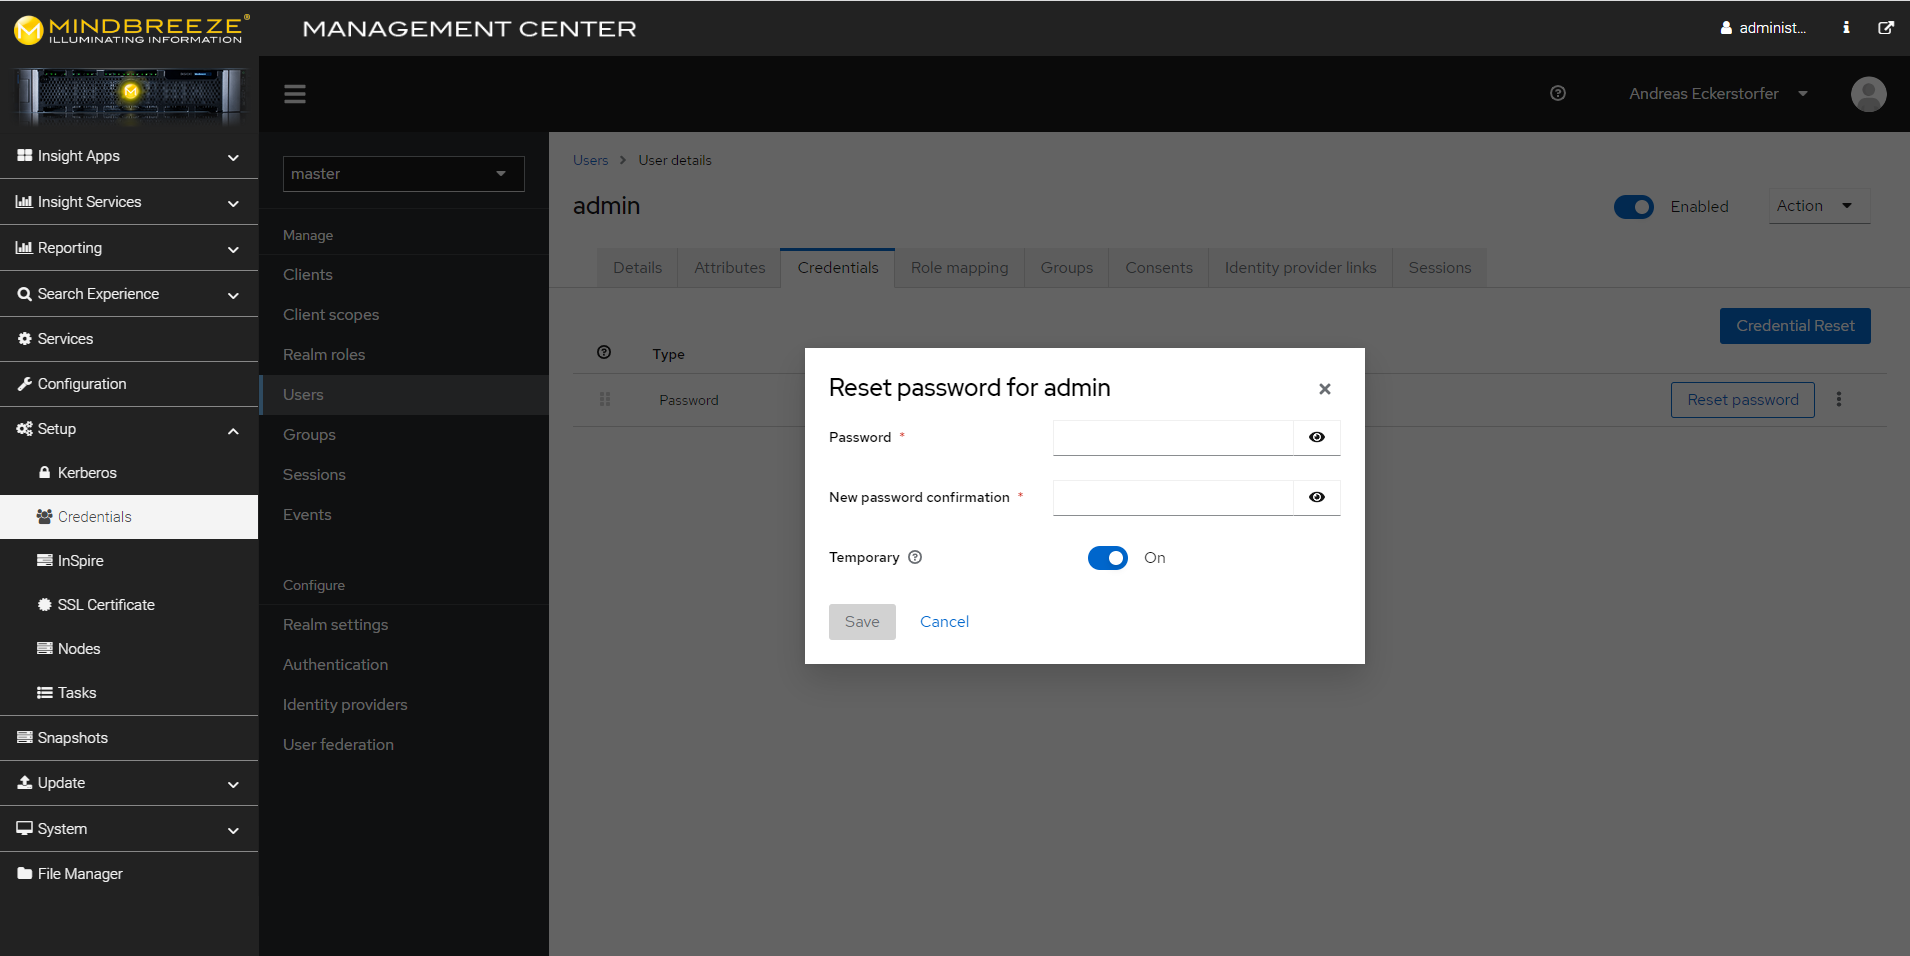
The first time you log in to the Management Center, you will be prompted to change your password. If you want to change a user's password at a later time, proceed as follows: In the Management Center, navigate to "Setup," "Credentials," and then under "Manage," "Users." Find the user in question using the search function, or search for "*" to display a list of users. Click on the desired user. To set a new password, click "Reset Password" in the "Credentials" tab. To specify whether the user has to change the password themselves the next time they log in, select the "Temporary" setting. Confirm your entries with "Save".
Create User
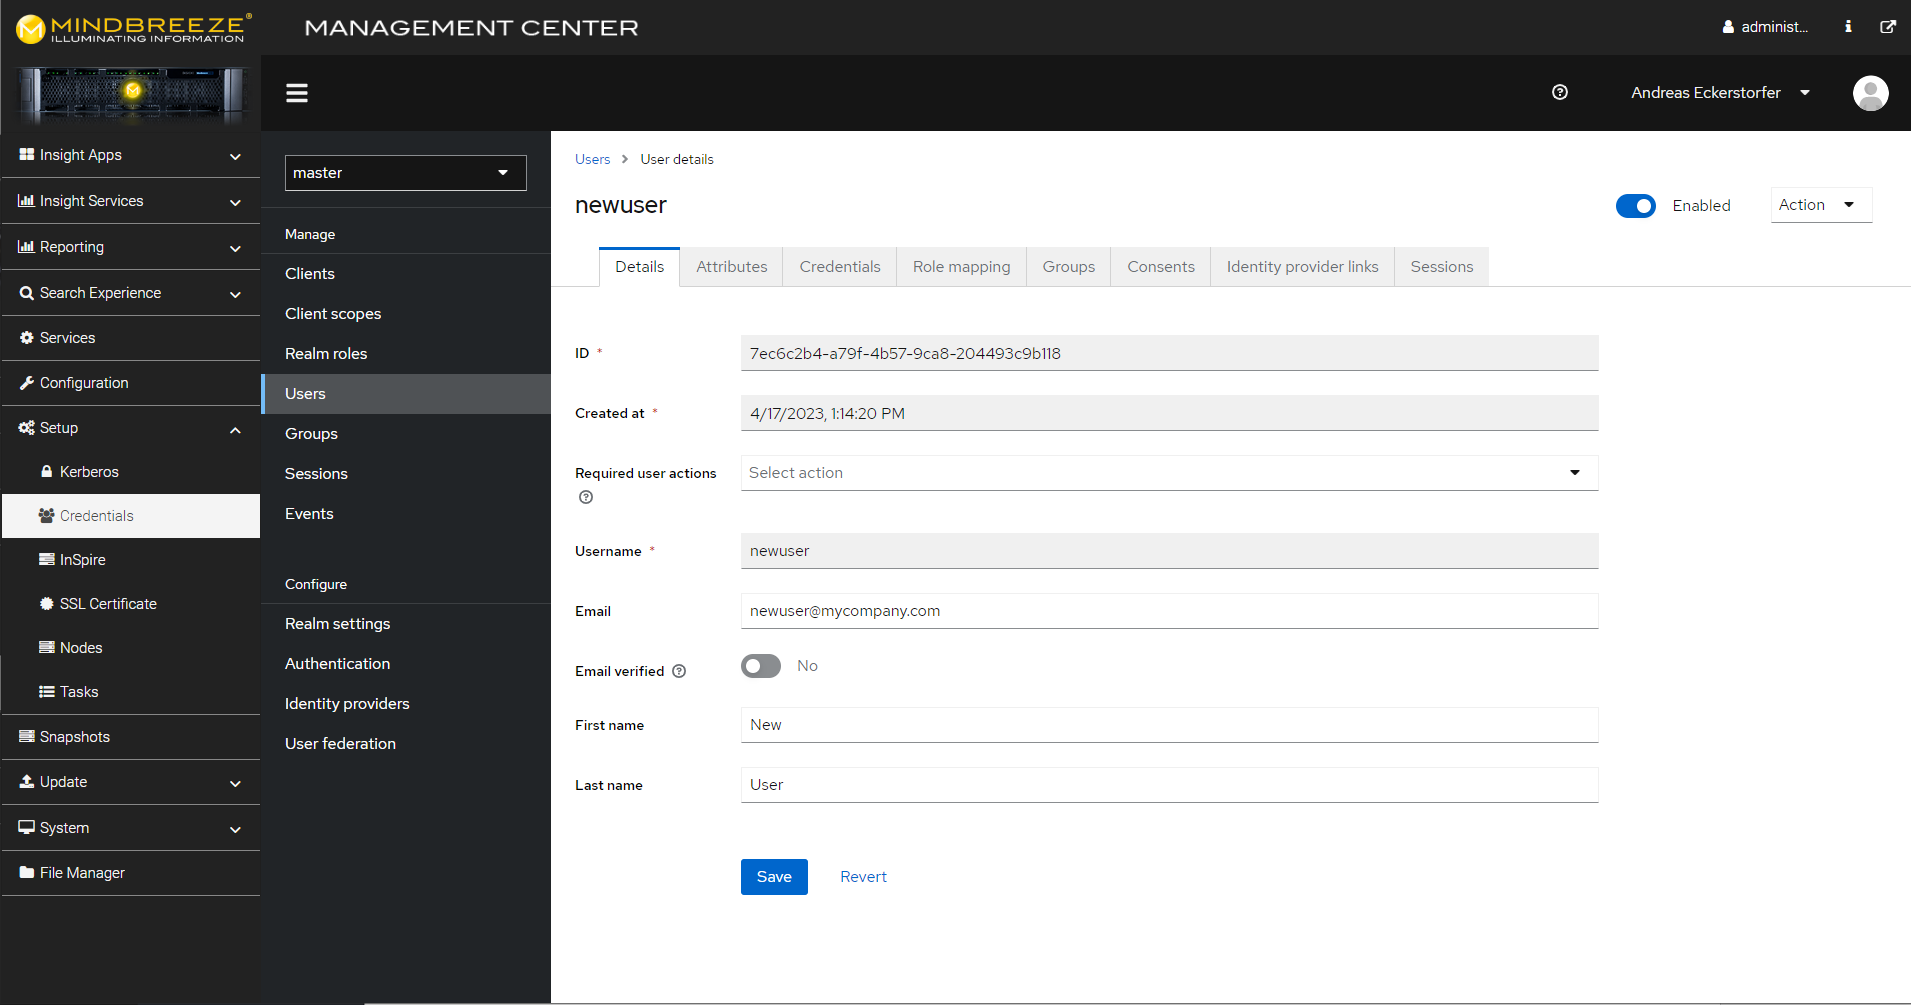
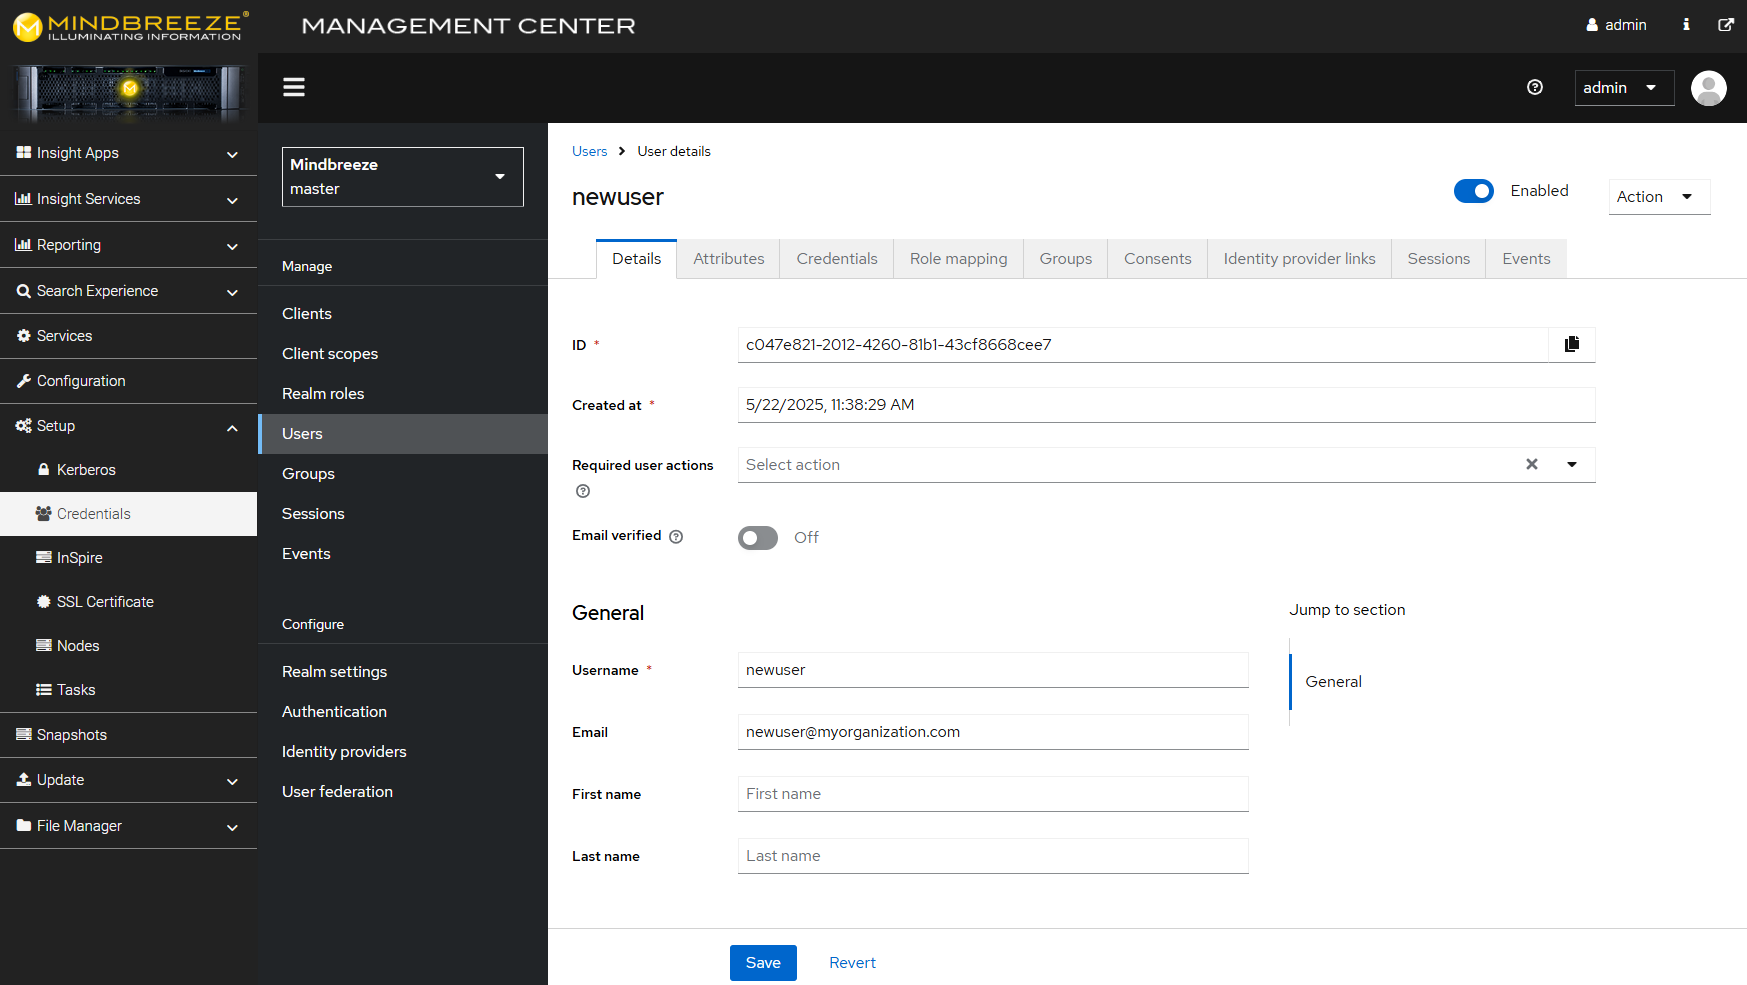
You can create multiple users. In the Management Center, navigate to "Setup", "Credentials" and then to "Users" under "Manage". Click on "Add User", then enter the user name under "Username" and click on "Save". Next, switch to the "Credentials" tab and click "Set Password" to set a password. This is described in the previous section "Change Password".
After you set a password, you still need to assign roles to the user. Otherwise, the new user will not be usable in any meaningful way.
For more information, see the following section: "Manage roles". In order to be able to use the "Forget/Reset Password" function, it is recommended that you enter a valid e-mail address for each user.
Manage Roles
Access to the different areas of the Management Center (e.g. "Reporting", "Configuration") is managed using predefined roles. For example, to use the "Configuration" item in the Management Center, a user must have the "InSpire Config Administrator" role. Several InSpire roles are already created by default.
A list of all Mindbreeze InSpire roles can be found in Configuration - Back-End Credentials - Description of the Mindbreeze InSpire Roles.
You can access the list of all available roles as follows: In the Management Center, navigate to "Setup", "Credentials" and then under "Configure", "Roles". By default, the "admin" user has all roles.
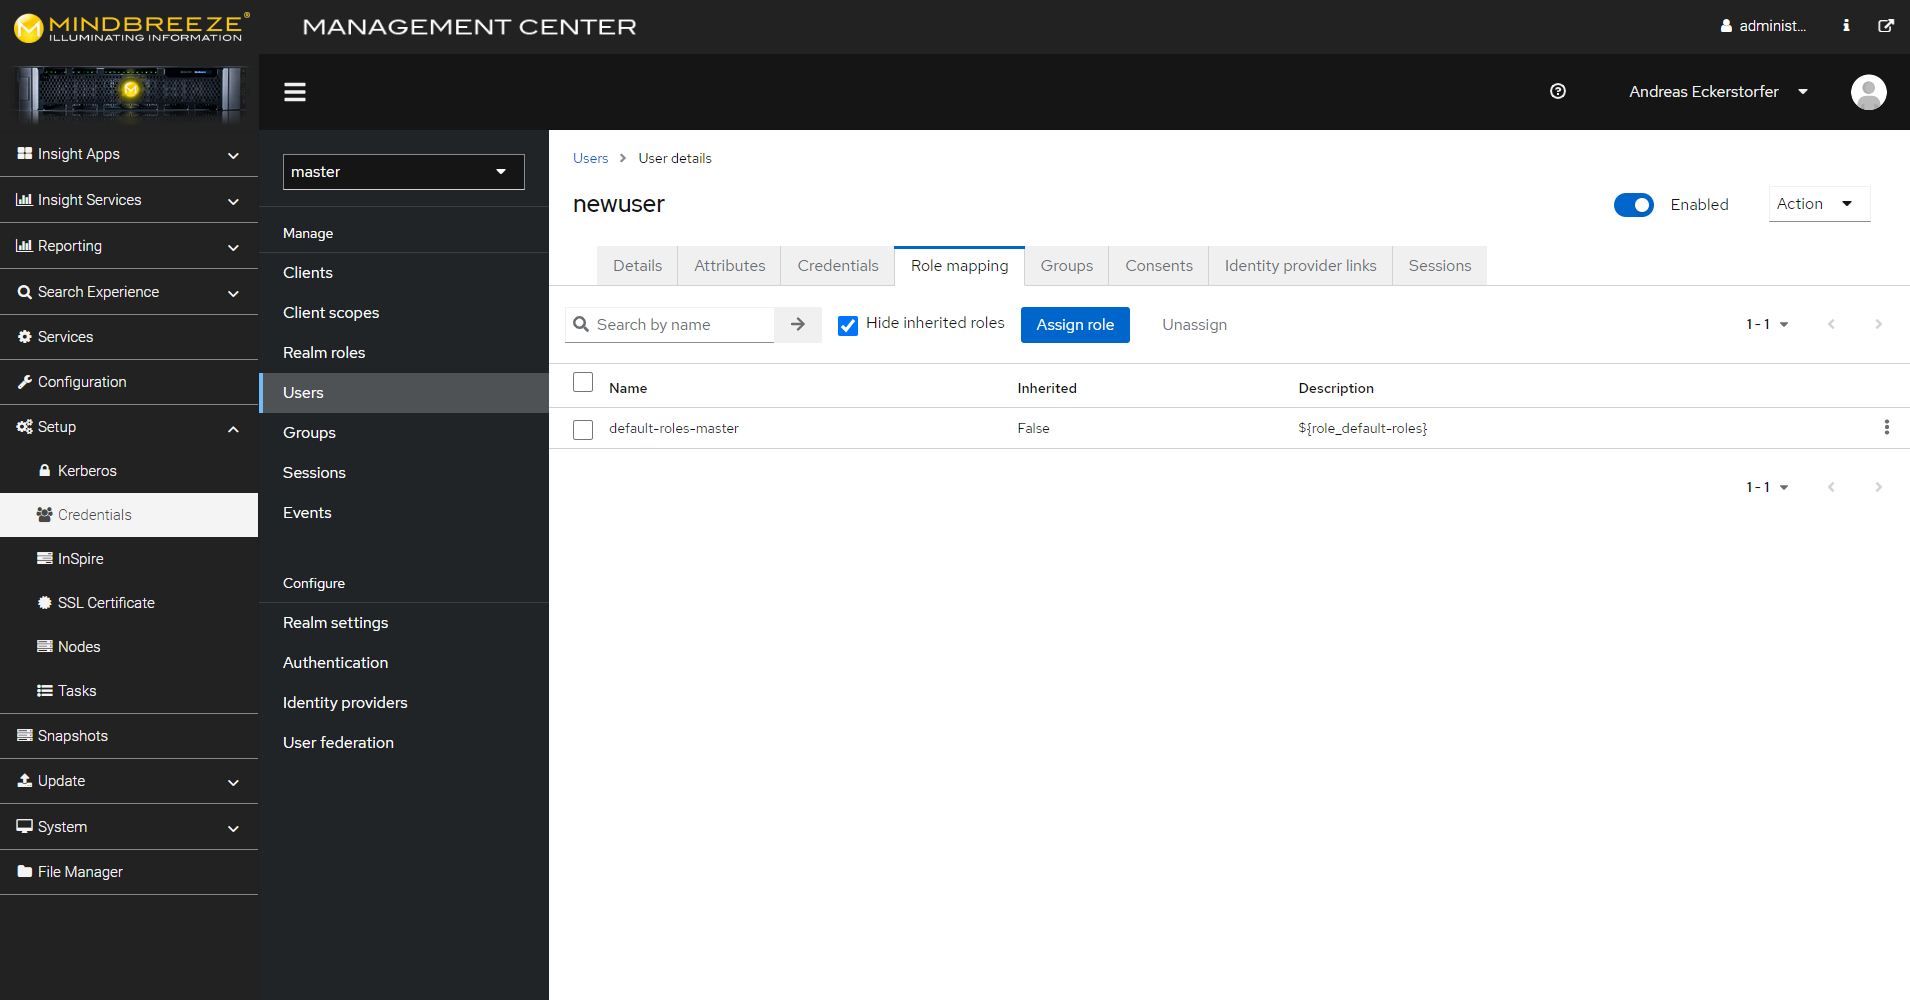
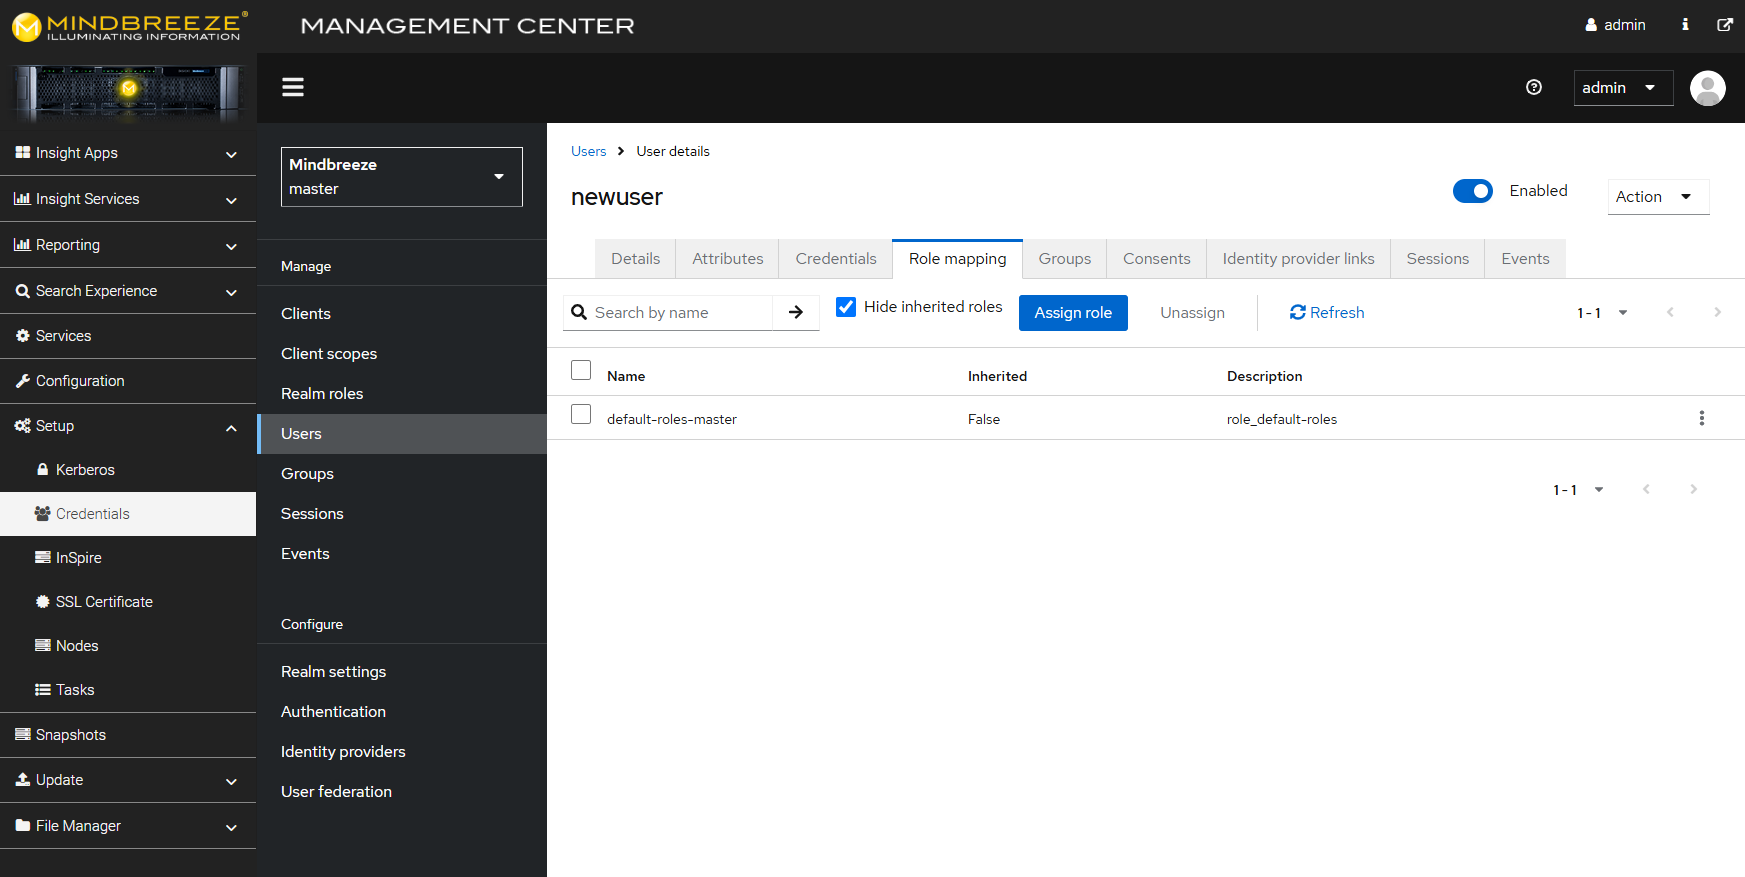
You can assign or remove roles to users as follows: In the Management Center, navigate to "Setup", "Credentials" and then under "Manage", "Users". Locate the desired user using the search function or click "View all users*" to display a list of users. Click "Edit" for the user in question. Switch to the "Role Mappings" tab. Here you can assign the roles.
Continuous Updating of the Operating System Patches
Operating system patches are provided as part of the Mindbreeze InSpire update package. After applying the update a restart of the appliance is required.
Mindbreeze InSpire Updates
Tutorial Video „Update a Mindbreeze InSpire appliance“
In this video we show you how to update your Mindbreeze InSpire Appliance to the latest software version. It features also how to downgrade to older versions and discusses patches and other enhancements.
Link to video: https://www.youtube.com/watch?v=pwyDkJ_gsyc
Introduction
New versions of Mindbreeze InSpire can be installed via the Management Center. You need the (G7-) Image-File and a webbrowser with access to the Management Center.
You can aquire the Image-File at the following link on the Mindbreeze website: Updates & PI
Installation
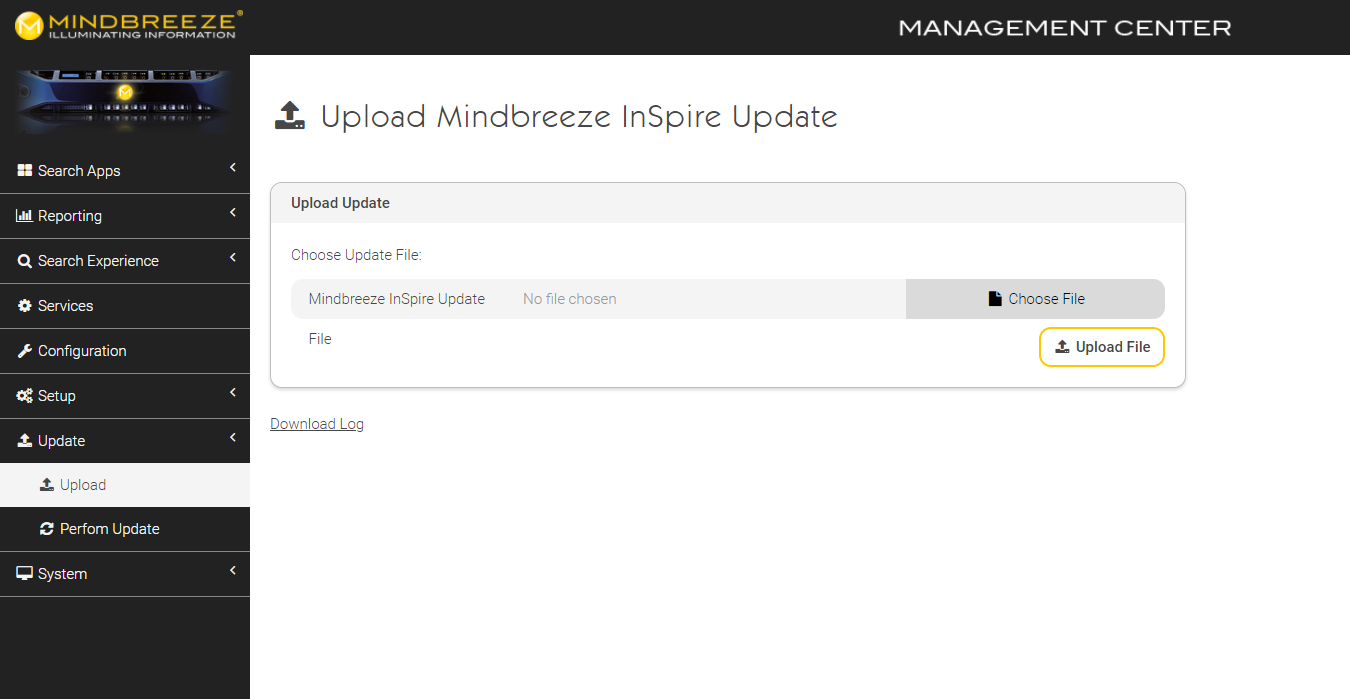
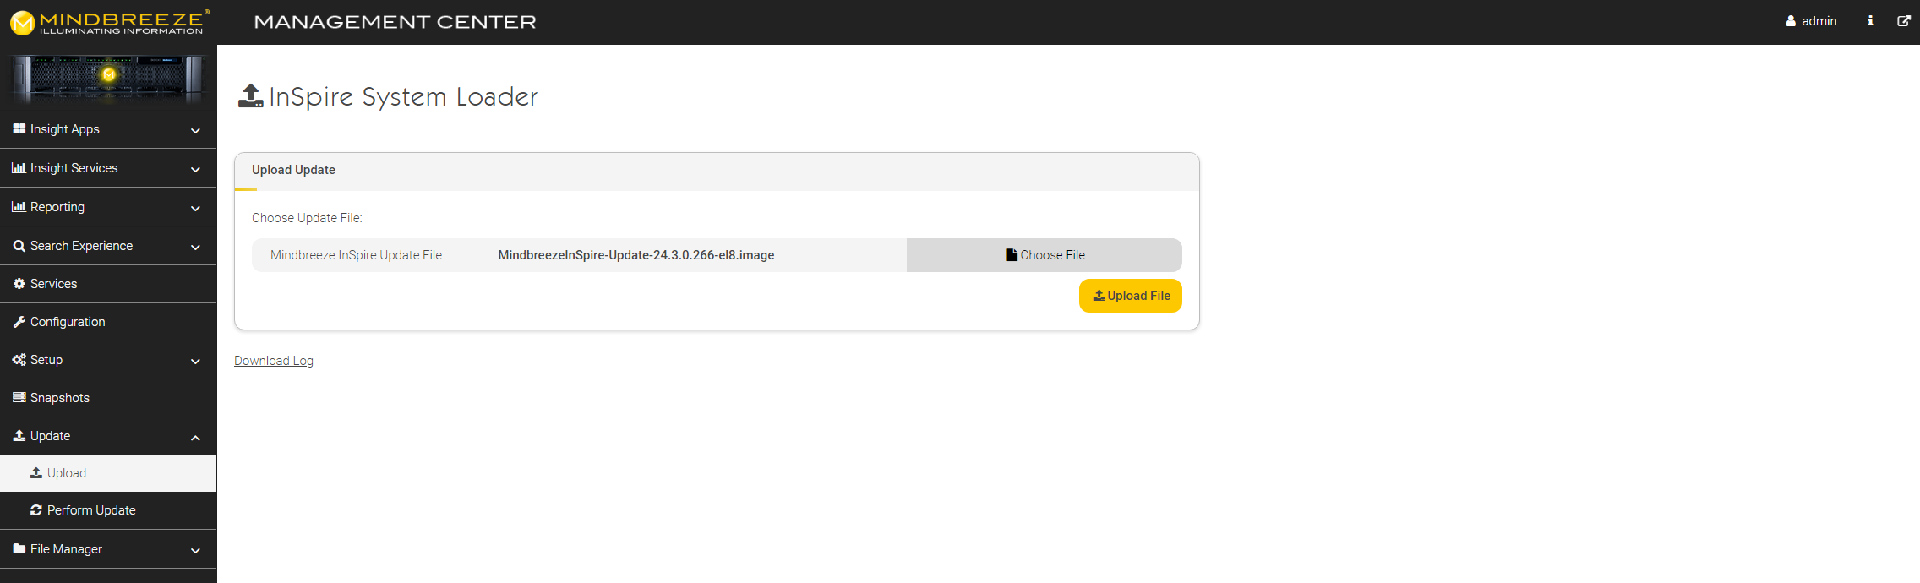
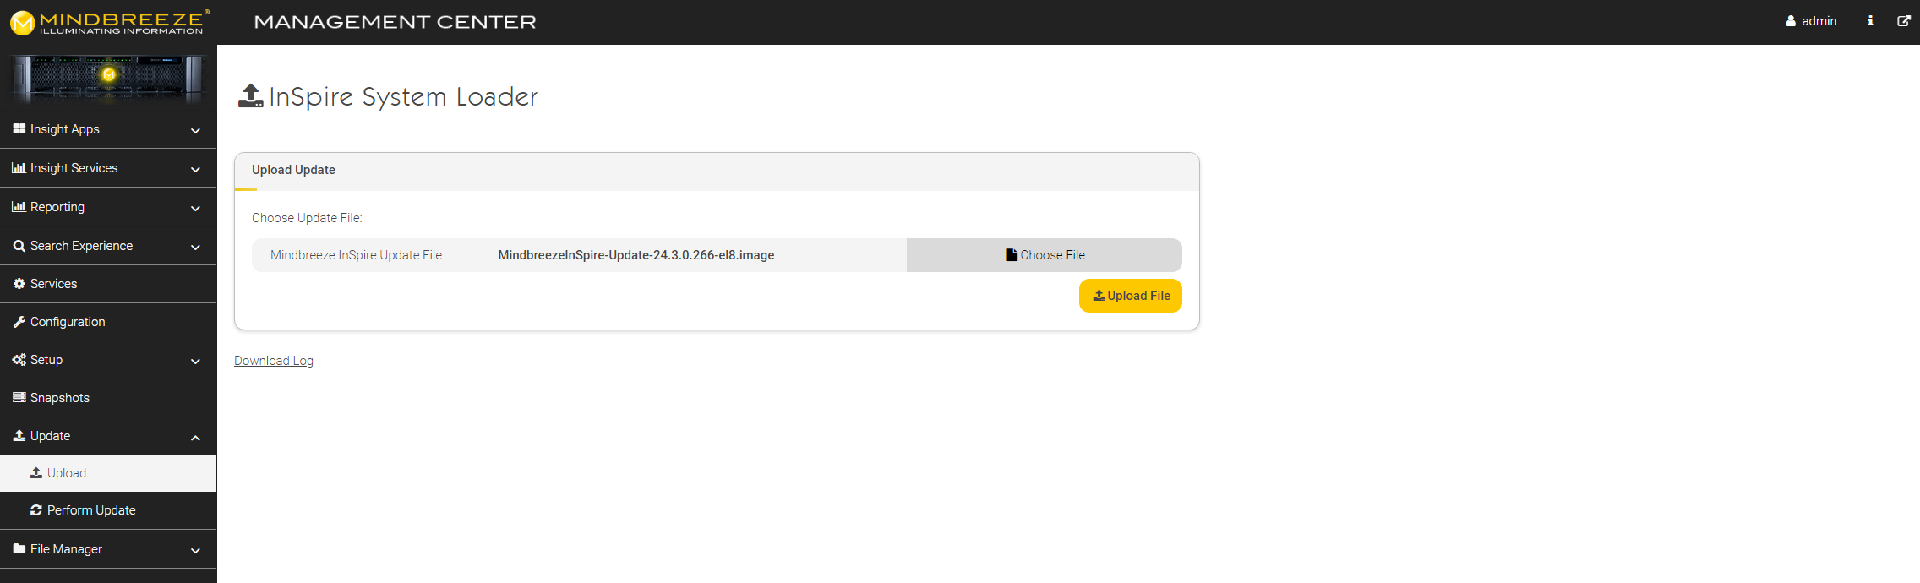
Open the Management Center and navigate to the section „Update“ „Upload“.
Select the image file via „Choose File“ and click on „Upload File“. A progress bar is displayed during the upload process.
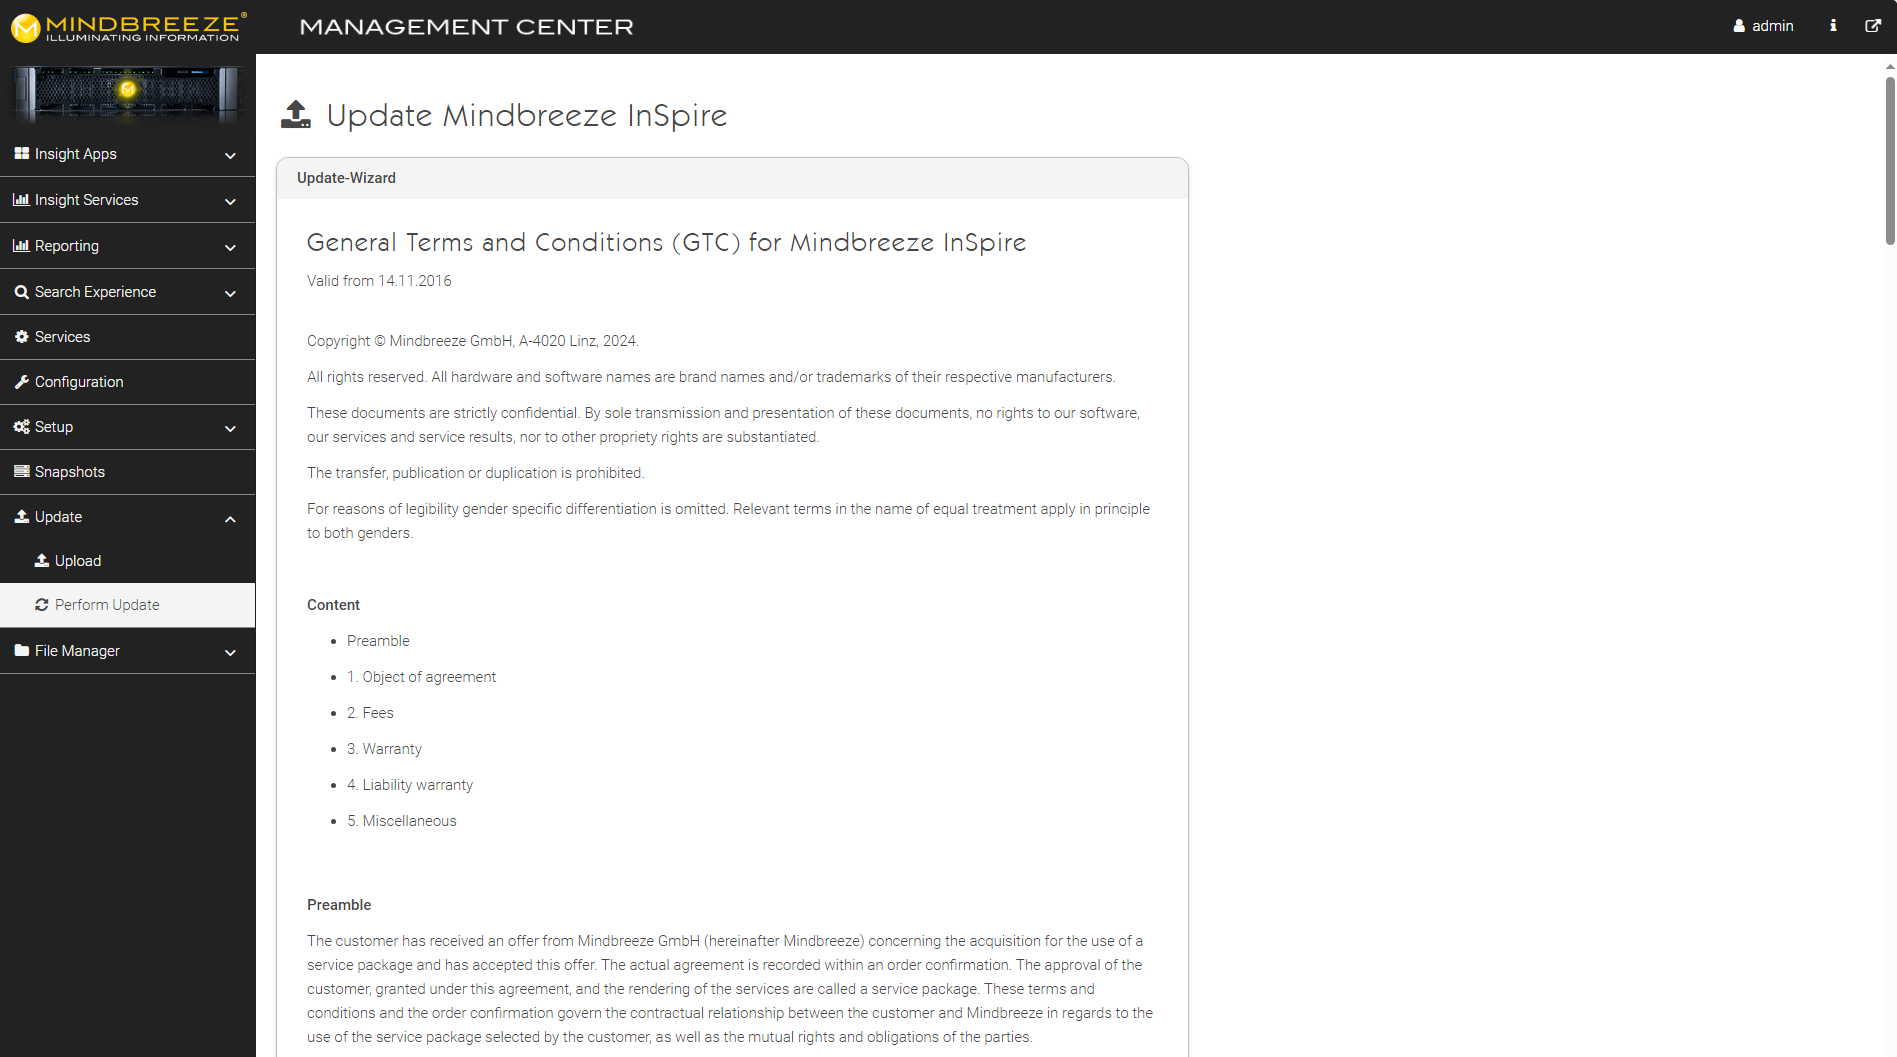
The next step shows important information about the update.
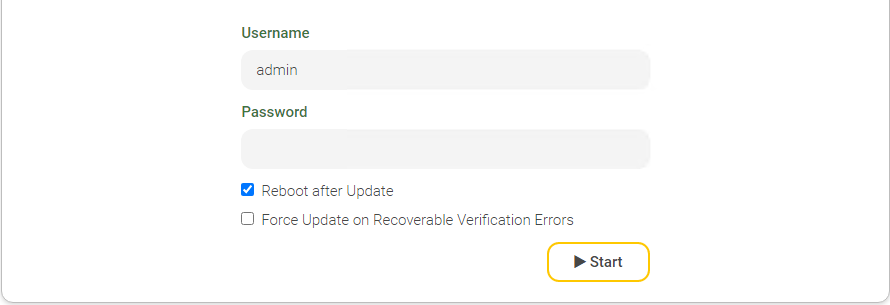
You can choose if the appliance should reboot automatically if needed. The default behavior on recoverable errors is to abort the update. Using the option “Force Update on Recoverable Verification Errors” you can try to continue with the update regardless.
A password is only required if the update does not start (please contact Mindbreeze support if that happens).
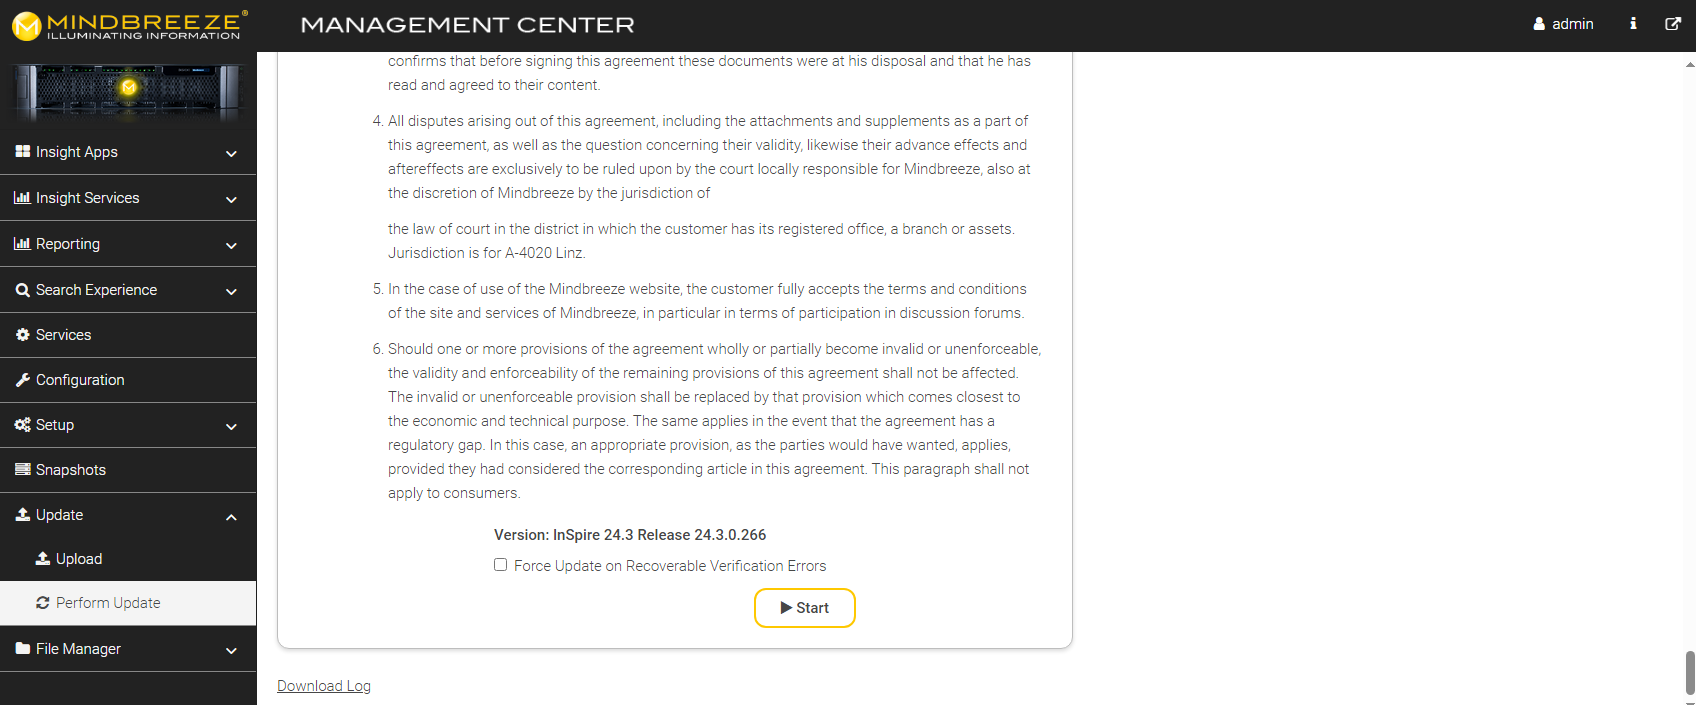
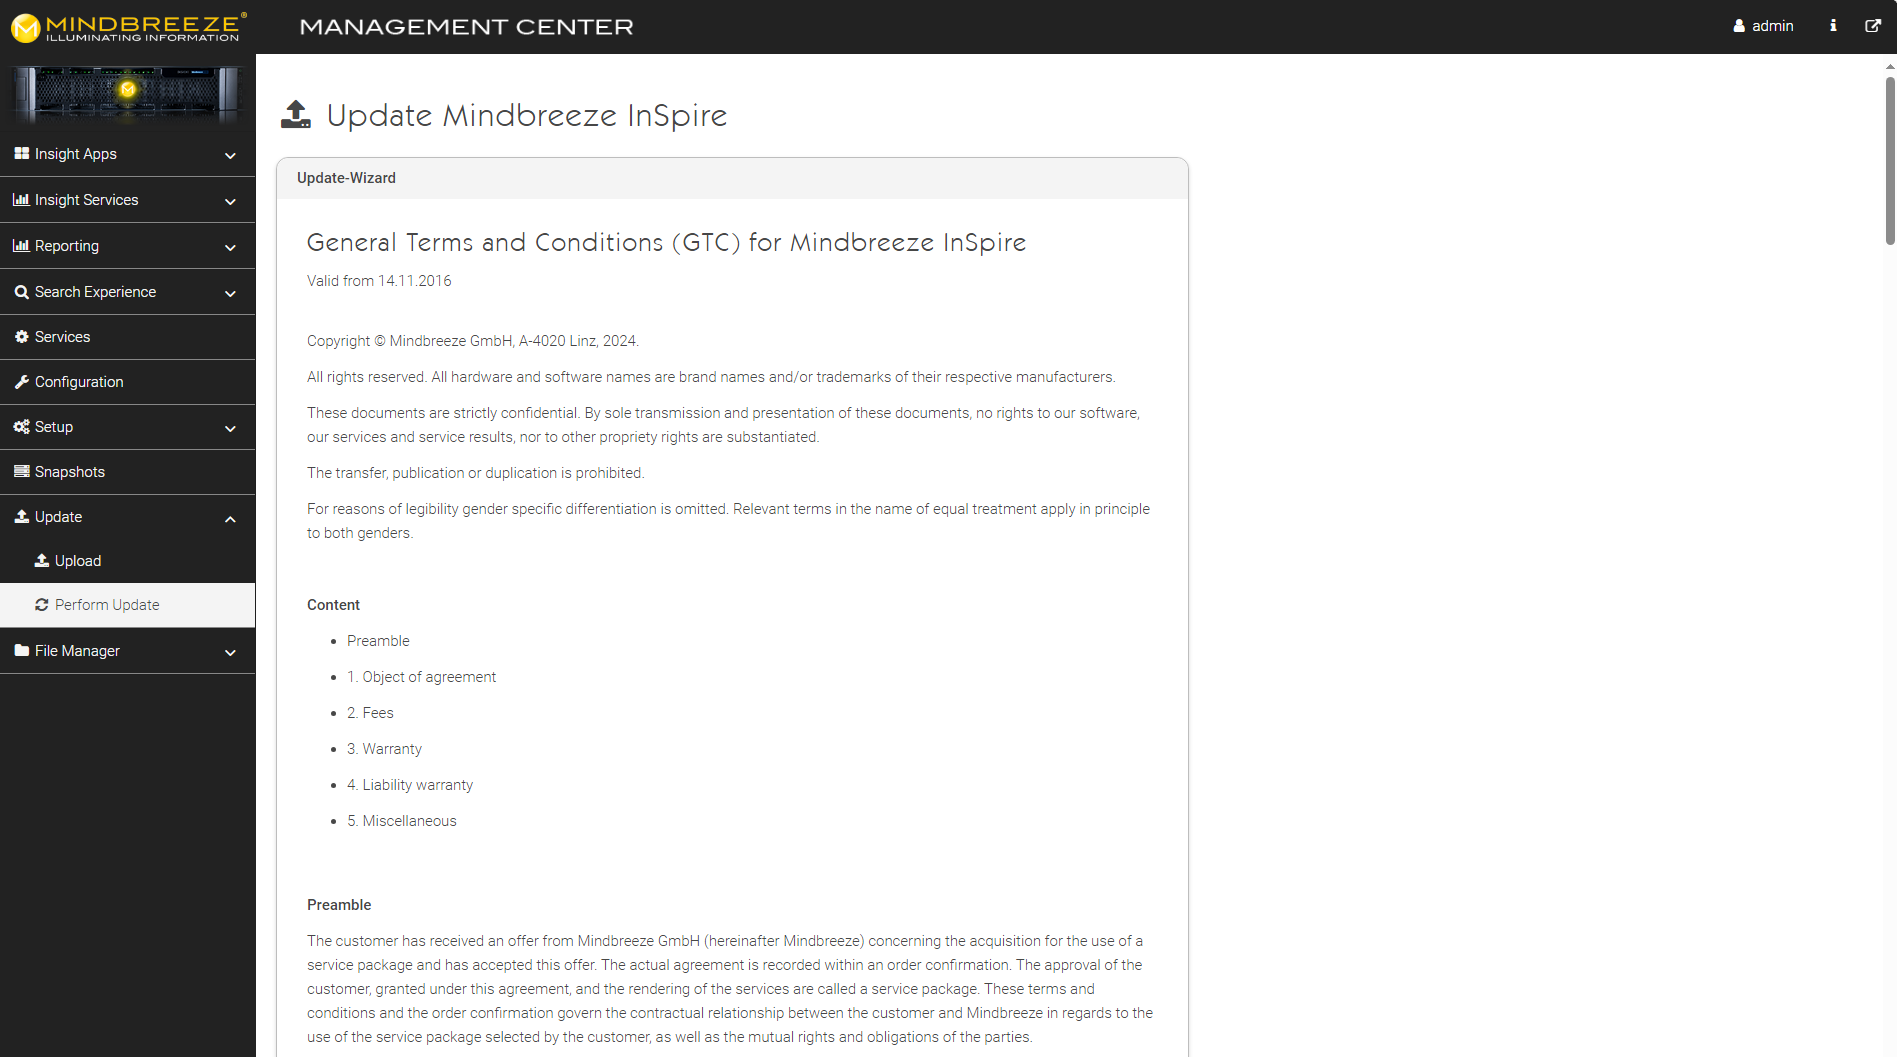
If you agree to the General Terms and Conditions, click on „Perform Update“ to start the update process.
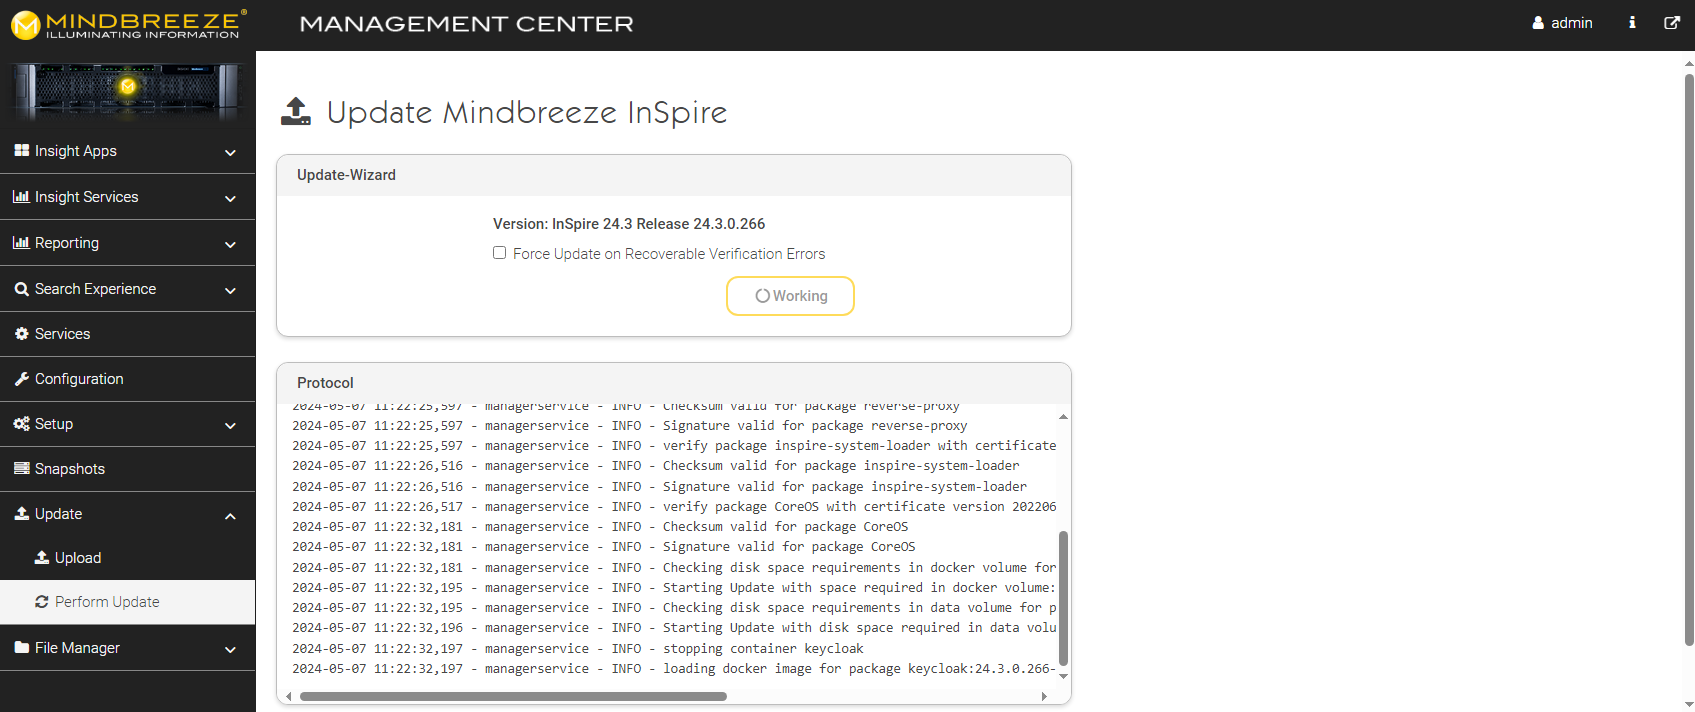
Hint: Services are not available during the update. The update step shows detailed information about the update process.
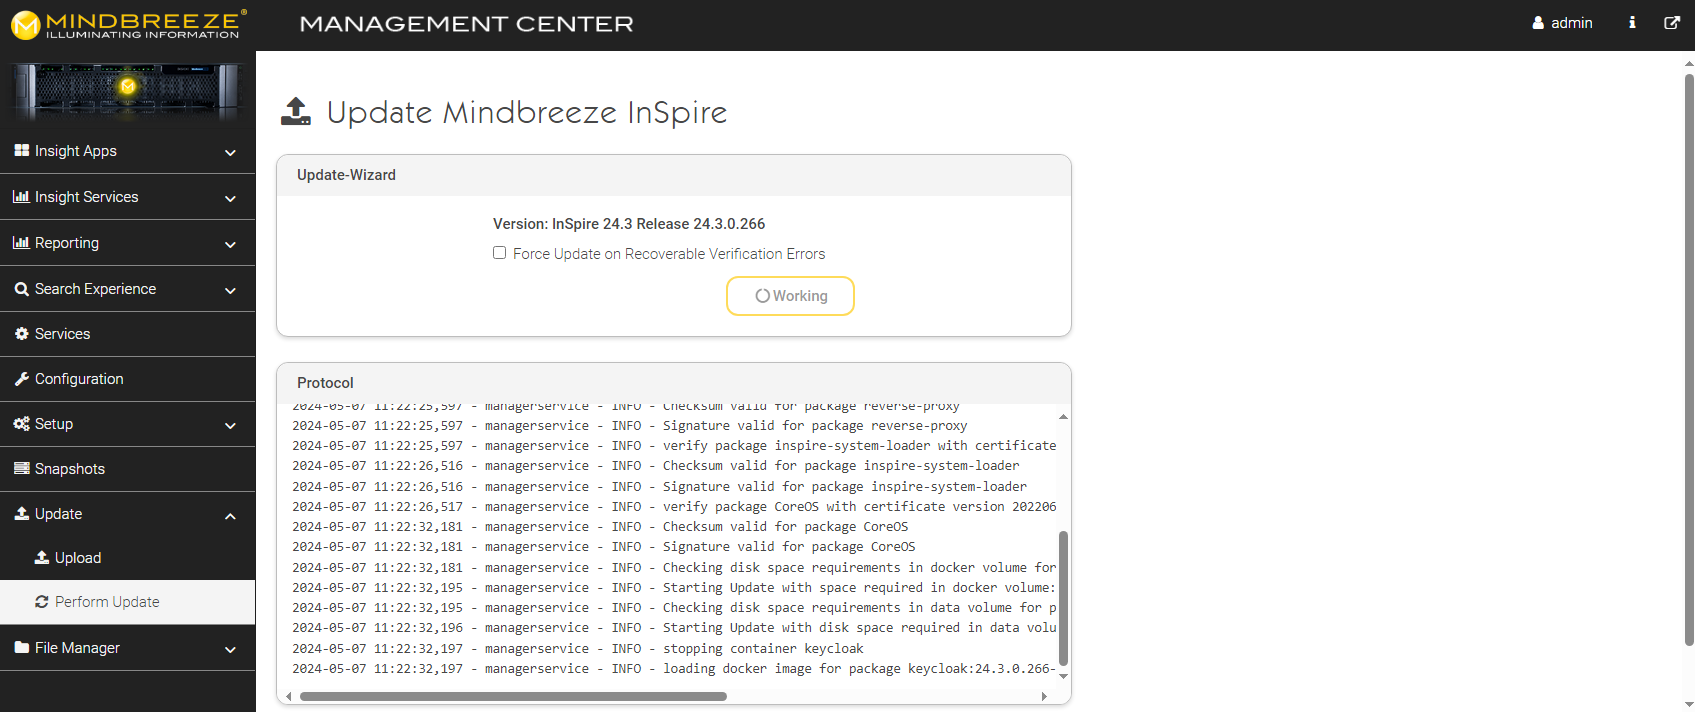
The message „Success“ is displayed after the update is done successfully. During the update you may be have to enter your credentials for the management center again.
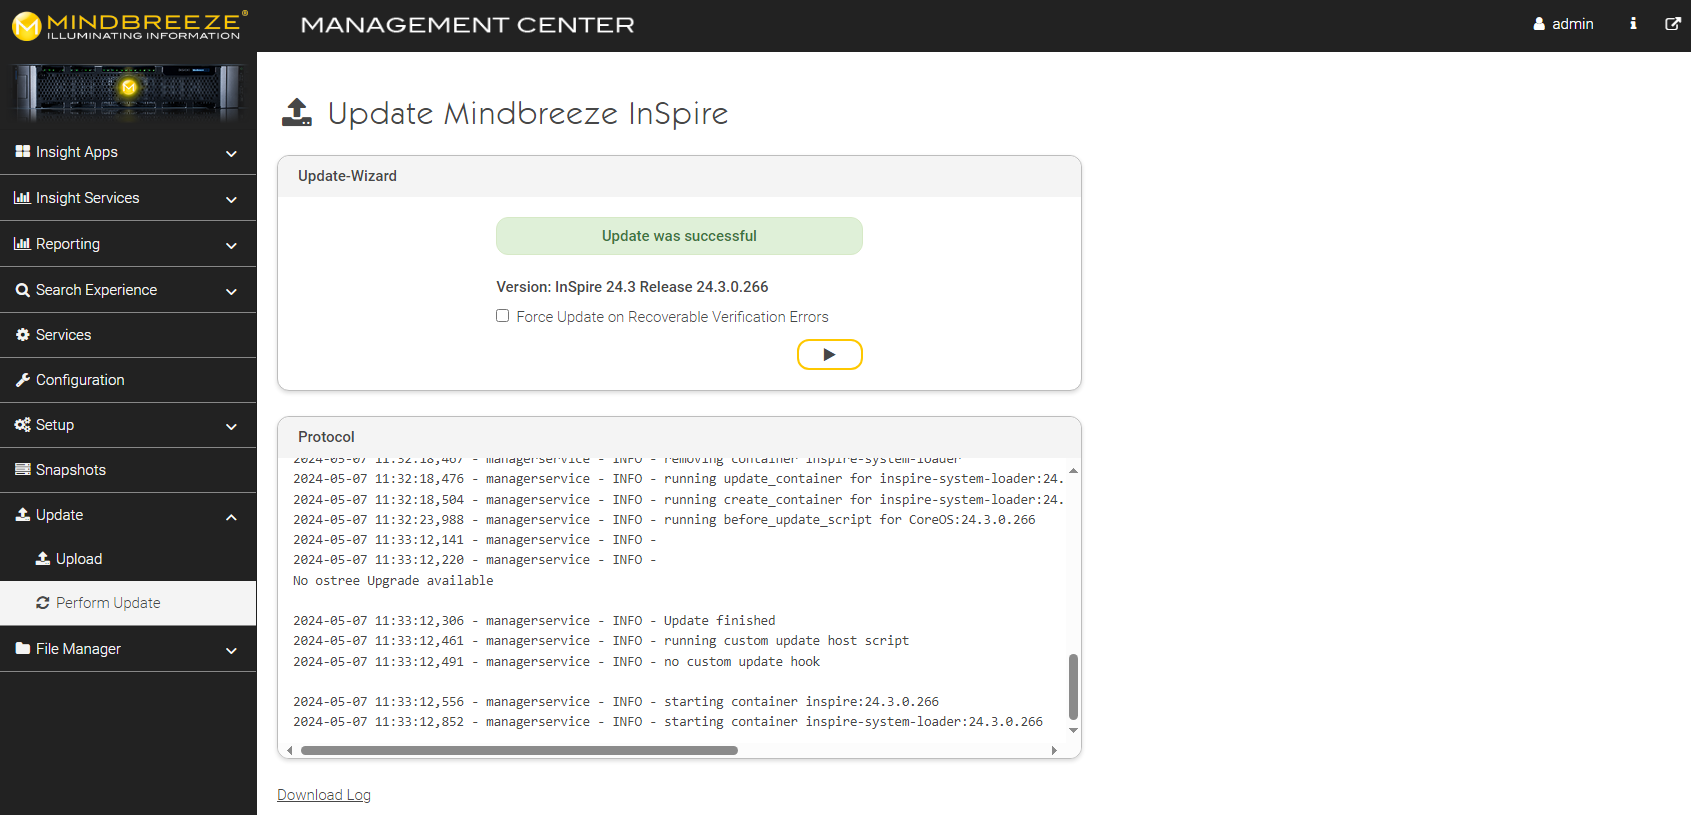
If you do not want to start the update immediately after the upload your can always come back to the section “Update”->”Perform Update”.
Mindbreeze InSpire Management
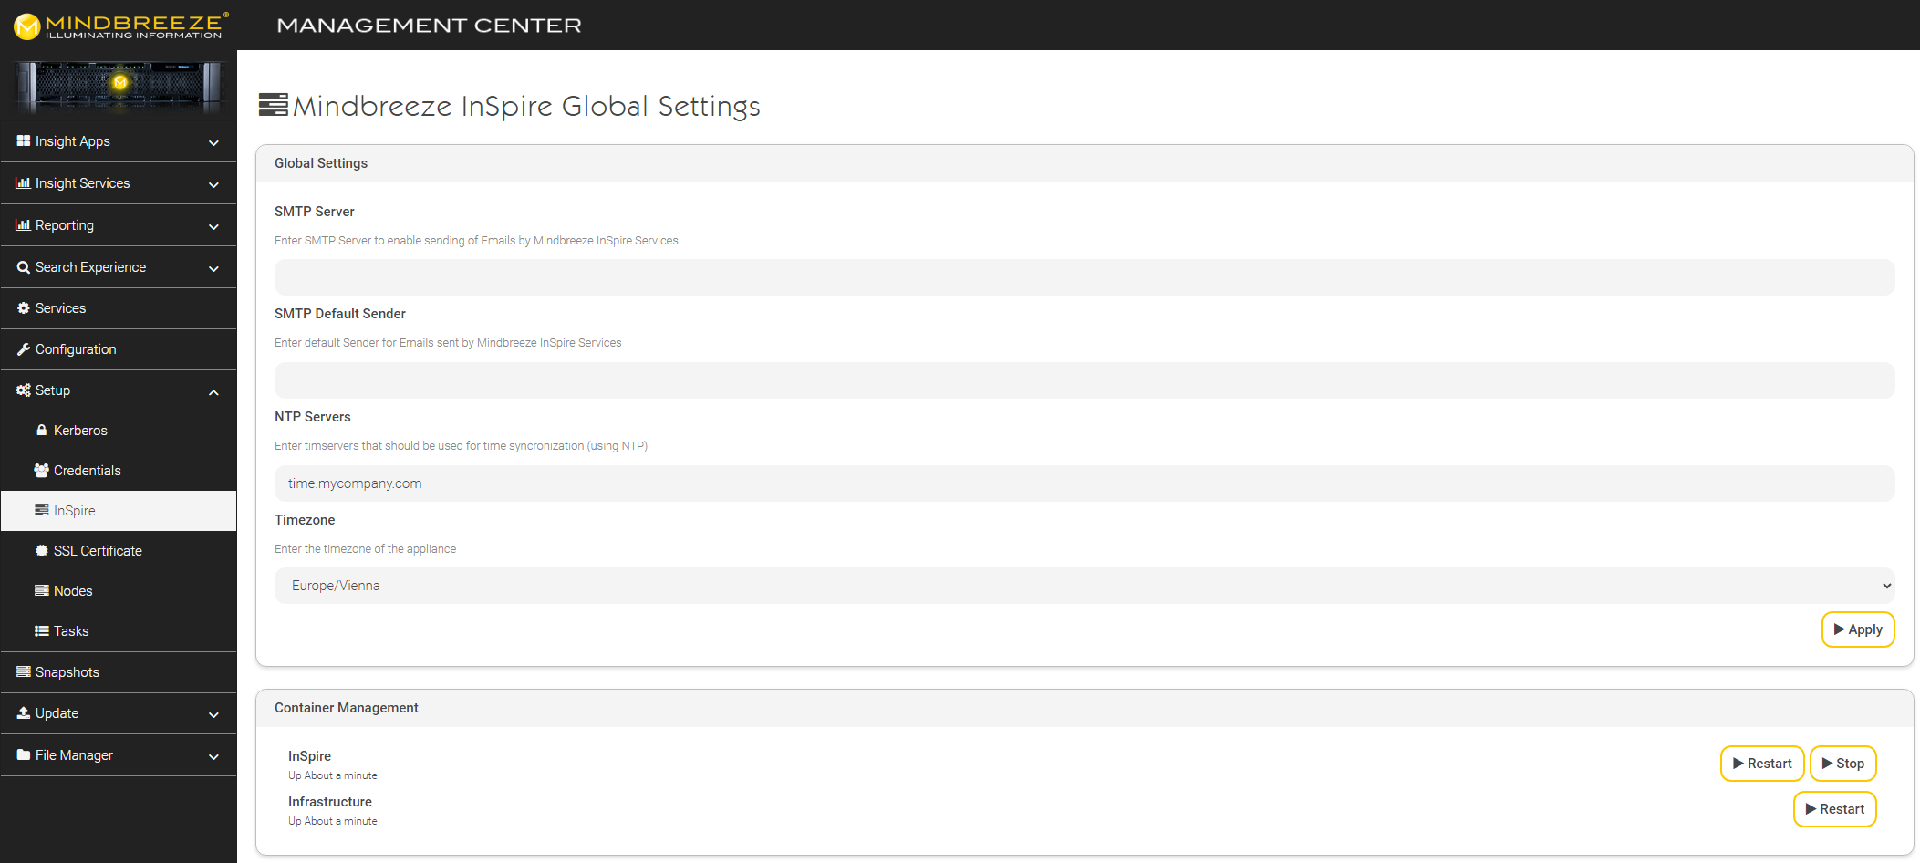
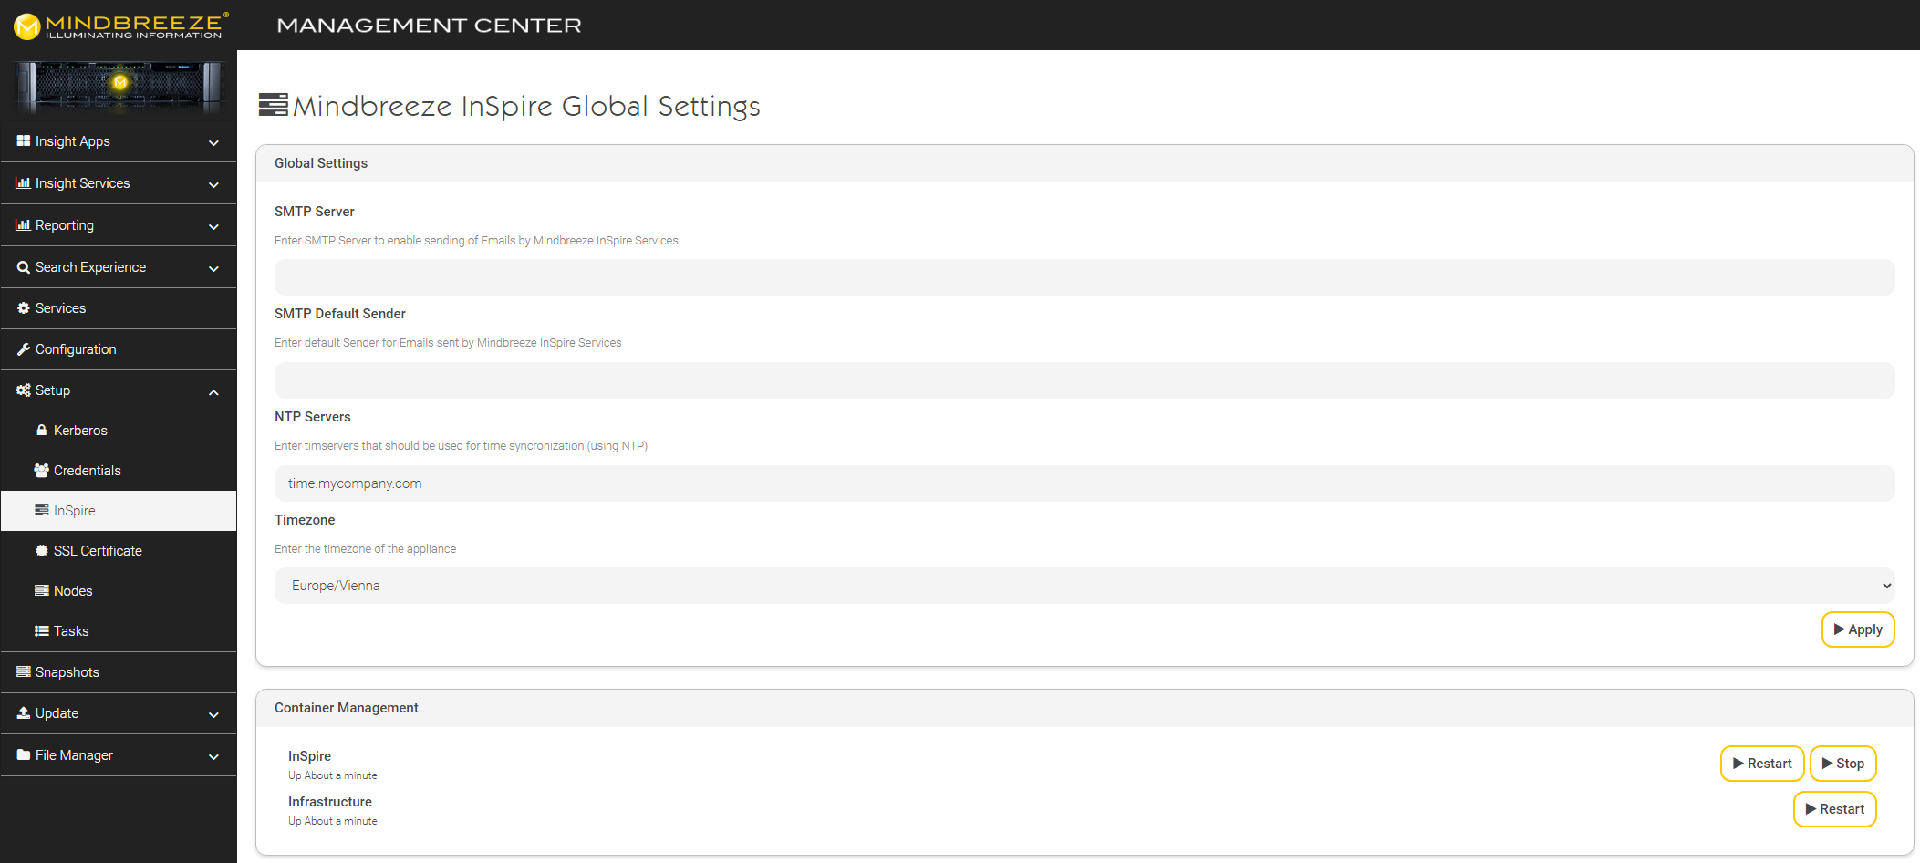
Mindbreeze InSpire Management allows you to configure global settings for the InSpire appliance and restart individual containers as needed.
Open the Management Center and navigate to the section “Setup” “InSpire”.
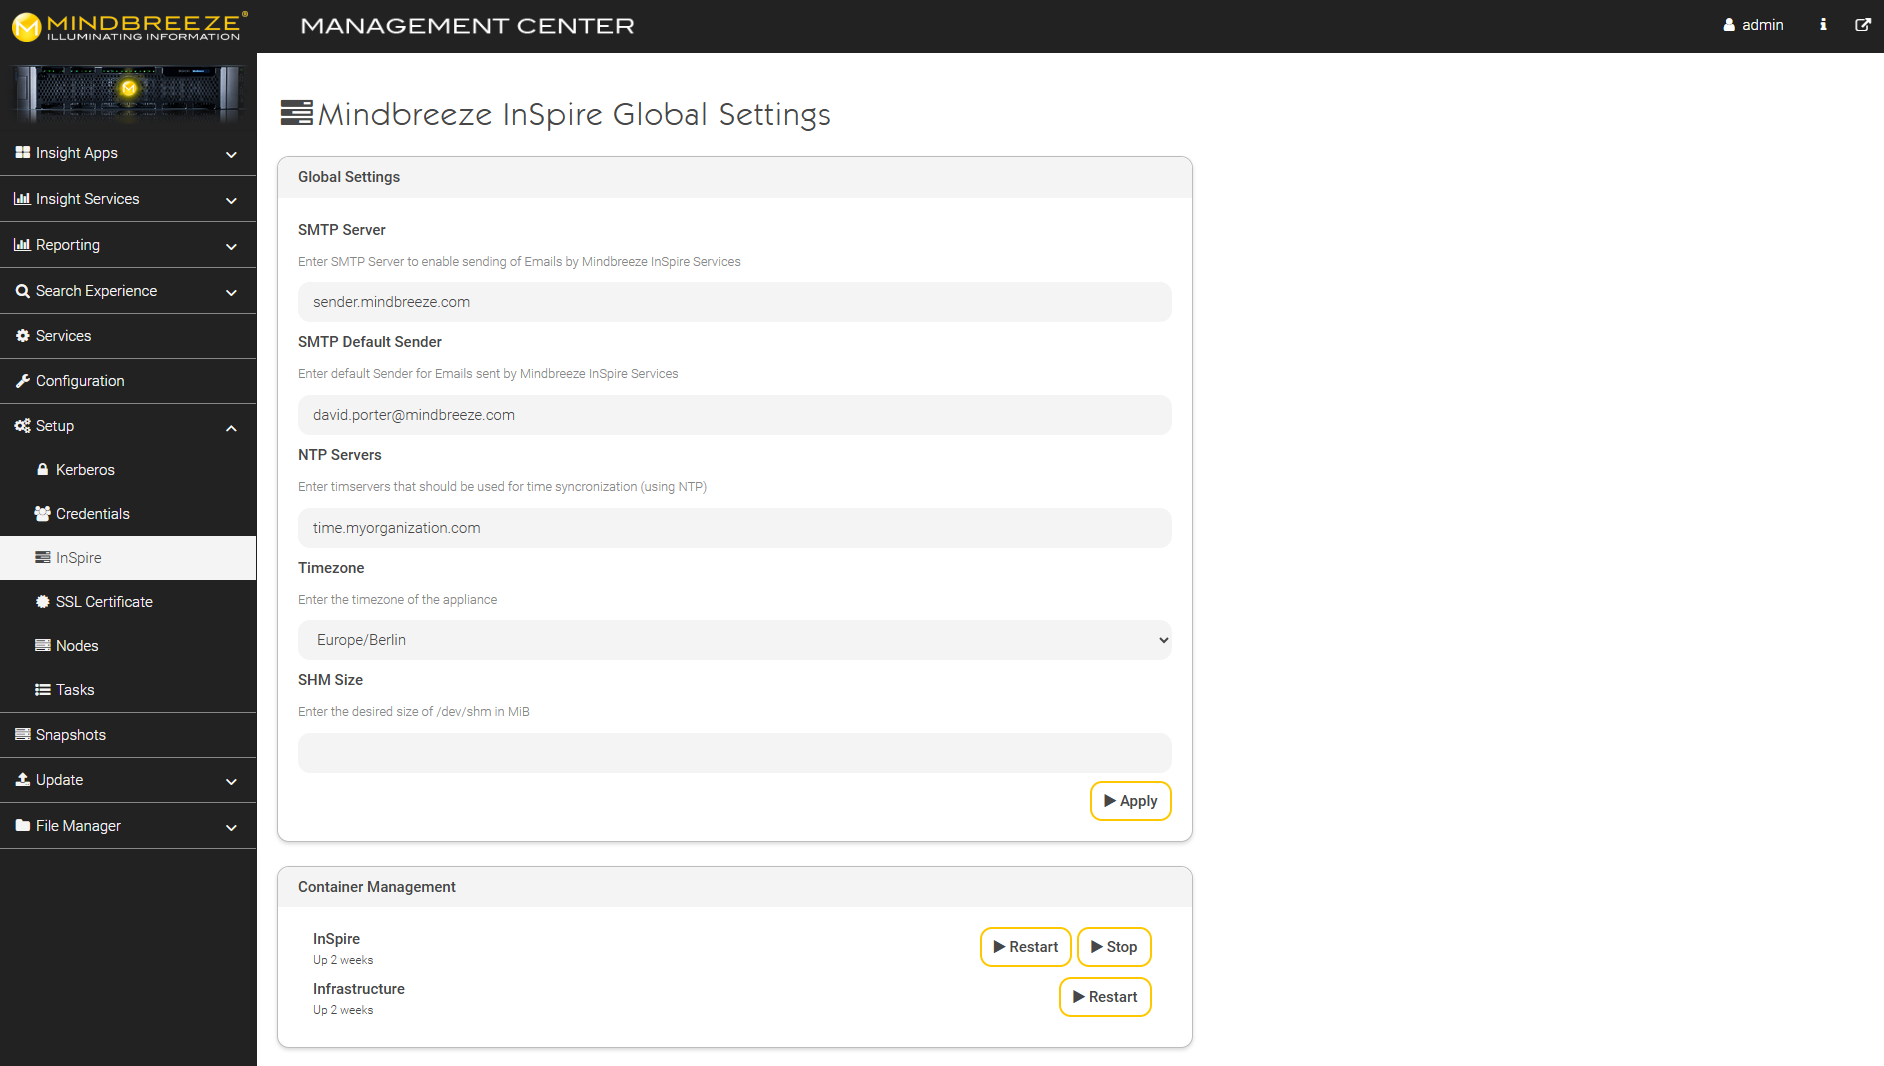
Global settings
SMTP settings
Mindbreeze InSpire needs to send emails for resetting the administration password and app.telemetry notifications. Please supply your mail server in “SMTP Server”. To use the same mail server for sending alerts, configure “localhost” for the Client Service Alerts setting “SMTP-Server”. The default sender address for emails sent by InSpire Services can also be configured.
Time Settings
For Kerberos based authentication using Active Directory, an NTP server that is time-synchronous with your Active Directory server has to be specified in the configuration of your Mindbreeze InSpire appliance.
Fill out both the “NTP-Servers” and “Timezone” fields. The time server is applied immediately. A reboot is needed for the timezone to be effective in all containers.
Shared Memory Settings
The InSpire container provides 64MiB of shared memory used by various services. This default amount is enough for almost all use cases. However, if necessary, the size can be increased.
The size of /dev/shm can be configured with the Setting “SHM Size”. The setting is interpreted as MiB and applied immediately.
Container management
The “Container Management” section enables you to restart the InSpire Container. If the InSpire Container is stopped, the InSpire services are not available. You also have the option of restarting the InSpire infrastructure.
Uploading certificates
The “SSL Certificate” section enables you to exchange the SSL certificate for the Management Center of the appliance. You can install a p12 or pfx certificate file via upload. For encrypted certificates, the password for decrypting the certificate file must be entered.
Tutorial Video „Install SSL certificate“
This video demonstrates how to install the SSL certificates for both the Web Client and for the Management Center: https://www.youtube.com/watch?v=oThC_VNcc5s
Backup Strategy
Below you will find a quick guide on backing up configurations and indices for Linux.
Mindbreeze InSpire Backup Strategy
This document describes the key facts that should be regarded for backups of Mindbreeze InSpire configuration files and index data.
The backup strategy should include the following type of data and should especially be performed before installing product updates:
- Mindbreeze Configuration data: After major changes in the Mindbreeze configuration you should take a backup of the main configuration files.
- Custom Insight Apps: After deploying custom Mindbreeze Insight Apps you should take a backup of those changed files.
- Mindbreeze Index Data: Before starting product updates or for huge data sources after they have been fully crawled you should take a backup of the index.
- app.telemetry Configuration Data: Also the app.telemetry configuration should be included in your backup strategy (at least if modified/extended for custom needs).
- Credentials: The user database contains the credentials of the users and role mappings for the access control system and should be in the backup.
- Other adjustments: Take a backup of any further adjustments that do not conform to the Mindbreeze standard product.
Backup Strategies
Backing up the Configuration Data
The last 10 revisions of the Mindbreeze configuration data files are kept in the configuration directory. Nevertheless, you should take an external backup of those files:
- Configuration files are stored in /etc/mindbreeze
Important configuration files:
- mesconfig.xml
- license
- plugins
- mesmasteruri.conf
Furthermore, please execute export_managerconfig.sh including a path (e.g. export_managerconfig.sh /data/export) and make a backup of the folder “export”.
Backing up Custom Insight Apps
If you have deployed your own Insight Apps, you should take a backup of these changes:
- Custom Insight Apps
(/data/apps/<yourApp>)
Backing up the Index Data
Fabasoft Mindbreeze uses a file-based index. These index files can be backed up completely in a consistent state.
To save index data, perform the following steps:
- Change the mode of the index service to “Mode: readonly” with mescontrol (adapt the index port for the desired index)
mescontrol http://indexserver.yourcompany.com:23100 readonly - Check the consistency of the index with mescontrol (adapt the index port for the desired index)
mescontrol http://indexserver.yourcompany.com:23100 checkconsistency - Verify the exit code (ERRORLEVEL) of mescontrol
echo %ERRORLEVEL% (should return the value 0 on success) - In order to start the backup process navigate to the directory where the index is stored and perform the backup (after a successful consistency check) as follows:
- Either copy the whole index directory to the target backup path using the operating system copy tools (e. g. Linux Console). You could compress this target folder later on to save disk space.
- Or directly create a backup archive of the index directory using any compression tool of your choice. But be careful and consider the following issues:
- Creating a compressed backup archive may take much longer than a simple copy task therefore the Mindbreeze index will stay in readonly-mode for a longer time.
- The backup tool must not modify any index files and must be able to handle open files with shared read access (locked by some Mindbreeze processes for read-access). For example using the 7-Zip tool you have to activate the option „Compress shared files“ (-ssw).
- Change the mode of the index service to “Mode: normal” with mescontrol (adapt the index port for the desired index)
mescontrol http://indexserver.yourcompany.com:23100 readwrite
Backing up the app.telemetry Configuration
Just take a copy of the main app.telemetry configuration file (infra.xml) located at following location:
/etc/app.telemetry/
Backing up the app.telemetry Database
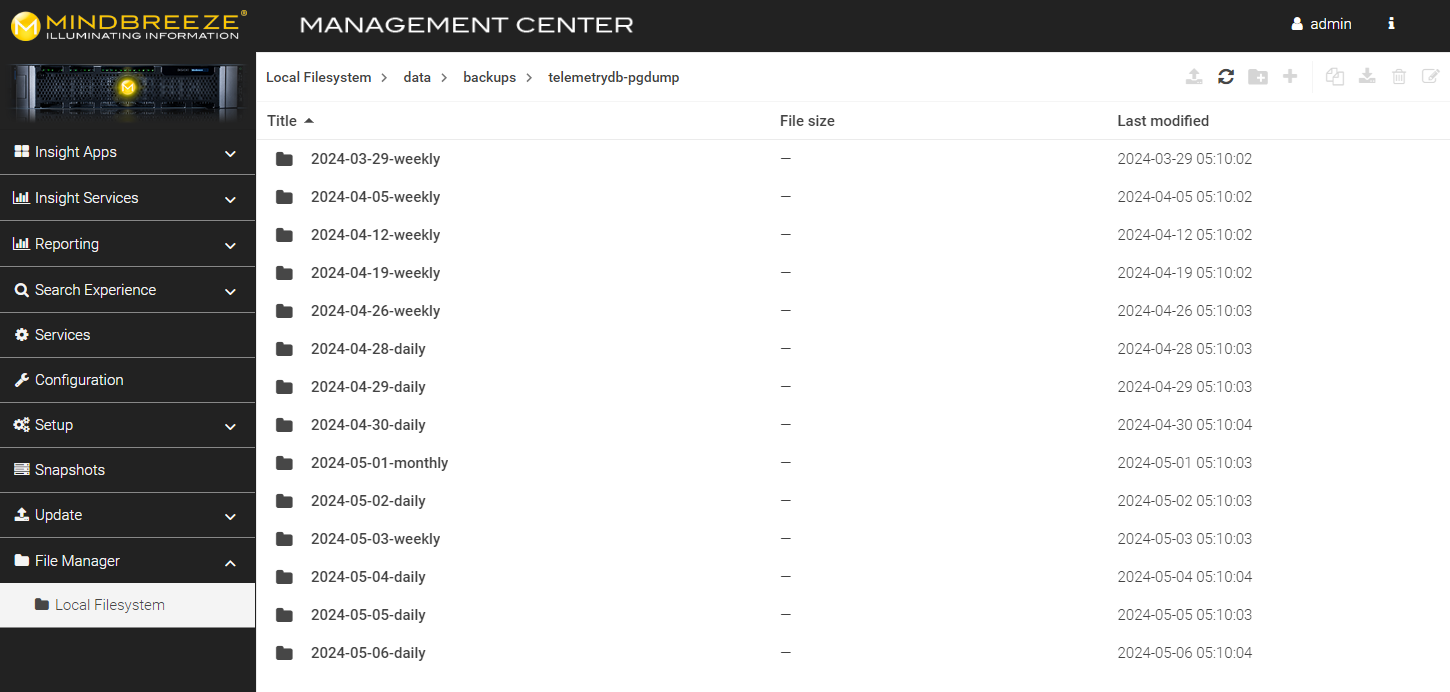
A Cron-Job creates daily backups of the database that are accessible with the File Manager in “/data/backups/telemetrydb-pgdump”.
Backing up Credentials
The user database is exported daily into the following location within the keycloak container:
/data/backup/curr
This location is also accessible in the host under the location:
/var/data/keycloak/data/backup/curr
Add this location to your backup.
Running Third-Party Software
General notes about Mindbreeze InSpire as an appliance
Mindbreeze InSpire is delivered to customers as a preconfigured appliance. The pre-installed software components were coordinated with one another and tested for possible side effects. It is not intended that customers make changes to the software status on their own.
Possible examples of adverse changes to the software status include:
- Software updates from installed applications (except Mindbreeze product updates)
- Removing (uninstalling) preinstalled software
- Installing new software (such as antivirus software)
Impact of third-party software on Mindbreeze InSpire
Depending on the type of third-party software components, the effects this may have on Mindbreeze can vary.
The possible effects of third-party software include:
- Negative impact on system performance …
- due to excessive hard disk access (e.g. antivirus software)
- due to excessive storage usage of the third-party application
- Stability problems due to unexpected file access …
- File locking
- Modification of file contents
The most common problems are to be expected through the use of antivirus software and can be minimized as described in the following chapter.
Minimizing the impact of antivirus software on Mindbreeze
To minimize any negative impact on Mindbreeze performance and stability, the following directories should be specifically excluded from virus scanning runs:
- Mindbreeze index directories (depends partly on the configuration)
- Automatic path: /data/servicedata
- Configured paths, e.g.: /data/indices and /data/cache
- Mindbreeze log directories (path depends on the configuration)
- Mindbreeze configuration directory
- /etc/mindbreeze
- /data/resources
- Mindbreeze product directory:
- /opt/mindbreeze
- Fabasoft app.telemetry product directory:
- /opt/app.telemetry
- Fabasoft app.telemetry data directory:
- /var/opt/app.telemetry/
- Directory of the Fabasoft app.telemetry telemetry database:
- /data/postgres/
- Temp-directories used by the individual services:
- /tmp
- /var/opt/mindbreeze
- /data/servicetempdata
- Insight Apps:
- /data/apps
- Other directories that should be excluded:
- /var/lib/docker
- /sysroot/ostree/deploy/centos-atomic-host
- /usr/lib/modules
- /usr/lib/ostree-boot
- /usr/lib/firmware
- /sysroot/ostree/repo
However, any type of virus scan run can have a potential negative effect on the system performance and consequently the response time behaviour of Mindbreeze. If regular system scans are unavoidable, we recommend that they be performed in maintenance windows or outside the core time in which the search is offered.
Mindbreeze InSpire support process
Directions in case of problems with Mindbreeze InSpire
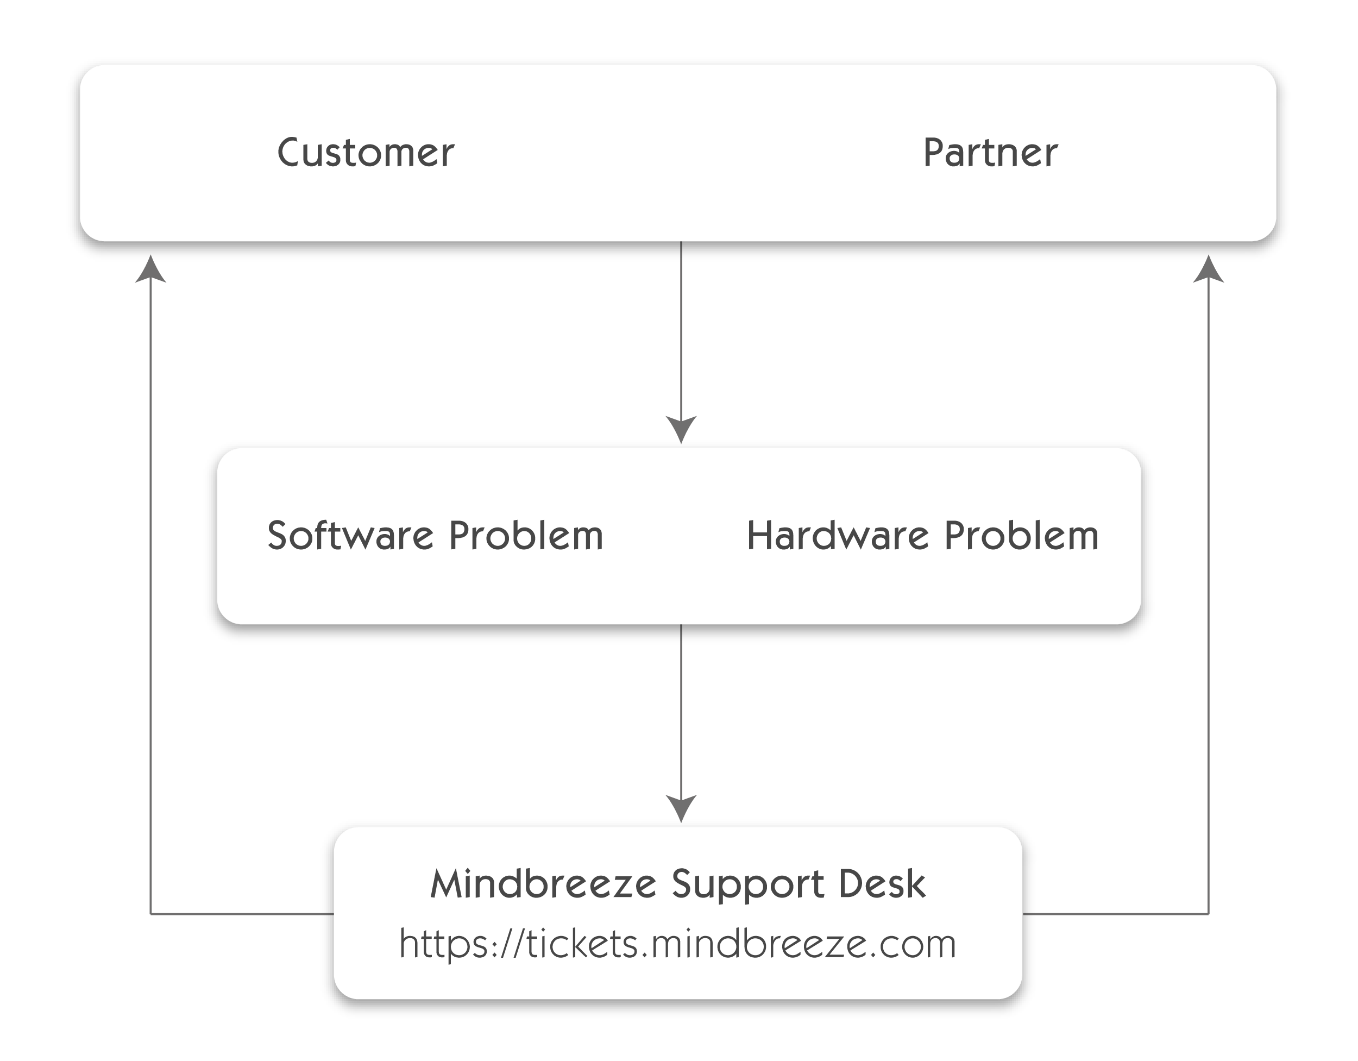
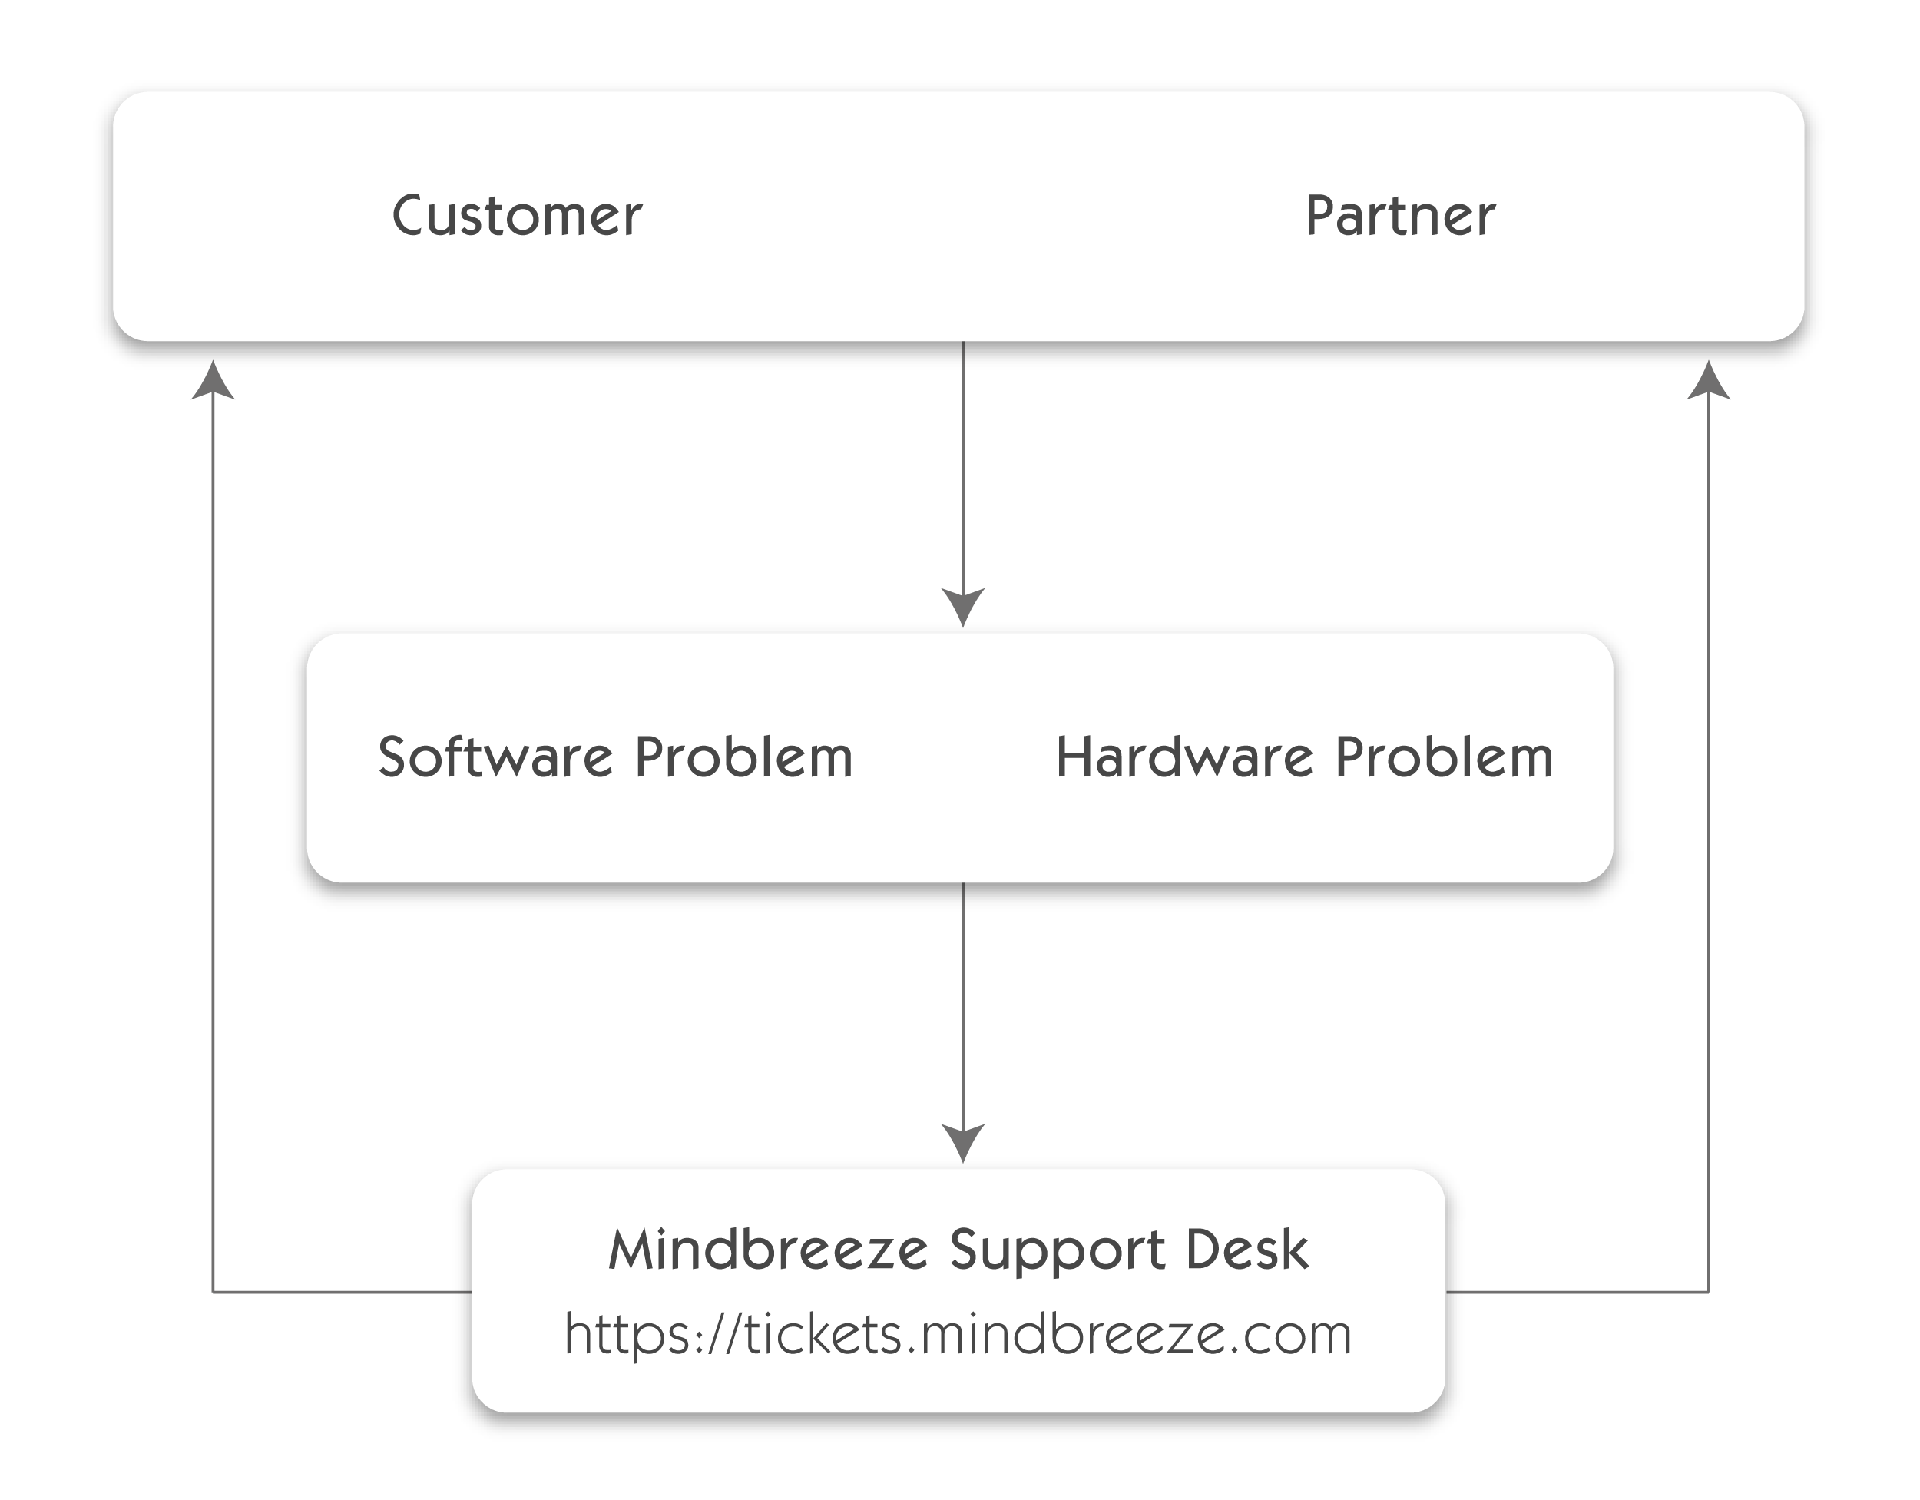
To ensure the best possible support, we ask all our customers and partners to follow our standard support process.
- For any standard product problems (software, hardware), each customer and partner creates a ticket from our support desk at https://tickets.mindbreeze.com.
- The members of our support team are the first point of contact for resolving any problems that arise and will ensure that the problem is remedied quickly.