
Sure, you can handle it. But should you?
Let our experts manage the tech maintenance while you focus on your business.
Let our experts manage the tech maintenance while you focus on your business.
Handbook
Backup & Restore
Introductory remarks
This document describes the most important aspects of backing up Mindbreeze InSpire configuration and index data.
The backup strategy should contain the following types of data and should be applied especially before installing product updates:
- Mindbreeze configuration data: Before major changes in the Mindbreeze configuration, a backup is also useful.
- Custom Insight Apps: If you have imported your own Insight Apps, a regular backup of them is recommended.
- Mindbreeze index data: Especially before product updates or in case of extremely large data sources after complete indexing a backup of the index is advisable.
- app.telemetry configuration data: Also the app.telemetry configuration should be included in the backup strategy (at least if modified/extended by customer).
- Registration data: The user database contains user credentials and role assignments for the permission system and should be in backup.
- Other adjustments: All further adjustments that do not correspond to the Mindbreeze standard product must also be backed up.
Creating backups
Mindbreeze InSpire regularly backs up:
- Mindbreeze configuration data
- Mindbreeze index data
- Databases (app.telemetry, persisted Resources)
All other data must be backed up manually.
If you want to create manual backups, you can read about this in the following documentation, depending on which Mindbreeze InSpire Generation you are using:
Restoring backups
Automatically created backups are stored in /data/backups. The following sections provide details on restoring backups.
Restore configuration data
Please note that shell access is required to restore configuration data.
Stop the mesmaster service and run the following script:
/opt/mindbreeze/bin/import_managerconfig.sh <configuration directory>
The <configuration directory> refers to the automatically created backups in the /data/backups/mesconfig-backups/inspire_mesconfig-<date time> directory.
Restoring service configurations and service data
Services have their own configuration files that must be restored separately.
The backup contains the backup of the service configuration under /data/backups/mesconfig-backups/inspire_serviceconfig-<timestamp>. This must be copied to the configured "Service Config Directory" (if not configured otherwise, this is /data/serviceconfig).
The current service configuration directory can be displayed in the Management Centre under the menu item "Nodes" in the info of the respective node (service configuration directory).
Some services, such as the RAG service, also store data in the "Service data directory". The current service data directory can be read from the Management Center in the "Nodes" menu item in the same way as the service configuration directory. Unless configured otherwise, this is /data/servicedata.
The backup of the service data is stored under /data/backups/messervice-backups/inspire_service_data-<timestamp>. Directories that only consist of a UUID can be copied to the service data directory. If a directory has a path appended to its name, then a separate service data directory was configured for the service. The service data must then be copied to this directory.
Note: If the service data directory was configured for a service and the value was defined by a configuration parameter, the backup of the service data will unfortunately not work.
Restoring Mindbreeze index data
Automatically created index backups are stored under /data/backups/index-backups. To restore the indexes, copy the underlying /data/backups/index-backups folders (but only the contents of the current folder) to their original directory (typically /data/indices or /data/servicedata), for example:
mkdir /data/indices/ms-file
cp -a /data/backups/index-backups/ms-file/current/* /data/indices/ms-file
Restoring databases
Automatically created database backups are stored under /data/backups/telemetrydb-pgdump/<date> and contain the following files:
- persistedresources.sql.gz: persisted Resources
- postgres.sql.gz: Schemas and users
- telemetrydb.sql.gz: app.telemetry
To restore the databases, first stop the services mesnode and apptelemetryserver. Execute the following commands:
cd /data/backups/telemetrydb-pgdump/<date> #replace <date> with the desired folder
gunzip <backup.gz> #replace <backup.gz> with persistedresources.sql.gz, postgres.sql.gz or telemetrydb.sql.gz
dropdb --if-exists <dbname> #replace <dbname> with persistedresources, postgres or telemetrydb
createdb <dbname> #replace <dbname>
psql -d <dbname> -f <backup.sql> #replace <dbname> and <backup.sql> with the extraced sql file
Migration using snapshots
Snapshots can be used to migrate from one Mindbreeze InSpire appliance to another. Snapshots can be managed in the Mindbreeze Management Center (MMC) (since Mindbreeze InSpire version 21.1, G7).
Since Mindbreeze InSpire version 20.1 the command line tool mesadmin supports the sub-command snapshot. This makes it possible to create and restore snapshots independently of Mindbreeze InSpire Generation (G6 / G7). This tool can therefore be used to migrate a Mindbreeze InSpire G6 appliance to a new Mindbreeze InSpire G7 appliance. Please note that migration from G7 to G6 is not supported.
About the snapshot
A snapshot created in Mindbreeze Management Center (MMC) or with the command line tool mesadmin snapshot contains
- Mindbreeze InSpire configuration (indexes, crawlers, services, encrypted passwords ...)
- Client service authorization configuration (Kerberos, SAML, ...)
- SSL certificates and CAS
- Plugins that were installed manually
- Resources (in /data/resources)
- Resources referenced by Plugins
- Custom apps
- Databases (Persisted Resources, Persisted Queries, app.telemetry)
Please note that snapshots are not a complete backup! For example, indexes, cache files of Caching Principal Resolution Services or also Mindbreeze InSpire licenses are not included in the snapshot. Service configuration data is included and stored in the service configuration directory..
Please also make sure that you keep your snapshots in a secure place, as sensitive information is also included!
Migrating Mindbreeze InSpire G7 Appliances
If you want to migrate from your Mindbreeze InSpire G7 appliance to another Mindbreeze InSpire G7 appliance, please read the following subsections. If the migration target appliance is a new Mindbreeze InSpire appliance, please also refer to the initial setup for G7 appliances.
The following subsections explain how to first create a snapshot of your Mindbreeze InSpire G7 appliance and import it to another appliance. Please also note that in certain cases, manual intervention is necessary – details on this will be described later.
The migration process is as follows:
- Initial startup of the new Mindbreeze InSpire G7 appliance (only if the target appliance is new).
- Creating a snapshot
- Importing a snapshot
- Manual adjustments (configuration adjustments, indexing …)
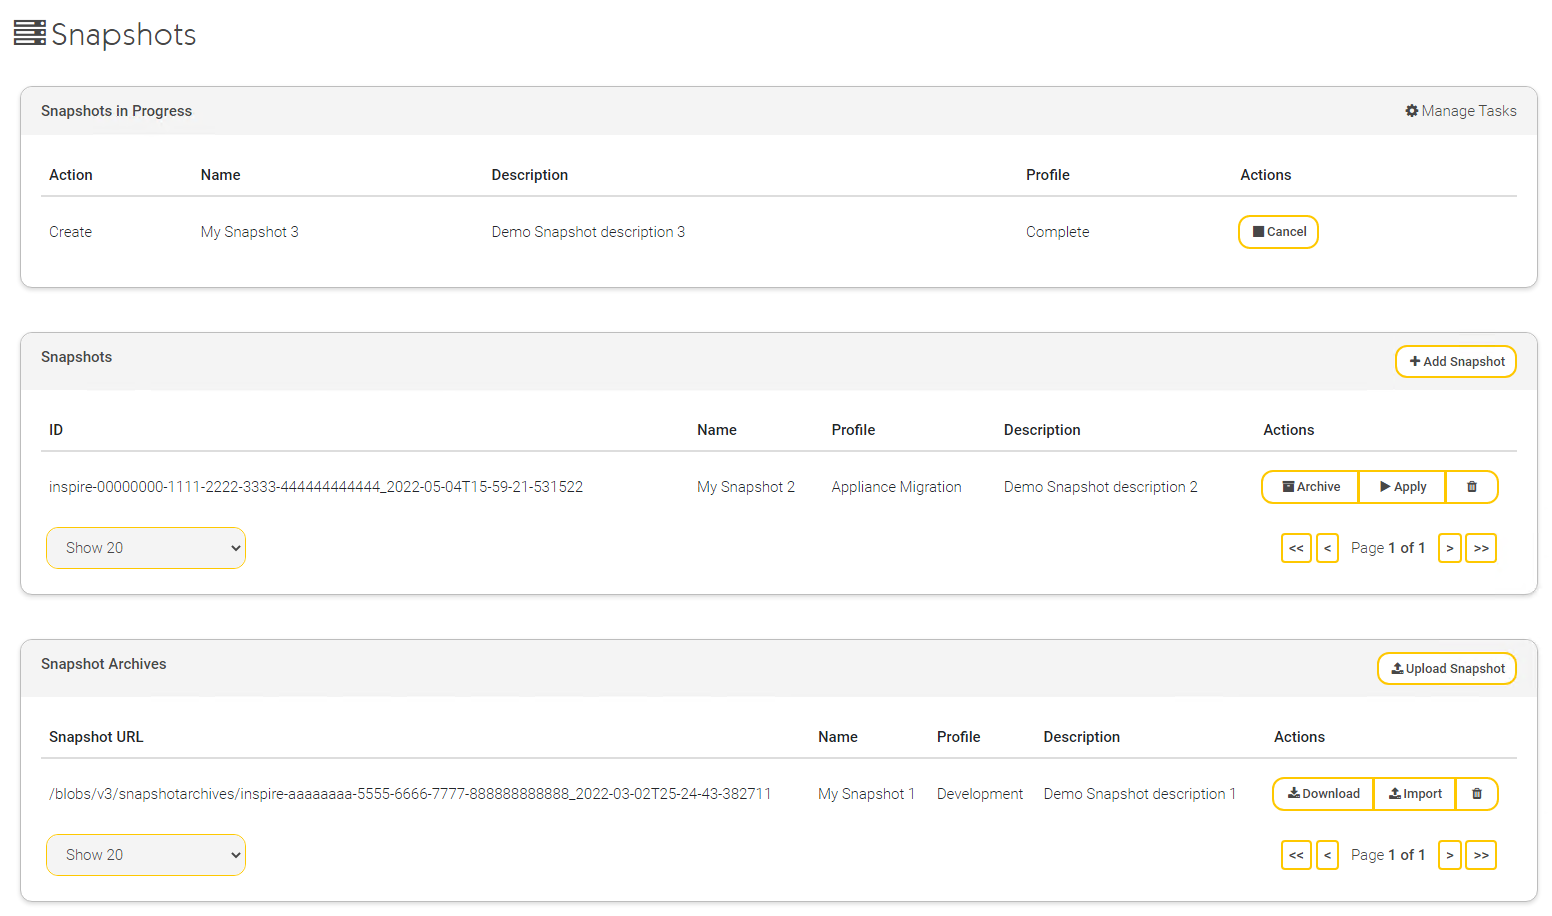
Managing Snapshots in Mindbreeze Management Center
Snapshots can be managed in the Mindbreeze Management Center in the "Snapshots" menu. A distinction is made between "Snapshot in Progress", "Snapshots" and "Snapshot Archives", with the following functions available:
- Snapshots in Progress: Creating and applying snapshot actions are performed through a back-end task. These snapshot tasks are listed in this table until they are completed.
- Snapshots: These are the actual snapshots that were created or imported. Imported snapshots can be applied to restore the state of the snapshot on the appliance.
- Snapshot Archives: These are required to export and download snapshots. You can also upload snapshot archives that were exported on another appliance.
Creating a snapshot
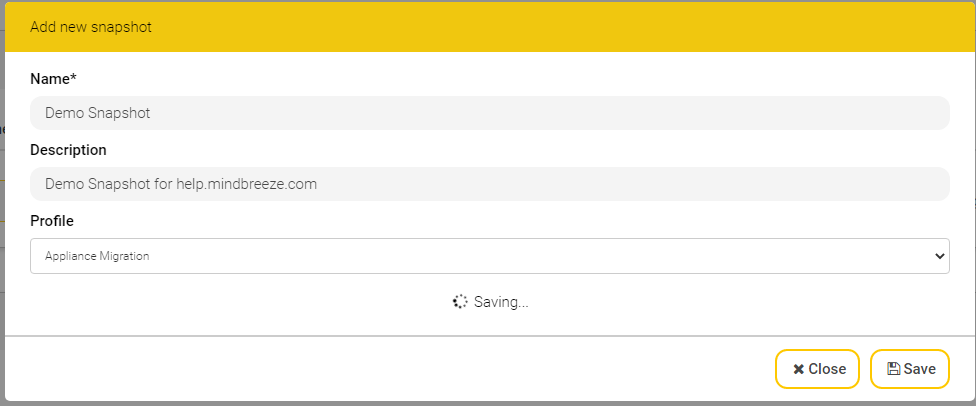
To create a snapshot, click “Add Snapshot” in the “Snapshots” list. Then enter a name and a description. Click the "Save" button to create the snapshot. Depending on the appliance, this can take up to several minutes. The snapshot is created by a task.
When creating a Snapshot, one of the following profiles can be selected. The profiles differ in that they include different properties in the Snapshot. Their included and non-included properties are also listed under the respective profiles.
- Appliance Migration
- Configuration
- Insight Apps in /data/apps
- Credentials
- Search Experience
- app.telemetry Configuration and Database (except tables containing statistics about Insert and Filter operations)
- Resources in /data/resources
- Resources referenced by Plugins
- Persisted Resources in Database
- All custom Plugins
- Development
- Configuration
- Only configured Insight Apps in /data/apps
- No Credentials
- Search Experience (only Relevance)
- No app.telemetry
- Only Resources referenced by Plugins
- No persisted Resources in Database
- All custom Plugins
- Search Experience
- Synonyms
- Replacements
- Vocabulary
- Relevance Query Boostings
- Relevance Settings
- Complete
- Configuration
- Insight Apps in /data/apps
- Credentials
- Search Experience
- app.telemetry Configuration and all Database tables
- Resourcen in /data/resources
- Resources referenced by Plugins
- Persisted Resources
- All custom Plugins
For backing up your Mindbreeze InSpire appliance you need either “Application Migration” or “Complete” profile.
Then archive the snapshot by clicking the “Archive” button.
Now the created archive appears under "Snapshot Archives". Click on “Download” and select the desired output format from the drop-down menu to download the snapshot so that you can import it into the target appliance later.
Available output formats
Once you have archived the snapshot, you can choose from two output formats in “Download”:
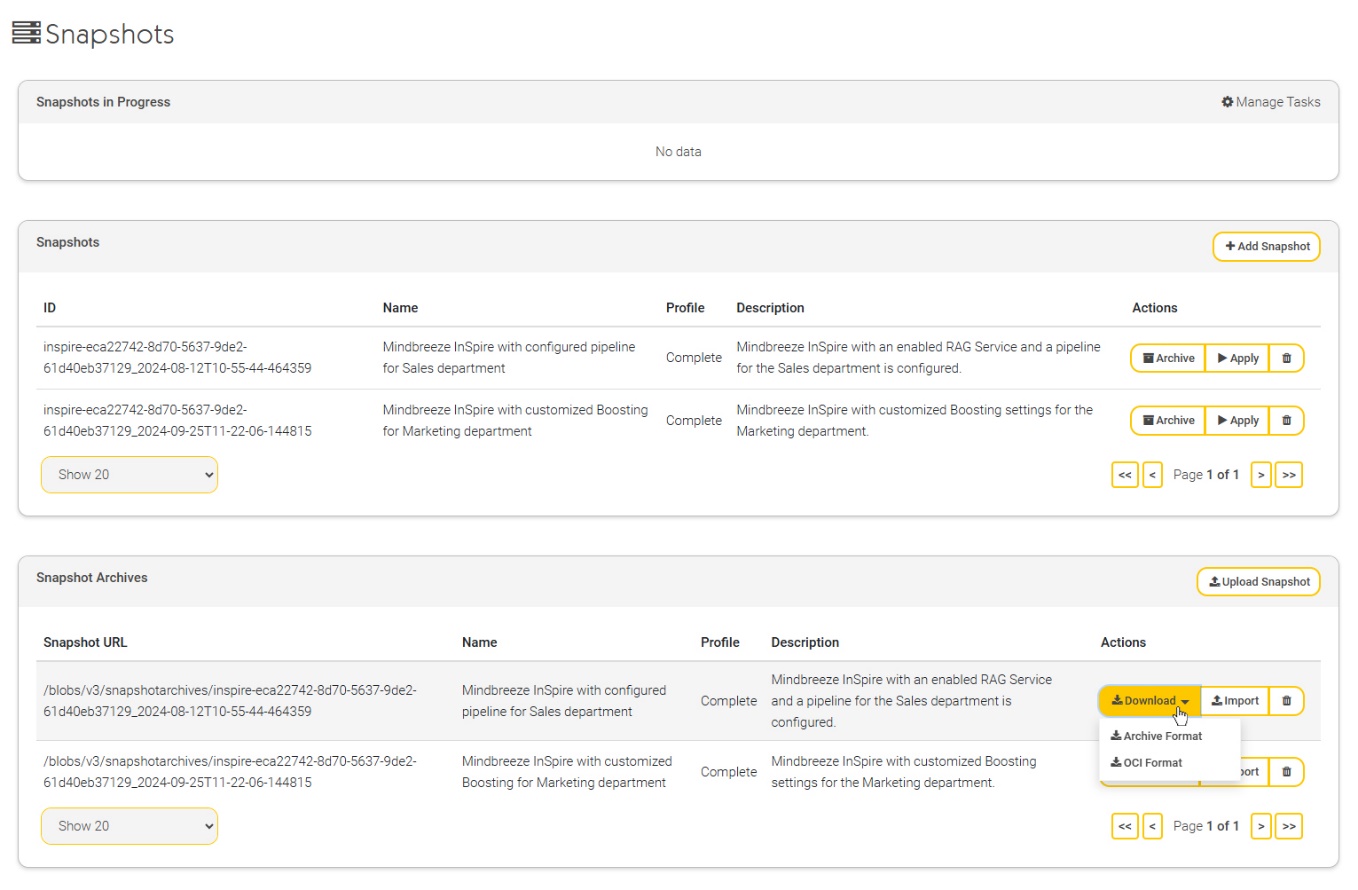
Output format | Description |
Archive Format | Previous standard format for snapshots. |
OCI Format | Recommended for use in special use cases in Kubernetes, such as pushing an image into a registry. |
Hint: Both the archive format and the OCI format can be used in principle. There is no difference between the output formats, except that the OCI format is useful for use cases in Kubernetes.
Importing a snapshot
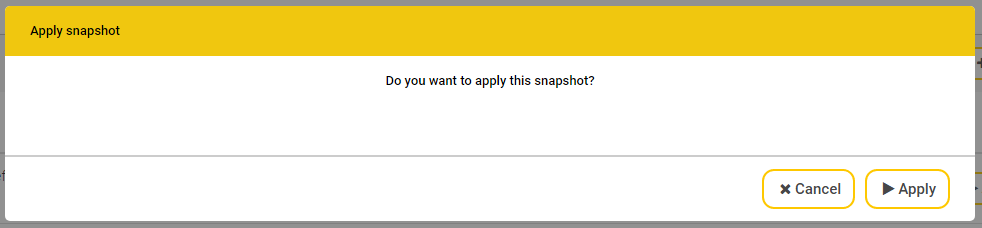
Now go to the appliance where you want to import the snapshot. In the “Snapshot Archives” list, click “Upload Snapshot” and select the snapshot archive you exported in the previous step.
Then import the uploaded snapshot by clicking "Import". You will now be asked if you really want to import the snapshot; confirm the dialog by clicking "Import".

The snapshot now appears in the "Snapshots" list. Apply the snapshot to your appliance by clicking "Apply". Again, depending on the appliance, this may take up to several minutes.
Further steps after migration
In order for your migrated Mindbreeze InSpire appliance to be fully operational now, you only need to perform a few more small steps:
- Check if additional manual intervention is necessary (see section Cases for necessary manual intervention).
- Wait until all services are restarted and re-indexing is complete.
- Test your migrated Mindbreeze InSpire appliance.
Cases for necessary manual intervention
In certain cases, manual intervention is necessary during migration. This can be due to various reasons:
Hostname of the source appliance is different from the hostname of the target appliance
If the host name of your source appliance is different from the target appliance, you have to make manual changes to the target appliance:
- SSL certificates must be exchanged in most cases (see Uploading certificates)
- Replace Mindbreeze Management Center certificate
- Replace the Client Service certificate
- Adjustments in authorization:
- Kerberos: If you are using Kerberos, you will need to re-execute the instructions according to Configuration - Kerberos Authentication.
- SAML: If you use SAML, you only need to perform the necessary configuration steps on your Identity Provider, see SAML-based Authentication. The configuration of SAML in Mindbreeze InSpire can be omitted, as it is already correctly included in the snapshot.
- CAS: If you use CAS, you only need to carry out the necessary configuration steps on your CAS server. The configuration of CAS in Mindbreeze InSpire can be omitted, as it is already correctly included in the snapshot.
- Further configuration changes:
- In the tab "Client Services" you have to update the host name in "External URL" (Advanced Settings).
- If you have made explicit configuration changes on your G6 appliance that affect the host name, you must replace the host name on your G7 appliance at all points. For example, this can affect the "External URL" or the "Query Service URL Base Path" of the configuration for indexes.
Reset app.telemetry agents in app.telemetry configuration
In Multi Node Scenarios the app.telemetry agent configuration must be adjusted. To reset the app.telemetry agent configuration to the current agents in the Node Environment, the following steps must be done:
Delete the agent configuration module com.mindbreeze.enterprisesearch.apptelemetry.scripting.node_agents from the app.telemetry configuration:

Create new node agents by rebooting the InSpire Master.
Files not included in the snapshot
Some files may be located in a directory that is not included in the snapshot. You have the following options:
- Move the files on the source appliance to a directory that will be included in the snapshot (preferably /data/resources) and adjust the configuration before the snapshot is created or
- Manually copy the files of the source appliance to the target appliance after migration.
ATTENTION: It is absolutely necessary that these files are located on G7 in the directory or subdirectories of /var/data/default/data (in the inspire docker container /data), otherwise they will not be available after a Mindbreeze InSpire product update.
Here are some examples:
- Google Drive Connector: Configuration option “Client Secret JSON File Path” and “Credential Persistence Directory Path”
- Data Integration Connector: Configuration option “Directory of Job”
- Microsoft SharePoint Connector: Configuration option (advanced settings) “Content Type Mapping Description File”
- It can be possible that custom Insight Apps are not stored in /data/apps, but are located with the legacy variant in the directory /opt/mindbreeze/bin/webapps. In this case, you will need to move your Insight App(s) to /data/apps and make configuration changes in Mindbreeze Management Center under Client Service (see Running Insight Apps through the client service and changing the default Insight App).
Mindbreeze Management Center Menu
The menu in the Mindbreeze Management Center can already be customized with Mindbreeze InSpire G6. Please note that with G7 the "title" in "resource.json" may not contain any special characters. It is also possible that you have customized the host name of the Insight App. Please note that you may need to change this if the host name of your target appliance has changed.
Since Spring Release 2018 HF3 (G7 only) Mindbreeze InSpire supports a role-based permission system to restrict access to certain menu items. If you choose this variant, additional features are available, such as the definition of submenu items. To switch to the role-based variant, the inspire Docker container must not contain the file data/resources/resource.json. Rename the file first before you delete it permanently and read the documentation for the Role-based Management Center menu.
Migration of a primary system with standby appliance (concerns only the migration from G6 to G7)
If you have a primary system and a standby appliance in use, you only need to migrate the primary system (create the snapshot on G6 and install it on G7).
In Mindbreeze InSpire G7 (since version 19.0) the configuration and operation of a primary system and a standby appliance has been simplified (see Setup InSpire G7 primary and standby appliances and update notes between image versions (18.x to 19.0)). Since this has fundamentally changed the configuration, you will need to make a few configuration changes.
- Cluster configuration
- Service configuration:
On G7, the consumer nodes (in this case the standby appliance) themselves know which services need to be started. Therefore, you must remove all settings where the standby appliance has been explicitly selected from the configuration. This normally affects the following settings:- Indices:
Check all indices and remove the two check marks from the Standby Appliance Node ID, as shown in the screenshot below
- Client Service(s):
In the Client Service configuration, you would normally have selected the standby appliance as the "Additional Client Service Node". Remove the check mark from the Standby Appliance Node ID, as shown in the screenshot below
Then make sure that all indices that are to be searchable with the Client Service are selected under "Query Engines".
- Indices:
- Synchronization of the configuration, data and indices:
To synchronize the configuration, data and indices, cron jobs are no longer needed, instead there is the "Tasks" menu on G7, where synchronization tasks can be defined.
Using Consumer Index as Producer
Using distributed operation you have the possibility, for special cases e.g. if the Producer Index is no longer available, to use the Consumer Index as Producer.
The following requirements must be met for this:
- In the MMC, in the "Indices" tab, the option "Update Documents in-place" of the desired index must be deactivated.
- The index must never have been started with the "Update Documents in-place" option. However, if this is the case, you can deactivate the option "Update Documents in-place" and perform a complete synchronization of the Producer Index. To do this, navigate in the MMC under Setup -> Tasks in the area "Synchronize indices". Now create a new task by clicking on "Add Task" and click the "Edit" button in the newly created task, click on "Show request" in the newly opened window and select the option "Sync Forced Full" in the dropdown menu field "Operation" and then click on "Run now".
If the prerequisites are met, now follow these steps:
- In the menu item Setup -> Nodes, select the desired Consumer Node and select "None" in the "Source" drop-down menu. The consumer node has now been converted to a producer node.
- In the menu item Configuration -> Indices, you must now assign the newly created/converted Producer Node to the desired Index Node in the "Index Node" option.
- If necessary, the edited index node must be checked in the "Query Engines" area in the Client Service in the desired client.
- Finally, the nodes must be synchronized accordingly in the menu item Setup -> Tasks. To do this, click on the "Edit" button in the "Synchronize config and data" area and synchronize the node by clicking on "Run now".
Note: If you want to use several different consumer indices as producer, you have to perform these steps for all indices.